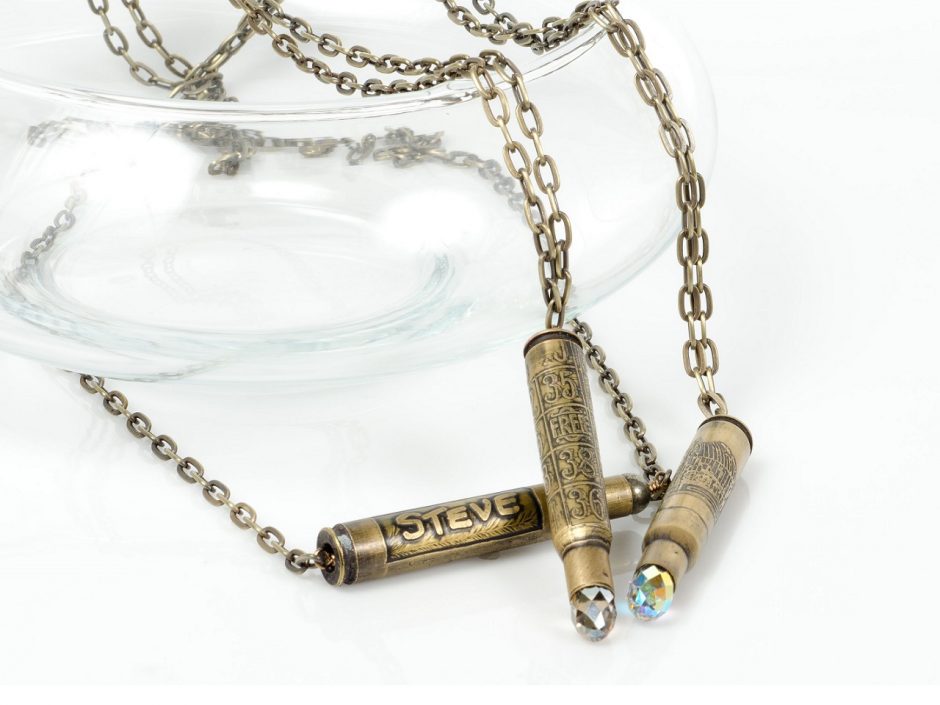
Archive for the ‘multipurposing’ Category

How to use charm bracelets to make necklaces!

Monday, February 20th, 2012

Hola, bloglandia! Today I wanted to share a quick and easy way to make necklaces using charm bracelets. Rings & Things has a great selection of ready-made chain bracelets with toggle clasps. The typical use is to leave the bracelet in one piece and add charms with jump rings for a charm bracelet. However, these bracelets are a bit longer than advertised.

long-long-bracelets

With clasps, the 7.5" bracelet measures 8.5", and the 8.5" measures 9.5" long!

It is always better to have too much chain vs. not enough, so think of those extra links as a bonus you can use to make coordinating earrings.  Or, do as I did and use two bracelets to make a necklace! Instead of removing extra links, you can also take advantage of the longer length by removing the bar from one and the loop from another to create a necklace!

convert-bracelets-into-necklace

My pendant had two holes, so I just attached on bracelet to each hole and viola! A 19" long necklace.

Here’s another example:

resin-necklace-pretty-lady

For this one, I attached the two bracelets with a single jump ring to my resin pendant.

These extra long bracelets also make great anklets.  And yes, they still make great bracelets! Here are two examples:

proud-mary-bracelet

I hung a handmade resin charm with a chain tassel, a steamboat charm and sparkly Swarovski crystals for my "Proud Mary" bracelet. I like to think Tina'd be proud to wear it!

altered-chain-bracelet

I simply removed a section of chain and replaced it with my handmade copper clay connector.

You might have noticed that all the focals for these pieces are handmade. Browse our resin and bezels, metal-working tools and metal clay selection to get busy making your own!

Twelve Days of Christmas Jewelry Designs: 10 – Velvet Bookmarks

Monday, December 5th, 2011

Yes, it is just my opinion, but I’ll say it as though it is a fact:  books always make great gifts. I love giving books. I love receiving books. And it is easy to make pretty ribbon bookmarks to personalize your gifts even more!

velvet-ribbonsStart with a length of  beautiful velvet ribbon.

bead-marked-booksUse choker clamps to attach beads and baubles to the ends.

velvet-ribbon-bookmarksAmy’s bookmarks are in our design gallery, where you’ll also find a list of the exact supplies she used to make them.

Sure, Kindles and other e-readers are gaining popularity, but nothing really compares to curling up with an actual paper book and a big mug of your favorite beverage. Make the moment even more indulgent with a luxurious bookmark! Need a jewelry-making book to gift (to a friend or maybe yourself)? Here are three recommendations:

Jewelry Lab by Melissa Manley

Wire Style 2 by Denise Peck (includes DVD)

The Encyclopedia of Contemporary Jewelry Making Techniques by Vanetta Seecharran.

Happy reading! ~ Cindy


Upcycle cans and tins into jewelry!

Friday, October 7th, 2011

Metal shears, a metal tin and the completed metal pin!

We all know recycling is a good thing, but upcycling is even better! Aluminum and tin cans can easily be turned into jewelry, but there are a couple of things to keep in mind:

  1. Metal edges can be wicked sharp. Make clean cuts and file off any jagged points. Quality jewelry metal shears make this much easier! Most tin snips and other shears from hardware stores are difficult to grip.
  2. Aluminum cans and most tins are too thin to be durable enough for jewelry by themselves. We suggest layering the metal you cut from recycled items. Three ways of doing this are riveting, gluing and/or coating the metal pieces.

Here are a few examples of how to turn packaging into lovely adornments:

pollys-tin-pins

Polly's tin pins and pendants

Polly sandwiched her recycled metal elements between brass fairy doors, disks and gears. She riveted the pieces together using Crafted Findings’ riveting tool. Learn more about the riveting tool system here.

soda pop can necklace

The holes are lined with large eyelets from a scrapbooking supplier.

For this Soda Pop necklace, we cut disks out of cans and then glued them to brass disks to make them thicker. A circle template makes this task  easier. Get more info in our design gallery.

soda can bobby pins

Layers of flowers punched from soda cans form these fun bobby pins.

Instructions for how Toni coated these pins with liquid polymer clay to make them safe to wear are in our design gallery.

Start looking at soda cans and other product packaging in a different way! I for one always check the bottle cap design when deciding on a beverage.

How I wish every city had an Upcycle Exchange Market. It is a brilliant idea for reusing and redistributing crafty supplies and recyclables! Until then, ask your friends and family to help collect interesting materials for you. You might just upcycle something wonderful!

Two ways to color metal using Image Transfer Solution

Friday, April 22nd, 2011


Alice in Wonderland image transfer bracelet

Hi Bloglandia! Last weekend I did a demo in our Spokane showroom on how to use Sherri Haab’s Image Transfer Solution (ITS) and thought now would be a good time to share these techniques for colorizing metal with everyone.

Image transfer is just that – transferring an image from the paper it is printed on to a different surface (in this case, metal jewelry components). Image transfers have a vintage, ethereal feel, and I love how the different colors of metals shine through. Unlike many of the other solvents and processes used for image transfer, Image Transfer Solution (ITS) is non-toxic. Yay! Plus, it has another purpose not even mentioned on the bottle: it is an excellent way to seal colors onto metal (more on that in a bit).

Transferring Images – ITS Method #1

One caveat: The images you use must be printed on a laser (toner based) printer. Ink jet pictures will not work. The pictures can be black or white or color. Photos and text should be reversed before you print, since transfers will be mirror images.

To be honest, I did not like ITS the first couple of times I tried it. I kinda hated it. Following the directions on the bottle, I prepped my metal with steel wool and heat-set the images in a 325 degree oven – just like it said! – but things just kept going wrong. Either my images would wash right off the metal or the paper would be so very stuck to the metal that no amount of scrubbing would remove it. But I loved the concept, so I kept playing with it.  Below is my own method for using ITS. Maybe the package directions will work like a charm for you. If not, I hope my tips and tricks help:

  1. Scuff up your metal (aluminum, brass, copper and silver all work great) with a medium grit sanding pad or sand paper. Steel wool leaves the surface too smooth, in my opinion.
  2. Wash metal with rubbing alcohol to remove dirt, dust and oil – even if it looks clean!
  3. Using a clean, dry paintbrush, evenly coat the prepped metal with just a couple of drops of ITS.

  1. Press image face-down onto metal and press firmly into place to remove any air bubbles. ITS is like glue – you will not be able to reposition your paper at all, so be careful to place it where you want it! Let dry. Use an iron (high heat, no steam) to heat the metal for 1 or 2 minutes. Don’t worry, the paper won’t burn. Let metal cool.
  2. Place the metal into water and using a gentle circular motion, begin rubbing the paper off, leaving the image behind. Don’t get to aggressive or you could lift off parts of the image. Patience pays off here.
  3. After most of the paper is removed, use a sheet of polishing paper and more water to remove the finer paper fibers.
  4. After all of the paper is removed, seal the image with a dab of Renaissance Wax and a soft cloth. It really improves the luster.
image transfer necklace

My photograph looks like a vintage postcard after being transferred onto aluminum. The Swarovki crystals are the same colors as the prayer flags hanging on the mountain tea house.

Complete your jewelry piece! The image is permanently attached. You can even punch holes or dap the metal and it won’t come off!

Sealing Colors – ITS Method #2

Image Transfer Solution can also be used to permanently seal inks onto metal! Ranger Adirondack Alcohol Inks are tons of fun to mix and blend onto non-porous surfaces, like metal, but since they are ink, they can be rubbed or washed off. That is, unless you seal them with ITS. When you heat-set ITS, it binds the color to the metal. It will not wash off or bleed onto your customer’s skin.

Vintaj fussy peacock pendant colorized with alcohol inks for a faux enamel look.

You can color your metal with alcohol inks and then, after they’ve dried, paint a thin layer of ITS over the top. Another option is to mix the ITS directly with your inks (just a few drops of each) and paint that mix onto your metal. Either way, once the ITS has dried, you need to heat-set it to make the bond permanent. Just follow the directions on the Image Transfer Solution package for using an oven to heat-set (the iron won’t work for this application).

Looks like patina - but this blue bee was colored with alcohol inks.

There you have it! Two tried and true methods for permanently coloring your metal pieces for jewelry and other applications. Although this post focused on metal, Image Transfer Solution can be used on polymer clay, etched glass and other surfaces too! Since it really only takes a couple of drops per image, you’ll have plenty to experiment with! ~ Cindy


PS: here are some handy links to some other how-to‘s in the Rings & Things blog!