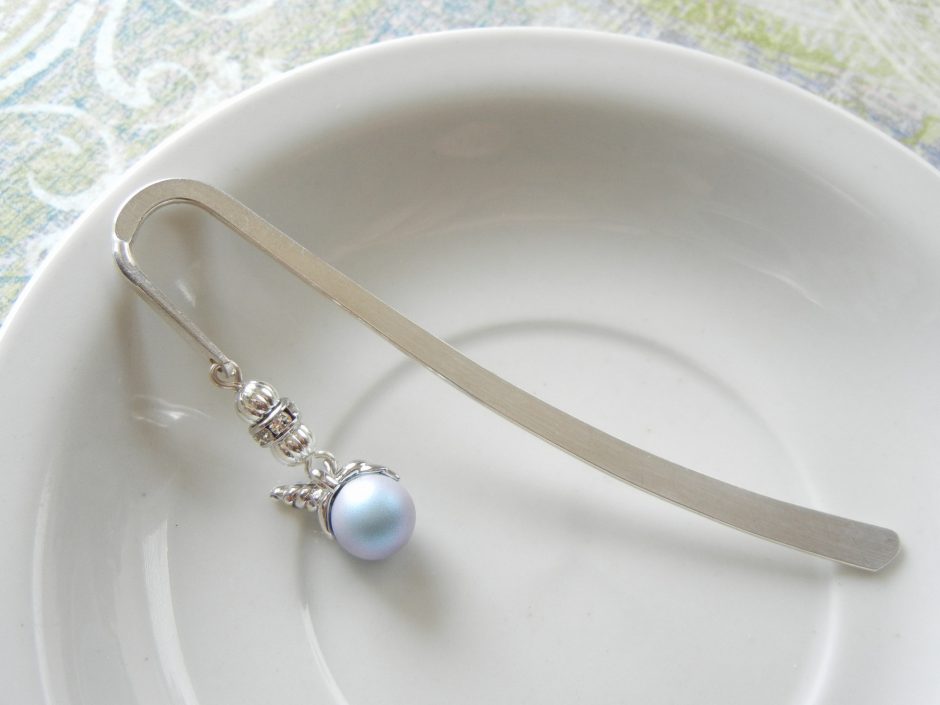
Archive for the ‘Fun’ Category

Sweet heart jewelry designs – for Valentine’s Day and more!

Thursday, January 19th, 2012

Valentine’s Day is just a few weeks away. How did that happen?!? But there is still plenty of time to make your own jewelry to wear, to gift, even to sell (how many men wait until the day before to purchase gifts, hmm?).

brass-heart-vintaj-earrings

Brass heart cutouts textured with the new Vintaj BIGkick machine.

Mollie made the above earrings with our brass fairy doors and the Vintaj BIGkick (tutorial coming soon!). Hearts are popular year round. Especially SWAROVSKI ELEMENTS crystal hearts- they are so sparkly!

blue-valentine

Mollie's "Blue Valentine" necklace is a classic.

zombie-love-valentine-cindy

My zombie bracelet is not!

I used ITS (image transfer solution) to copy the zombies to the copper disks, and alcohol inks to colorize the stamped tags.

But hearts are just the beginning. Since Valentine’s Day is all about love, I think jewelry that features items you or the intended wearer love is totally appropriate. How about sweets for your sweet?

sweet-treats-bracelet

Toni's sugar rush of a bracelet.

Tiny ceramic cupcake and donut beads create an adorable confection. And don’t forget about toys. Who doesn’t love to play?

barrel-o-monkeys-necklace

Mollie's monkey is barrels of fun!

Jump rings and chain can turn most anything into a necklace! Does anyone else think the monkey bears a striking resemblance to Dr. Quinn’s (Jane Seymour’s) open hearts? Maybe if you flip it sideways and upside down?

Whatever your style, have fun with your Valentine’s creations! ~ Cindy

DIY Shamballa style macrame bracelet tutorial

Sunday, January 8th, 2012

square-knot-tutorialSquare knot macrame bracelets have been given new life due to the influence of high end designers. I’ve got the “Circle of Life” from The Lion King playing in my head as I write this. How else to explain how a simple macrame bracelet design, which has spent years as a summer camp staple and a tourist shop standard, has been reborn as the chic “Shamballa” brand must-have look?

I think it is a great example of how basic techniques can be adapted to suit nearly any style or budget. Have hemp cord and plastic pony beads? You can make this bracelet. Have premium knotting cord and diamond-studded platinum beads? You too can make this bracelet! The trickiest part is making the sliding clasp, but like any type of magic, once you know the trick, it is no problem.

Rings & Things actually made a square knot (aka half knot)  macrame bracelet instruction sheet years ago. The sliding clasp instructions were also published as part of our “Meteor” macrame bracelet, which has a totally different look. It is past time to update the tutorial with some photographs!

Supplies needed for square-knot macrame bracelet with sliding clasp:

Cord – hemp, Chinese knotting cord, linen, cotton – whatever you like. You’ll need about 12 feet total.

Beads – again, whatever you like – but the holes must be large enough for two strands of your selected cord to fit through. Depending on your knot to bead ratio, you might need one bead or 20.

Scissors, needle, a clipboard (or a work surface and a binder clip), and flat or chain-nose pliers.

Cut two 2′ pieces of cord and one about 6′ long.  Leaving approx. 8″ tails, clip the two anchor cords to your work surface. Center the long cord under the two anchors. (For the sake of photos only, the anchors are blue and the knotting cord is black.) You can start with either side, but I start from the right:

2-right-loop

3-left-through-loop

Pull to tighten the cords and you’ve completed 1/2 of a square knot. The second 1/2 is the same, just from the left:

4-left loop

5-right-through-left

Pull tight and you have a complete square knot.

6-keep-knotting

It is totally up to you how many knots to tie between beads, but odd numbers (1, 3, 5, etc.) look best. Tie a few knots, slide a bead onto the anchor cords, tie a few more knots…it is really quite fun! Continue until you have the length you want. Keep in mind that the clasp will add about 1/2″ to the overall length.

Since you started knotting with a single long piece of cord, the starting end is “finished” while the tail end has….tails. To remedy this, sew the tails (one by one) up through the last section of knots. I needed to use pliers to pull the needle through.

7-sewing-up-end

Snip off the ends and it is like they were never there!

8-magic-clean

Now that you know how to make square knots and finish the ends, let’s make the “magic” part – the sliding clasp. Make your bracelet into a circle and overlap the anchor cords. Use bits of cord to bundle them together for the moment.

9-ready-to-tie-clasp

Now clip the top to your work surface. Cut a 12″ piece of cord and center it under your four anchor cords. Start tying square knots, just like you did for the bracelet itself. Continue for about 1/2″, then sew the ends back in. This section of knots should be able to slide back and forth on the anchor cords. Now, for the tails: they serve an important purpose.  Make slip  knots an inch or two away from the clasp on each pair of anchor ends. Tie beads on too if you like. These knots/beads  act as stoppers, ensuring the ends don’t slide out of the clasp. Make sure you leave enough length to make the bracelet big enough to get over your hand.  And ta-da! Adjustable bracelet bliss.

10-sliding-clasp

Happy knotting! Please let me know if you have questions, and have fun making your own bracelets! ~ Cindy

Torch fired enamel jewelry ideas

Wednesday, January 4th, 2012

Torch fired enameled metal is really (really!) quite beautiful! We recently added a selection of artisan copper components from C-Koop Beads. The colors are deep and lustrous due to the layers of glass fused to the surface of the metal, and since they are handmade, each one is slightly different. Here are a few of the mixed-media jewelry pieces our designers have recently created with enameled copper:

enameled-leaves-handpainted-wood

Nory painted wood pendants and beads with a rose motif, and had Tiffany construct his design using silk ribbon and brightly dyed wood beads. The enameled copper leaves, rings, bead caps and toggle clasp are all by C-Koop.

cindy-morris-gogoshebogo-design

I used copper clay powder to create the bird pendant, which coordinated well with C-Koop enameled pink rings and Swarovski antique pink crystals. I love how you can see bits of copper underneath the enamel.

bottle-cap-necklace-enameled-heart

The elongated heart shape is practically Sondra's signature, so of course it was the finishing touch on her bottle cap necklace.

enameled-etched-copper-bracelet

Rita etched a copper washer to create the center link on this bracelet, and used a clasp and beads from C-Koop to add more color.

~Cindy

Twelve Days of Christmas Jewelry Designs: 12 – Fairy Doors

Monday, December 12th, 2011

A super easy way to create some holiday magic is with our exclusive brass fairy doors. These precut metal shapes with cutouts can be stamped, hammered, riveted, painted, patinaed, layered…so, so many options! Mollie used one to make her sister a sweet keepsake necklace (Day 6). Sondra added a stamped tag to one of her designs on Day 11. Earlier this year, Polly made several sweet pins and pendants by sandwiching pieces of recycled tins between the riveted layers. Basically, the designers here are in love with them – and it isn’t just us! Sondra’s Victorian Christmas fairy door design just won Vintaj’s blog contest!

sondra's winning design

Also, jewelry designer extraordinaire Molly Alexander shared with us the design below that she created with our heart fairy doors for Art Bead Scene’s November Challenge. It is just too lovely not to share. Merry Christmas! ~ Cindy

Molly Alexander design