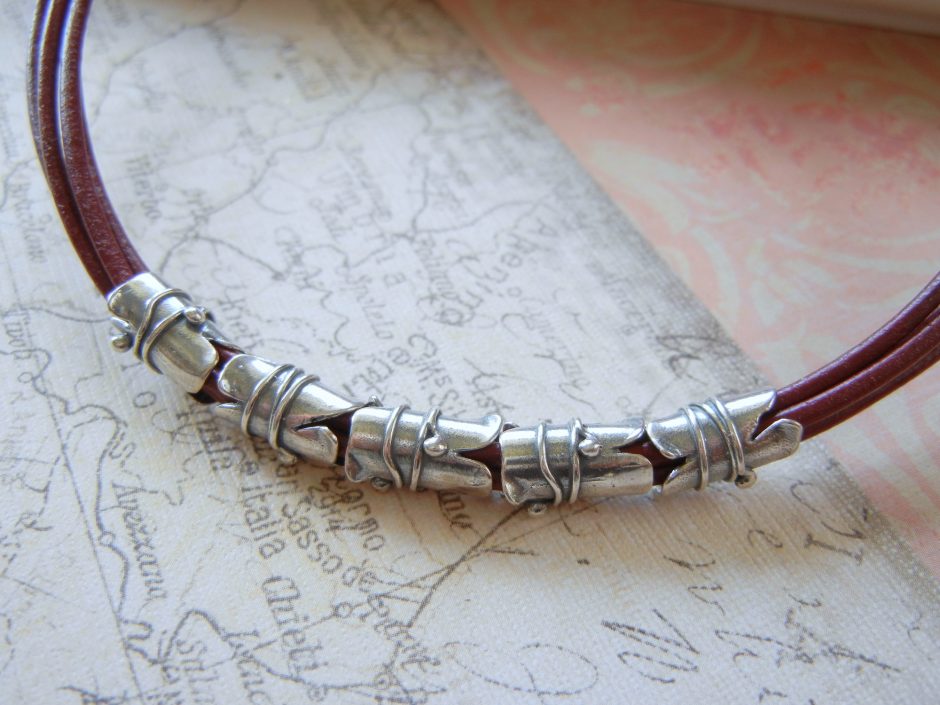
Archive for the ‘Uncategorized’ Category

Three Great Ways to Incorporate Swirls into your Jewelry

Wednesday, October 12th, 2011


Swirly Curly Jewelry!

For as long as I can remember I have loved making swirly curly-Q designs. In middle school, my favorite pee-chee folders were covered in them. Well I’ve grown out of my doodling habits, mostly, but I still love those swirls! Unwilling to give up on swirls altogether I have found three great ways to incorporate them into your jewelry with the help of a little wire. Adding a simple curly-Q can take any design idea from ordinary to whimsical! You can make your swirls free form using pliers or try this great Spiral Maker to eliminate marks from pliers!

All of these projects can be made using your basic tools and 18, 20 or 22 gauge wire. The tools here are a from a fabulous mini tool set that I keep at my desk. The set is only $12 and includes these three tools plus tweezers and a mini bead board!

1. Swirly Head Pins

The first and easiest way to add some swirl power to your jewelry is to make curly-ended headpins. Making your own headpins out of wire is easy and gives your jewelry an even more hand-crafted look. I recommend using either 18, 20 or 22 gauge wire.  (18 being the thickest, 22 being the thinnest) Keep in mind the size of beads you plan to use. If your beads have smaller holes, you will need thinner wire.

Use your Round Nose Pliers to Start the Loop

Use your chain nose pliers to create the swirl

Make a right angle with your chain nose pliers so that your head pins have nice perpendicular look at the end.

Completed head pins ready for use!

Finished jewelry made using swirly head pins. Both earrings have been antiqued to emphasize the swirl design.

2.  Swirly Post Earrings

Making your own swirly post earring findings is actually quite simple.  I personally like to use 18 gauge for sturdiness, though standard earring wires are not usually that thick.  Most earring findings are no thicker than a 20 gauge. It’s up to you, though know if you do use 18 gauge, you will probably have to use a rubber earring back as most metal nuts won’t fit that thick of wire.

Use a piece of wire about 2 inches long. Make a 90 degree bend in the wire at about 3/4 inch

Make a loop where you bent the wire.

Using your chain nose pliers, build the swirl like you did with the head pins.

You can see the earring being formed. The post that goes into your ear is coming from the center of the loop.

Make a loop to complete your Swirly Earring Post. Also, make sure the ends of the post are smooth. You can do this with either a metal file or a cup bur.


To finish, I used Liver of Sulfer to give the earring wires a patina, then buffed them with steel wool. To prevent your ears from turning green seal the post with a little Renaissance Wax or clear nail polish.


Two completed earring designs using Swirly Earring Post!

3. Egyptian Coils!

Now that you have mastered head pins and earring post, you can move onto the ultimate swirly design, the coveted Egyptian Coil! This design feature multiple swirls and looks so pretty at the top of dangly earrings or as an entire bracelet.

Start by making two-sided swirls. Make sure that they are all the same size.

Bend the wire in the center using your round nose pliers.

Use your chain nose pliers to flatten links like so. Don't be alarmed, it is supposed to look kind of phallic at this point.

Use your round nose pliers to bend the loop back. You now have links!

Connect links to make a chain

View of links from the back

Finished Earrings using Egyptian Coils

Well I hope you enjoyed my swirly blog post and are now inspired to try out some of these ideas. For all of these earrings I used bare copper wire and then oxidized the wire to antique it. I then buffed the designs with steel wool to expose the bright copper. I highly recommend doing this with your swirl designs because is really makes those curly-Q’s stand out.

~~Tiffany in the Showroom

Feel free to ask me any questions about how I did anything or what materials I used for all the designs.


How to make “Cluster Earrings”

Monday, September 12th, 2011

Around here I am kind of known as the “cluster earring girl”.  I guess you could say it’s my signature. I just love to make earrings that resemble little bundle of grapes!  Anytime I see a new bead, be it a keishi freshwater pearl or a hematite cube, I imagine, how would those look in cluster dangling from my ear?

Cluster Earrings with Cubic Zirconia Briolettes and Rainbow Sparkly Glass

I am going to show you how to make a basic cluster, using some sparkly glass beads.  Once you get the basic “formula” down, the possibilities are really endless, and the results are always beautiful!  You can embellish this style by adding charms, graduating the size of the beads, or mixing different materials.  Clusters can be at the top of the earring, nested above a delicately wire-wrapped briolette, or they can be hanging from a focal bead or metal connector.

There are only a couple of steps to follow when it comes to making this type of earring.

Step 1. Choose a bead that has a size anywhere from about 3mm to 8mm.  You can use a round, cube, chip, or rondelle shape;  both smooth or faceted beads will work.  Depending on how long you want the earrings you will need anywhere from 5 to 21 beads per earring.


Hemetite Cubes, Freshwater Pearls, Sparkly Glass Rounds and Rondelles


Step 2. Choose head pins. My favorite are ball-end, but any head pins will work. If you are doing a simple loop, 1″ headpins are long enough. If you would like to try a wrapped loop you will want 1.5″ or longer.

Ball end head pins are my favorite!

Step 3.   Assemble your cluster pieces. Do this by putting one bead onto every headpin and securing with a loop. You can do a simple loop or for a fancier look try a wrapped loop.  Use side-cutters to clip any excess wire and chain nose pliers to tuck the extra wire. Assemble all the beads on head pins, before you assemble the earrings.

Place beads on head pins first.


You will need side cutters to clip the excess wire

On the left are wrapped loops, on the right are simple loops. Either will work for this style of earring.


Step 4.  Once you have all of your pieces made, you can begin assembling the clusters. To do this you will need jump rings. Smaller jump rings will create a tighter cluster, larger jump rings will make a looser, more airy cluster.  I follow a very basic pattern for the assembly. On the first jump ring, place only one looped head pin.  Add a jump ring and two more head pins, one on each side. Continue, forming a chain until you reach your desired length.

Attach one beaded head pin to a jump ring


Attach a second jump to the first jump ring and place two more beaded head pins

Keep building your cluster!


I used eleven beads on each earring.

Step 5. Attach ear wires! I sometimes I add one more looped head pin to the ear wire itself, though this step is not necessary. It’s that simple!  (p.s. the earring wires I used are niobium! They are great for sensitive ears and will match your antique copper and antique brass earring designs!)

Attach earring wires and you are done! These completed earrings are the exact same, except one has small jump rings and one has larger jump rings.

 Examples of Cluster Style Earrings


 Well, I hope you enjoyed my tutorial :) For more designs with “Cluster Stlye” check out the design gallery at our online store, Rings-things.com.  If you have any questions about the beads I used for any of these earrings please leave a comment and I’ll get back to you as soon as possible! Happy Beading!

Tiffany @ The Rings and Things Showroom

Other great how-to blogs:

How to Wire-Wrap a Briolette

How to Make Wrapped Leather Bracelets

How to Dap and Dome Metal


How to transfer texture to metal with a hammer!

Friday, August 19th, 2011

As promised, here are some photos and instructions on how to use brass texture plates to transfer beautiful patterns – pebbles, waves, flowers and more – onto other metal. With just a hammer, you can easily (but not quietly!) transfer the patterns from the brass sheets onto copper, aluminum, silver or even … brass. Transferring from brass to brass sounds silly – why not just cut up the texture sheet and use that? – but to texture pre-cut shapes, like these brass fairy door and window cutouts, it makes total sense.

I love hammering metal because it is cheap, fast and fun. The results are similar to what you can achieve with a rolling mill (not cheap!) and etching (not fast!). Those techniques are fun though – we will post a tutorial on etching soon. But today, we hammer:

Tape your piece face-down onto the texture plate. Cover the entire piece with tape to avoid transferring a tape-seam along with your pattern.

Place the piece on a steel block and hammer away! Make sure to hit every little bit of your piece.

Pull back the tape part way to check the transfer. If there are any missing or faint spots, keep hammering.

The piece will likely get a bit misshapen as you whale away on it. Not to worry.

Once you are satisfied with the texture, remove the tape and use a rubber or rawhide mallet to flatten your piece again. You might also need to file the edges a bit.

Tada! Before and after hammer time.

When using a long strip of metal, like these pre-cut copper and brass bracelet strips, I just tape down one edge, texture up to the tape line and then turn the piece around to texture the other side. The strip will curl upwards as you work, but it is easy to flatten out.

The hammered texture on the back of the piece is a nice bonus, like on my copper bracelet.

To really bring out the high and low points in the texture, apply a patina such as liver of sulfur or Win-Ox and buff the high points with steel wool (note: these patinas do not work on aluminum).

Annealing (heating) your metal piece beforehand will make it easier to transfer the pattern, but as you can see, it isn’t necessary. Have fun hammering!

Top five reasons to come to the Rings and Things Anniversary Sale!

Saturday, August 13th, 2011


5. Red Tag Madness!!!
We have bins and bins of of marked down beading goodness! There are marked down gemstones, findings, pendants, glass beads and more! Get ready to dig! Oh and P.S. you get an additional 10% off all red tag times!

Tons O' Red Tag Strands

Red Tag Resin Beads

4. Magical Gemstones Galore

We have beefed up our inventory of gemstones in preparation for our upcoming traveling Bead Show, but before we take all these goodies on the road, we wanted to give our local clientele a sneak peak!

Gemstone Maddness!

Gemstones in Jewel Tones

3. Free Demos

Curious about Riveting and Dapping? Perhaps you feel the need to see some jewelry making power tools in action? Want to solder but don’t know where to begin? Don’t fret, here at Rings and Things we have our experienced staff doing all these things and more!

Riveting and Dapping!

Soldering Demo

2. Tools, Tools, Tools!

In celebration of our 39th year in business we are giving you tools at a 15% discount! Come grab a new pair of pliers or wire-cutters so you ca throw that old pair out! There is nothing like a the feel of new tools in your hands!

"Don't be a tool......buy some tools instead!"

And the number one reason to head down to the Rings and Things Anniversary Sale……….

1. The oh so Loveable Men of Rings and Things!

Josh, Ted and Lynn!

Oh and don't forget Dan the Man!

Nate can help you carry out all your new tools and beads!