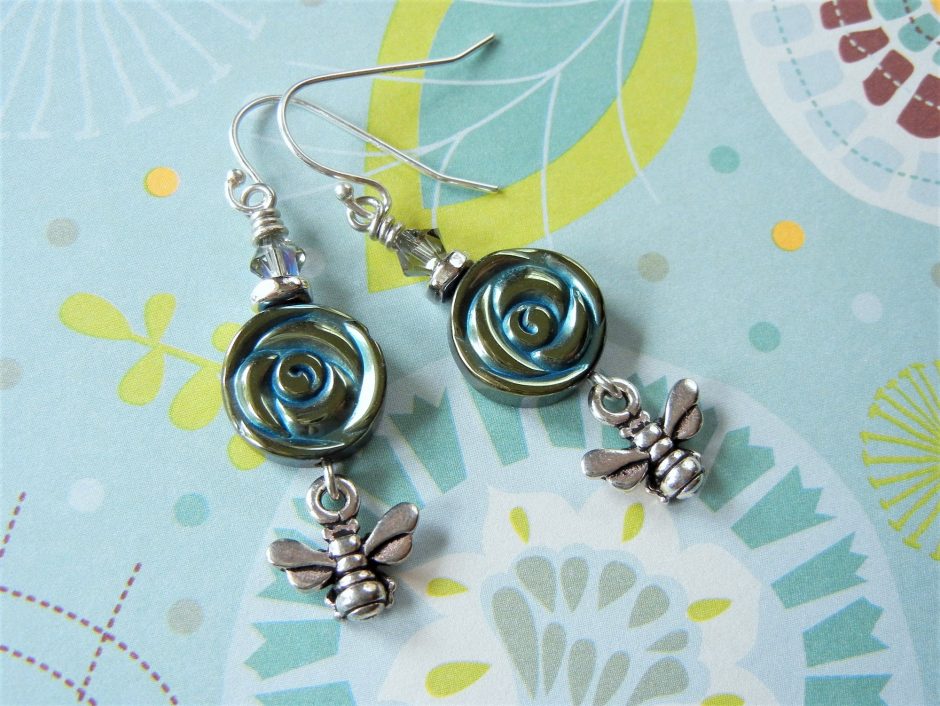
Archive for the ‘Uncategorized’ Category

Cloverleaf Connectors: My new favorite thing!

Friday, January 27th, 2012

I am always looking for ways to incorporate messages or cute little phrases into my jewelry.  I think a word or phase can change the whole meaning of a piece of jewelry. By adding words, you can add emotion to your designs.  So when we added new stamp-able Cloverleaf Connectors to our inventory, I just couldn’t resist making a pair of earrings to show off their stampability!

All six platings and all three sides with the circle side showing.

All six platings and three sizes with the diamond side showing.

The connectors come in three sizes and six platings. The sizes are 9mm, 12mm and 16mm and the platings are raw brass, antique brass plated, antique silver plated, antique copper plated, gunmetal, and silver plated. They are also two sided and you can even stamp both sides! So let me show you how I created these and hopefully you will be inspired to create a pair of your own.

Everything needed to make these cute earrings. See the list below for links to the supplies.

I am an antique copper kinda girl myself so that is what I chose to use for this design.  I wanted to make a somewhat whimsical pair of earrings,  so I stamped WISH and WANT into the earrings, but you could choose any 4-letter word (naughty or nice ;) ) to convey your message. Here are the supplies needed to make these earrings:

Wire wrap the cubic zirconia briolettes. See the link at the bottom of the page to learn how to wire wrap a briolette.

Stamp your desired words onto the connectors. They are two-sided, so you can choose two different words to stamp.

Use an antiquing solution to darken the jewelry components. *note: plated findings are not intended to be antiqued. The patina will most likely not be consistant, but the intention is only to darken the lettering. *

I used Liver of Sulfur. When you mix the gel with warm water, it will make a yellow (saffron colored) solution.


After being antiqued, the copper components will turn black.

Use a little steel wool to buff away the patina, this will make the letters really "pop".

See what a difference a little buffing can make!

Assemble the earrings, making sure all your letters are in the right order. They are stamped on both sides, so they are reversible.

Completed Wish & Want Earrings

Well I hope I have inspired you to add a little wording to your designs! The possibilities are truly endless! Worded bracelets, necklaces and earrings galore! If you need to learn how to wire wrap a briolette, go to our blog “How to Wire Wrap a Briolette” and if you have any questions, feel free to ask me!   ~~Tiffany

DIY Earring Project: Swarovski Crystal Tassel Earrings

Monday, December 19th, 2011


Tassel Earrings made using Wire Lace and Swarovski Crystals

I have always been a sucker for anything sparkly. So when I started working here at Rings and Things, I soon became addicted to everything Swarovski!  I know all the colors and all the shapes. Bronze Shade, Golden Shadow, Silver Night,  Red Magma and of course the coveted Bermuda Blue! I dream of crystals. Seriously. I rarely leave work without buying a few new crystals. (Basically I get paid in crystals!) So here is my new fun crystal project!

Some of the different Swarovski Crystal Jams.

One thing we do here at Rings & Things are make these magical little baggies full of mixed Swarovski Crystals called crystal jams. I love crystal jams because they are carefully selected assortments that contain several colors that coordinate. I have been wanting to make something with one of the crystal jams for a while so when a co-worker suggested these tassel earrings, I couldn’t resist.

Supplies needed to make these lovely earrings.

The crystal jam I decided to use for this project is called Brown Sugar.  It blends golden shades of topaz, beige and browns. I paired the crystals with chocolate Wire Lace, Vintaj findings, charms and niobium earring wires. I also use Hypo Cement to seal the edges of the Wire Lace.

Supplies needed:

First make several templates from card stock. Start with a 3x3 inch square. Cut a triangle out of one corner of the square, leaving about an inch on each side. Create a stair pattern up the diagonal, making a new step at each 1/4 inch.


Start threading the crystals onto the wire lace. Make a slit on the top left to string the lace through after each new loop is made.


Place anywhere from 5 to 10 crystals per step on the template.

Keep going until you have the desired amount of loops for your tassle.

For this one, I used 8 bicones on each loop, and made 8 loops, so a total of 64 bicones per earring.


Tie the two ends together. Then wrap one end under all the loops and tie another secure square knot. This way all the loops are connected.

Remove tassel from the template. I found that the best way to do this is to cut away the template from the tassel. This is why you need to make several templates.

Trim excess Wire Lace and add a dab of Hypo Fabric Cement to secure the loose ends. Attach your fold-over crimp before the glue sets. Fold the crimp over using your chain nose pliers.


Finished Tassel Earrings! I used some beautiful shell pearls, large Vintaj bead caps, cute little Vintaj bird charms and niobium earring wires.

Well I hope you liked my tassel earrings! I think that this technique could really be applied to all different beads and cording so go nuts with it! Now I just need to figure out what to name these earrings…..

~~Tiffany in the Showroom

Make Your Own Designer Jewelry: Multi-Chain Necklace!

Monday, October 24th, 2011

As a jewelry maker, I am constantly checking out the jewelry at department stores and boutiques for inspiration and current trends.  When winter and fall comes, so does big statement jewelry. The kind of pieces that you wear to Christmas parties with your favorite black cocktail dress. This year, I have noticed that there are a lot of multiple chain necklaces and necklaces that end with ribbons and I just couldn’t resist the urge to create one myself.  If you have a lot of leftover chain pieces this is a great way to use them up.

Items needed for this project:

  • Chain, lots of chain.  You can use all the same color and style or mix and match. I have seen ones that are in all antique brass, but with several different styles. I have also seen ones with all one style, but all different platings. For my necklace I used a variety of gunmetal and silver-plated chains, plus one strand of rhinestone chain for a little extra “wow” factor. Get creative with it!
  • Large connector rings. I used 32mm gunmetal rings.
  • Satin Ribbon. Get this at the craft store.  I like the nicer ribbon that you buy by the yard.
  • Hypo Fabric Cement or fabric glue, to keep the ends of the ribbon from fraying.
  • Jump rings, for the chain that has links which too small to open and close around the connector ring.
  • Chain nose pliers, flat nose pliers, semi-flush cutter and scissors.


 How to create it:

Step 1: Select your chain


Step 2: Pick out coordinating connector rings and ribbon

Step 3: Attach your first piece of chain to one of the connector rings. This will be the shortest length of chain. I found that 6 inches, give or take a little, was a good starting length.

If using rhinestone chain, pinch on an end piece to the rhinestone using your chain nose pliers.

Use a jump ring if using rhinestone chain.

Step 4: Add each additional chain and attach, one at a time to the first connector link. Cut each additional chain between 1/2 inch and an inch longer than the previous chain.


This is how the necklace will look after the chain is attached on both sides.

Step 6: Tie a peice of ribbon onto each connector link. Use about 16 inches on each side. Trim the short ends of the ribbon close with scissors.


Step 7: All you have to do to finish the necklace is finish the edges of the ribbon with a little anti-fray fabric glue or hypo fabric cement. I also added a few large hole metal beads for some extra pizzazze!

Showing off my new necklace in the Rings & Things Showroom :)

Well there you have it! If I had to rate this project on a scales of difficulty I would give it intermediate. It was a little tricky to keep my chains straight. If you do re-create a necklace like this with lots o’ chain, remember to be careful when storing it. I recommend hanging it so as to not get all the chain tangled.

~~ Tiffany

Check out these other great tutorials on our blog:

Three Great Ways to Incorporate Swirls into your Jewelry

Wednesday, October 12th, 2011


Swirly Curly Jewelry!

For as long as I can remember I have loved making swirly curly-Q designs. In middle school, my favorite pee-chee folders were covered in them. Well I’ve grown out of my doodling habits, mostly, but I still love those swirls! Unwilling to give up on swirls altogether I have found three great ways to incorporate them into your jewelry with the help of a little wire. Adding a simple curly-Q can take any design idea from ordinary to whimsical! You can make your swirls free form using pliers or try this great Spiral Maker to eliminate marks from pliers!

All of these projects can be made using your basic tools and 18, 20 or 22 gauge wire. The tools here are a from a fabulous mini tool set that I keep at my desk. The set is only $12 and includes these three tools plus tweezers and a mini bead board!

1. Swirly Head Pins

The first and easiest way to add some swirl power to your jewelry is to make curly-ended headpins. Making your own headpins out of wire is easy and gives your jewelry an even more hand-crafted look. I recommend using either 18, 20 or 22 gauge wire.  (18 being the thickest, 22 being the thinnest) Keep in mind the size of beads you plan to use. If your beads have smaller holes, you will need thinner wire.

Use your Round Nose Pliers to Start the Loop

Use your chain nose pliers to create the swirl

Make a right angle with your chain nose pliers so that your head pins have nice perpendicular look at the end.

Completed head pins ready for use!

Finished jewelry made using swirly head pins. Both earrings have been antiqued to emphasize the swirl design.

2.  Swirly Post Earrings

Making your own swirly post earring findings is actually quite simple.  I personally like to use 18 gauge for sturdiness, though standard earring wires are not usually that thick.  Most earring findings are no thicker than a 20 gauge. It’s up to you, though know if you do use 18 gauge, you will probably have to use a rubber earring back as most metal nuts won’t fit that thick of wire.

Use a piece of wire about 2 inches long. Make a 90 degree bend in the wire at about 3/4 inch

Make a loop where you bent the wire.

Using your chain nose pliers, build the swirl like you did with the head pins.

You can see the earring being formed. The post that goes into your ear is coming from the center of the loop.

Make a loop to complete your Swirly Earring Post. Also, make sure the ends of the post are smooth. You can do this with either a metal file or a cup bur.


To finish, I used Liver of Sulfer to give the earring wires a patina, then buffed them with steel wool. To prevent your ears from turning green seal the post with a little Renaissance Wax or clear nail polish.


Two completed earring designs using Swirly Earring Post!

3. Egyptian Coils!

Now that you have mastered head pins and earring post, you can move onto the ultimate swirly design, the coveted Egyptian Coil! This design feature multiple swirls and looks so pretty at the top of dangly earrings or as an entire bracelet.

Start by making two-sided swirls. Make sure that they are all the same size.

Bend the wire in the center using your round nose pliers.

Use your chain nose pliers to flatten links like so. Don't be alarmed, it is supposed to look kind of phallic at this point.

Use your round nose pliers to bend the loop back. You now have links!

Connect links to make a chain

View of links from the back

Finished Earrings using Egyptian Coils

Well I hope you enjoyed my swirly blog post and are now inspired to try out some of these ideas. For all of these earrings I used bare copper wire and then oxidized the wire to antique it. I then buffed the designs with steel wool to expose the bright copper. I highly recommend doing this with your swirl designs because is really makes those curly-Q’s stand out.

~~Tiffany in the Showroom

Feel free to ask me any questions about how I did anything or what materials I used for all the designs.