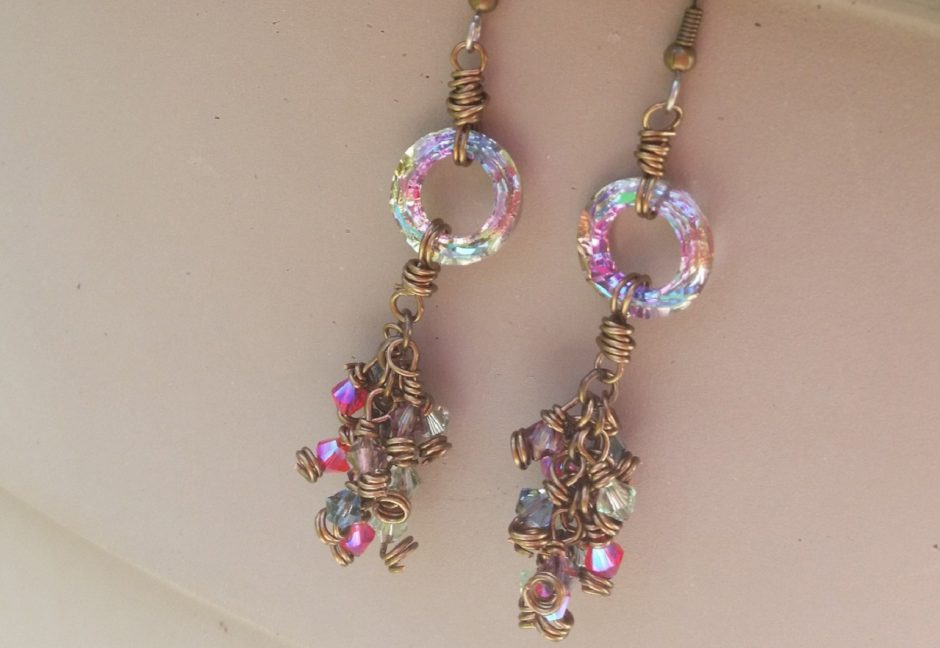
Archive for the ‘Tools’ Category

How to choose a Knew Concepts saw for jewelry making

Sunday, February 5th, 2012

Hi bloglandia! Do your jewelry projects ever seem to stack up, one on top of another? Mine do. Maybe you are able to focus entirely on each project, finish and clean up before moving onto the next, but it seems I always have 10 different things going at once. Right now I’ve got a bunch of metal shapes to saw out and then solder together. The next few blog posts are going to use a few of these projects to highlight different tools and techniques, starting with the Knew Concepts saw frames and ending with Blazer micro torches.

sawing-tools

Saw frame, saw blades, bench pin, rubber cement, sheet metal and a design! Ready to saw!

So, what is new about Knew saw frames, other than their distinctive shape and bright red color? Well, most of us learned to saw with standard adjustable saw frames. In order to get the right tension on your blade with these frames, you press the frame between your body and a table or other sturdy object. By inserting the blade while the frame is bowed, the blade gets pulled tight into place when you release that bow. But – ow! That action bruised my breastbone. And when you break saw blades as often as I did starting out, it becomes a real chore.

Knew Concepts saw frames are different in a number of ways. Obviously, they are bright fire engine red. They are extremely lightweight, which makes them more comfortable to hold. And they are available in a whole lotta different models! How to pick?

1. Size. 3″, 5″ or 8″? My vote is for 5″, unless you plan to work with very large or very long pieces of metal, in which case the 8″ frame makes sense. If your hands tire easily and you only work with small pieces, than the 3″ frame might meet your needs. I’m a middle of the road kind of girl! Note that the size refers to the depth of the frame. The height for all Knew frames is fixed. This means you won’t be able to re-use broken blades by shortening your frame. (But wouldn’t you rather not break the blade to begin with? Knew frames help with that!)

saw-frame-depth

If you want to pierce the very end of a long strip of metal, you need either a large frame or the swivel model.

2. Blade tension options. Screw tension or cam-lever tension? I 100% endorse the cam-lever tension because the tension does not change when you switch blades. Instead of sandwiching the frame between your chest and the table every time you break a blade or move to a different area of a pierced design, you simply flip the cam-lever switch! What a relief!

cam-lever-tension

The cam-lever option is totally worth a few extra bucks.

3. To swivel – or not to swivel? That is the final question. Personally, I found the swivel to be an extra complication that I didn’t really want to mess with. However, if having a really lightweight saw that can still get into tight corners is important, buying the small 3″ saw frame with the cam-lever and swivel would accomplish that goal.

After testing the different options, I decided the 5″ Cam-Lever Tension model was my favorite (69-169-52 – it is the one with the staff choice icon in our online store). It is comfortable to hold and large enough to handle pretty much any jewelry project I would undertake.

Of course, the first question should have been: do I really need a Knew Concepts saw frame when I can buy a standard jeweler’s saw for less money? The answer depends on how you define need! If budget is the #1 concern, then maybe the answer is no. An adjustable saw frame has been the industry standard for years. However, if you want to invest in a tool that will serve you well for years, and which will make the  - let’s face it – somewhat tedious job of sawing more enjoyable, then yes, you kneed a Knew frame! ~ Cindy

DIY copper etching tutorial

Wednesday, December 28th, 2011

It is easy to etch your own designs into metal for jewelry. This tutorial will teach you how!

etched-stamped-metal

Rubber stamp designs etched into brass sheet metal.

Before you begin, please read the safety considerations for etching metal with chemicals blog post.

You’ll also probably want to read the design considerations for etching metal blog post too!

Now, here are the steps for etching metal with ferric chloride:

1. Choose your metal(s). Ferric chloride works on copper, brass and nickel silver. It will not work on actual silver (fine or sterling). Do NOT use ferric chloride on aluminum. Metal as thin as 24-gauge can be etched – just leave it in for less time than you would for thicker metal. If you want to etch both sides or etch really deeply, use at least 20-gauge metal.

2. Clean metal with Penny Brite (our favorite) or an abrasive cleaner and scrubbie. The metal must be very clean. Water will sheet off  (not bead up) on the surface when it is truly clean.

3. Apply resist. Stazon ink, Sharpies, toner transfers – there are many options! (Read the design considerations.)

stamped-up-etch-copper

A combination of rubber stamps and hand-drawn Sharpie doodles decorate the large copper sheet. The "C" was done with a PnP blue toner transfer.

4. Cover all areas that should not be etched with ink or durable tape. This includes the back, sides and inside any holes.

inked-edges

It would have been less messy to ink the edges before putting the tape on the back.

5. Pour 3/4 – 1″ of etchant into a non-reactive container (glass or plastic). If you are etching more than one type of metal, use a separate container for each. If desired, add a teaspoon of citric acid to “boost” the etching action.

etching-chemicals

A little citric acid (from the grocery store) accelerates the etching action, but is not required.

6. Attach metal to a styrofoam float “boat” and place in etchant. Suspending the metal into the bath with tape is another option. Just make sure the metal is submerged yet isn’t touching the bottom of the container.

etching-bath-boat-float

A boat ready to float!

float-my-styro-etch-boat

Boat floating with metal face-down in the chemical bath.

7. Allow to float for 30-90 minutes, depending on depth of etch desired. Nickel silver tends to take longer than copper or brass because it contains just 65% copper. (The rest is nickel and zinc.)

artist-etched-metal-jewelry

Etched design is clearly visible - this piece is ready to be cleaned.

8. Scrub metal clean in a tub of water. Use baking soda to neutralize the acid if desired. Some people use a weak ammonia bath to really make sure the acid is removed. Cleaning all the etchant off is important, as it will stain.

That’s it! You’ll probably want to patina the metal with liver of sulfur or another oxidizer to really bring out the definition in your design.

etched-copper-bikes

Using steel wool to buff the patina off the high points.

Ferric chloride can be reused several times. Once it is exhausted (typically after about 3 uses), consult your local waste management system for guidance on disposing of it.

rita's etched bracelet

Rita wrote on a copper washer with Sharpie to make the etched center link on this bracelet.

Happy creating! Use the “print friendly” option to print these instructions – with or without pictures! Questions are always welcome too. ~ Cindy

Design considerations for etching metal

Wednesday, December 28th, 2011

Creating attractive etched metal pieces for jewelry requires masking portions of the metal to prevent the etchant from etching those areas. The unetched areas will be the high points on the metal.

artist-etched-metal-jewelry

This rubber stamp design transferred and etched nicely.

Lines need to be at least as wide as the etch will be deep. Lines should be a little wider than how you’d like them to be when the etching is done to allow for the fact that the etchant will typically undercut your design lines a bit.

If you’re doing a deep etch, use lines that are at least 1/32″ wide. Finer details might be lost.

There are a variety of resists you can use to created etched designs on metal. Here are some of our favorites:

  • Fine point Sharpie pens
  • Staedler red ink pens
  • Stazon ink pads (black and red work best) and rubber stamps.
  • Press-n-Peel (PnP) Blue paper or other toner transfers. If using transfers, be sure to reverse the text and images before you print them.

If you mess up your design, use Stazon cleaner to remove the ink and try again. The etchant will eat through faint, blurry or thin ink, so make sure your lines are dark and crisp.

That’s basically it!  Please feel free to add any experiences you’ve had with etched designs by leaving a comment.  The DIY etching tutorial has full instructions for etching metal. Please also read the safety considerations. Thanks! ~ Cindy


Twelve Days of Christmas Jewelry Designs: 11 – Stamped Metal Gift Tags

Thursday, December 8th, 2011

let-it-snowThe best thing about metal stamping is the ability to personalize jewelry and ornaments with the exact words, phrases and names you want. Hammering metal is one of those instant gratification crafts. In just a few minutes you can create a completely customized gift that will be functional for years. Below are some examples of custom gift tags and other gift items to inspire your Christmas crafting.

One of my favorite holiday-themed stories is Six to Eight Black Men by David Sedaris. It concerns Dutch Christmas traditions, like leaving your shoes out by the heater for Santa to fill with goodies. This is not much different from the American tradition of hanging stockings on the mantle. However, if you’re naughty, Santa (who happens to be the former bishop of Turkey) and his “six to eight black men” (no one knows the exact number) might beat you with a switch, kick you, or kidnap you and take you home with them (to Spain, not the North Pole). The essay is hilarious.  I highly recommend you read it.

davids-wine-bottleWith this story in mind, I made a personalized brass gift tag for David to hang from a bottle of wine. I think Santa’s festive crew of eight, clogs and paddle pins and crystals dress up a bottle of Zinfandel quite nicely. In my imagination he is very pleased with it when I show up at his European home for a holiday party with it in hand.

Here are two more examples of hand-stamped brass name tags. The tiny Vintaj brass blank makes a great addition to necklaces, bracelets and packages.

sunny-tag

Sondra’s “Sunny” tag brightens up this pendant necklace.
cindy-tagThis wee brass tag personalizes an organza gift bag full of chocolate covered espresso beans.

stamped-wine-markersStamped metal tags make DIY wine glass charms that much classier. I love how guests can reveal their personalities by choosing cranky or merry words. Our 1/2″ wide strips of brass and copper make it super simple to make these.

And finally, with my Let it Snow! copper gift adornment, I wanted to answer a common metal stamping question: which gauge metal should I use?

The answer: 24 gauge is the thinnest metal that works well for stamped metal jewelry. Thicker is fine, but anything thinner is probably too flimsy unless it is layered with other metal. (Our stampable brass fairy doors are only 26-gauge, but meant to be sandwiched together.) We recently added 18-gauge stamping blanks and 20-gauge sheet metal, primarily for etching and enameling. However, I really like the thicker blanks for metal stamping too. Compare:

blanks-compare1See how the 24-gauge piece has high points around the letters? Stamping displaces metal, and on thin pieces this is obvious as the metal will warp and wrinkle a bit. The thicker 18 gauge metal absorbs the hammer blows better and hardly “moves” at all.

blanks-compare2Back side – the 24-gauge piece shows clear shadows of the letters stamped on the front, and needs to be flattened with a rubber or rawhide mallet. The 18-gauge piece is still perfectly flat and shows just a hint of the letters.

If you don’t already have the tools you need, we’ve got a great selection of metal-stamping tools and tool kits, fun designer fonts and individual decorative stamps to get you going! ~Cindy