I recently got a chance to play with copper solder, and I LOVE it! This awesome copper solder is 7% phosporous (and 93% copper), which makes it self-fluxing. It flows and melts around the same temperature as hard-grade silver solder, so you can easily solder links, small bezels, and other basic joins with a butane micro torch.
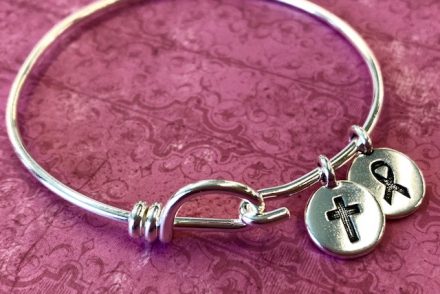
16-gauge copper wire link with 18-gauge copper solder.
Why do I love copper solder?
#1: It’s easy!
Jewelers have traditionally used silver solder to solder copper, but when using silver on copper, you have to be very careful so the silver seam doesn’t show. Since the copper solder is 93% copper (making it copper colored, even after you solder with it), I can enjoy the freedom of having my small mistakes invisible to the untrained eye. And it’s nice that the 7% phosphorous portion makes it self-fluxing, so I don’t have to use flux.
#2: It’s inexpensive.
Copper solder is about 1/10 the price of silver solder: silver solder is around $40 per ounce, but you can get 4 entire ounces of copper solder for around $14. I can experiment and practice all day and it only costs me a few dollars worth of materials. I can make affordable copper jewelry, and/or I can decide to upgrade to sterling silver, after practicing new techniques with copper.
#3: I have everything I need.
I finally bought my own torch last year, but haven’t used it a lot yet. I got the Blazer torch kit, so I’d have everything I need — 2 types of tweezers, a solder pick, and a few different soldering surfaces.
Blazer micro torch kit.
How do you use copper solder?
If you already know how to solder sterling or fine silver, then you already know how to solder copper. If you have no soldering experience, or have only used “soft” solder and soldering irons before, then copper solder is an EXCELLENT material to begin with.
So, where do you begin? At the very minimum, you need:
- Raw (bare, unplated) copper
- Copper solder
- A torch that gets hot enough for the job (all of Rings & Things’ torches work fine for this — but a soldering iron does not get hot enough).
- A firing surface — I use a magnesia soldering block on top of a ceramic fire block on top of an old cookie sheet.
- Something to grab melty-hot metal items. Check out the tweezers listed & linked in this kit.
Generally, you’ll drop your freshly-soldered item in a pickle pot or a metal can full of cool water. And there are safety considerations … you don’t really want to catch your clothing or kitchen/craft table on fire, or breathe or splash unknown chemicals, so if you’re completely new to soldering, pick up a book like Simple Soldering, by Kate Ferrant Richbourg, or Soldering Made Simple, by Joe Silvera.
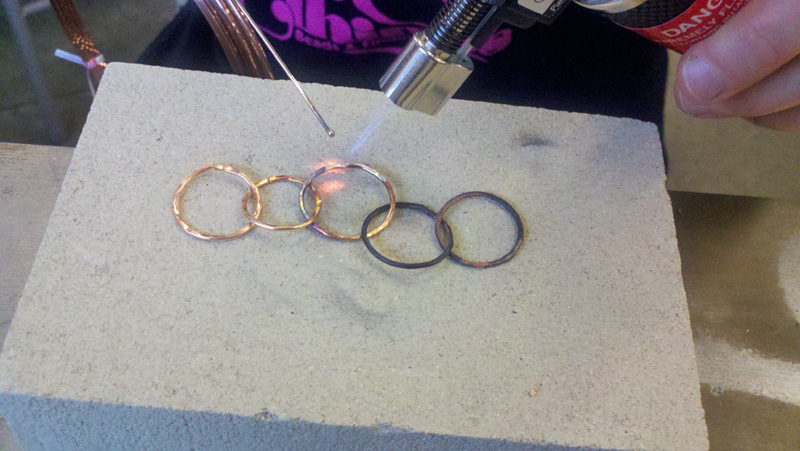
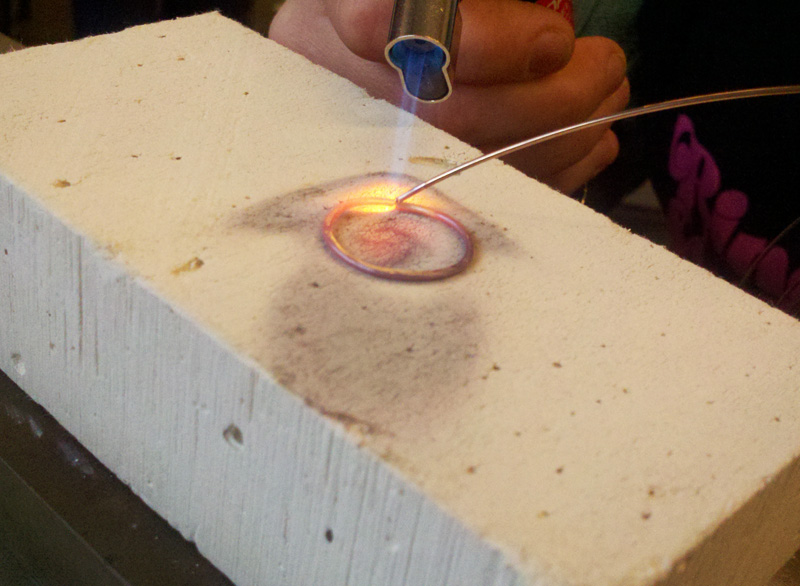
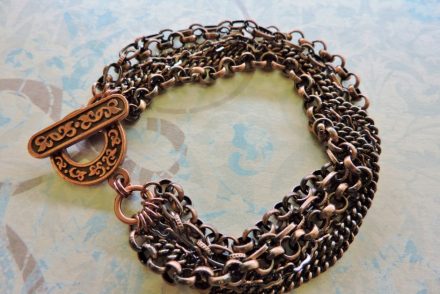
Here is my project: Simple soldered links, for a bracelet or necklace.
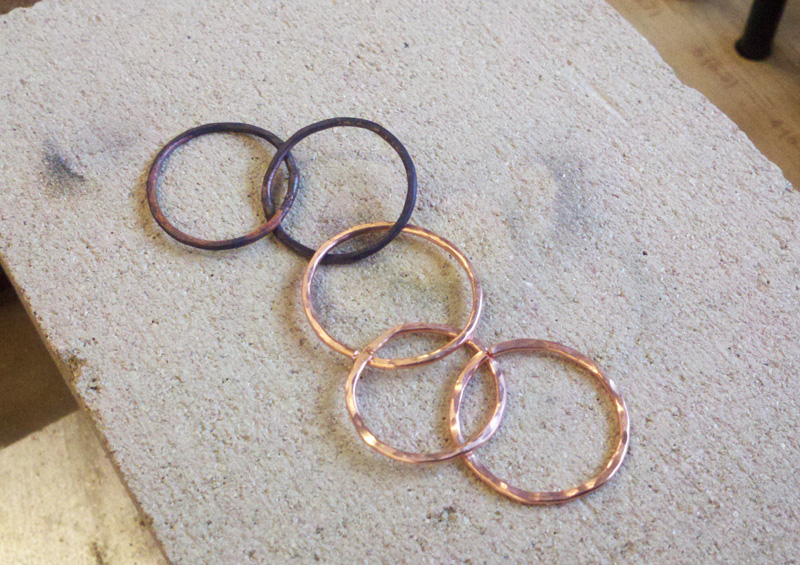
2 links soldered, the next 3 ready to go.

3rd link being soldered.
To make my loops, I used ring-bending pliers and the large side of Wubbers Extra-Large bail-making pliers to shape some quick links out of 16-gauge raw copper wire, and hammered them a bit on my metal block. Then I cut the ends nice and straight with flush cutters (You know solder doesn’t fill gaps, right? So your spots to be joined need to line up very cleanly … or your solder join is doomed or ugly), laid out a few links, and started soldering.
I soldered the quick way — torch in one hand, and spool of solder in the other hand. Heat up a link, then touch the solder to the joint, and fwoosh, it flowed. Sometimes a little too well, so my solder spots are a little globbier than they technically should be. So now I’m actually reading my copy of Kate Ferrant Richbourg’s Simple Soldering rather than just just flipping through and looking at the diagrams. Soon, I hope to pop in the DVD (included with the Simple Soldering book)!
The tips and techniques in Simple Soldering are all about silver soldering, but apply just as well to copper soldering.
Having Trouble?
Is your solder not flowing? Make sure you’re heating the entire area to be joined, not just the solder. Solder follows heat. Many problems are caused by heating the solder rather than the joint. So if your solder is going into a ball and refuses to flow into the joint, the key is to heat the joint rather than the solder. Once the joint is hot enough, the joint itself will melt the solder, and pull it into the joint.
What is your firing surface? For some projects, just about any firing surface will do. But sometimes, the firing surface can make a difference. Magnesia and charcoal blocks reflect heat back onto the item you’re soldering. This is great for larger items, because it helps them heat faster, but it can cause tiny items to melt away unexpectedly. Ceramic fire bricks and pumice are both heat sinks which means it can take longer to heat the join up enough to flow your solder, but is useful when soldering fragile items, or when you want to solder just one area of a larger piece.
One last tip based on questions I received last weekend: Do you know which part of the flame is hottest? You might think it is inside the brightest blue part of the flame, but it actually the darker space just past the tip of that bright blue inner cone.
More trouble? Check the 40+ comments below — someone else may have already asked your question, and had it answered below!
Coming soon…. (now finished):
Next blog article: a technique to add beads (even fragile beads!) directly to links before soldering the links, including bonus tips for efficiently cutting wire with straight ends. (Because you know that solder won’t fill gaps, right? And endless filing is boring.)
~~Polly
Edited December 2021 to update links.

48 Comments
This is just the info I was looking for! I am a wire artist but have begun my love of making pieces with recycled copper and wanted to learn a way to use a copper color for soldering. Thank you for the info and making it so easy to follow and understand as well as all the links for supplies.
Hi Dawn,
I’m glad I was able to help! If you have any questions, please post them here or on our FaceBook page
(http://www.facebook.com/BEAD.FANS)
Does this solder leave a copper looking seam or is it a silver colored seam where you soldered? I have tried using copper before but the solder always left a silver seam.
Thank you,
Jim
Hi Jim,
This copper solder really is copper — even after you solder with it! That (and the price) are why I love it so much.
If you accidentally make too big a glob of solder — and I mean a REALLY BIG glob — then it will be a little silvery or gray. I think some of the phosporous comes to the surface when you are too messy — which I frequently am when I’m talking too much during a demo, rather than focusing on my solder join.
I’m working on a “part 2” copper soldering blog entry and I will add some pictures of my mistakes to one of these so you can see what it looks like when you’re sloppy.
(now done: here is part 2)
2022 update: We have now learned that many users of this copper solder report always getting a grayish seam, even using the same batches of copper solder that I bought in 2013 and 2015; they haven’t gotten the bright copper seams that I was lucky enough to get. I’m not a “chemistry of soldering” expert, so I really can’t explain this!
Would this technique and the copper solder work on brass?
Hi Robin,
Yes, this technique works with brass, but I would use brass solder (https://www.rings-things.com/search?keywords=brass%20wire%20solder) so the color matches. We just got the brass solder in stock, so I haven’t played with it yet. It does need flux, and it is a bit more expensive, because it is 38% silver, rather than having any phosporous in it.
We also have bronze solder — it is almost identical to the brass solder, just a slightly different shade of yellow. (https://www.rings-things.com/search?keywords=bronze%20solder)
Great tutorial. I just by to see how to cut the wire straight and that I did find on your blog. But there is too many things to learn from your blog. Thanks for sharing. Bookmarking your site now.
Great! I’m so glad we could help =)
me encanta su consejo estoy empezando a hacer medallones de alambre de cobre material muy fàcil y barato acà en Chile de hecho es nuestro metal nacional tiene grandes propiedades medicinales etc pero el punto es que justamente al armar las piezas de cobre yo las pincho con una gota de soldadura pero este se dispersa hacia donde uno no quiere y la solucion es la soldadura de cobre puesto que yo uso la de estaño al 50% con fundente y se desliza, y se nota, en cambio, creo que con la de cobre esto no deberìa pasar ahora la misiòn será encontrar esa soldadura cerca de mi ciudad ya que todo se concentra en santiago,ah, ecxelente el dato que con esta soldadura de plata no se usa fundente adios desde Chilito lindo
Hola Marcelino,
Espero que puedan encontrar la soldadura de cobre cerca de ti. Se trata de 93% de cobre y el 7% de fósforo, y es un poco duro / frágiles, pero el color es maravilloso.
Y si no puedes encontrar la soldadura de cobre cerca de usted, por supuesto, podemos enviar a cualquier parte del mundo!
Hola Polly, por fin por fin dijo el delfín ,he encontrado la soldadura fosfórica y es una maravilla estoy experimentando con pequeñas pelotitas osea corte la barra de soldadura en pequeños trocitos y los voy repartiendo en el medallòn a medida que voy uniendo ya que primero lo hacia acercando la barra pero al derretirse no podía controlar la cantidad de soldadura que caía , ah! influye mucho la cantidad de calor que se aplique porque si le queda poco gas a la botella , la llama que se genera es de muy baja temperatura yo me compre un soplete marca ORCA de joyeria profesional y me costo como 85 dolares pero me da la seguridad de que vas a poder soldar de verdad , adios desde Chile .
Hi Marcelino!
Buena suerte con su soldador, espero que todo salga maravilloso.
~Polly
I must be using way too much, because mine shows up bright silver no matter what I do. Even when I file it down to the joint it’s silver. I’ll keep trying, but I was hoping this product would save me filing time!
I had that in a couple spots too, and I think you’re right about the cause. Heat up the whole piece(s) to be joined, and then just touch the solder to it, briefly, at the last moment.
Also, I should mention that any time I file my joints, they become silvery. You can use heavy-duty cutters to cut small pieces of copper solder, to apply them more precisely. (Copper solder is surprisingly brittle — you won’t be able to hammer them into proper pallions, but at least you won’t have the whole spool in your hand like I usually do.)
And a further 2022 update: We have now learned that many users of this copper solder report always getting a grayish seam, even using the same batches of copper solder that I bought in 2013 and 2015; they haven’t gotten the bright copper seams that I was lucky enough to get. I’m not a “chemistry of soldering” expert, so I really can’t explain this!
Hi, Is this solder suitable for jewellery? I mean from a safety / legal point of view. I know theUS and the UK (where I am) have slightly different laws but does anyone know?
Thanks Anna
Hi Anna,
Yes, no lead, cadmium or any other weird stuff. Only the 2 ingredients listed above.
~Polly
Hi Polly, thanks for the great info! I was wondering, do you need to paint your copper with a boric acid solution to prevent excessive firescale…? I’ve heard it’s often required when soldering silver….
Hi Divine, I’m sorry, I didn’t realize my answer didn’t come through. No, I haven’t painted my copper with anything at all. No flux, no nothing. I get a little firescale, but not too much. I drop it in plain water when done; that knocks of some of it. Then I drop it in a tumbler with steel shot and a bit of ShineBrite to clean up the rest, and it comes out bright and shiny in about an hour. (I could hand polish … but I’d rather make more jewelry and let the tumbler polish the already-made jewelry.)
Thank you for this tutorial! I’ve been having a lot of trouble with my copper solder (and solder, in general!) I can not figure out why. Like another post, my joints always end up turning silver. I guess I am using too much heat. How long does it typically take for the copper solder to flow? I’ve been trying to make ring bezels and have been getting very frustrated!
Hi Jenny,
It sounds like you are using too much solder, rather than too much heat.
I highly recommend “Simple Soldering: A Beginners Guide to Jewelry Making.
The Simple Soldering book (with a very well-done dvd included) will save you soooo much more than $30 by eliminating a ton of trial and error and guesswork. It’s true that the book is all about silver solder, but copper solder melts at the same temperature range as some of the silver solders. I have this book and LOVE it.
~Polly
Can I solder sterling silver post onto a copper hoop to make an earring?
Hi Doris,
Yes, you absolutely can! And you can use either silver solder, or copper solder — your choice, whichever will look better in the location. You might want to use the copper paste solder:
http://www.rings-things.com/Products/Hard-Jewelry-Solder-Flux-and-Pickle/EURO-TOOL-Solder-Copper-Paste-Soft.html;
it will be a good “bridge” color between the copper and sterling silver.
~Polly
Hi Doris,
Since my original 2013 reply, I’ve learned more about copper solder vs. silver solders, and now I would recommend that you (and others reading this post) use one of the forms of silver solder, rather than copper solder, for a precise application like this. While I still love the price and color of copper solder, it is much more brittle than silver solder, and it’s harder to control precisely. With silver solder, you can cut tiny pallions or use just a dab of the ideal grade of paste solder (probably a medium grade), and you’ll have a smaller, yet more flexible bond, so it will be more sturdy and attractive for an earring post.
(See various grades of silver solder here.)
If you can accept something a little thicker, try seeing if a welding-supply or HVAC-supply house has 1/16″ copper-phosphorus brazing rod (Harris 0 or equivalent) in stock. It’s the same compisition as copper jeweler’s solder (what the jewelry world calls “soldering” is what plumbers and air-conditioning installers call “brazing”). It sells for 1/2 to 1/4 the price per pound of jeweler’s solder.
1/16″ is about #14 AWG wire (most copper jewelry solder is #18 AWG, about 1/3 thinner).
Polly,
My solder keeps beading up and not fusing to, or bonding with my copper. I am using a butane micro torch for heat and a friend told me I was not getting enough heat, to try mapp gas or an oxy acetylene torch, and to heat entire piece before focusing on the joint. What are your thoughts? Also is there a video of this process/ tutorial available?
Thanks
Mack
Copper solder behaves a lot like silver solder, and melts in the same temperature range, so almost all the tips and tutorials you can find on soldering sterling silver, will help you with soldering copper.
How big is the piece you are trying to solder? The bigger the piece, the tougher it is to use a butane torch to heat it evenly and fully enough for solder to flow. I have made a ring with a 10mm cab, on an approx. 15mm disk using my butane torch. A bezel much bigger than that will be very difficult, because of the small flame available from the butane torch.
Yes, your friend is right about heating the entire piece before focusing on the joint.
Other possibilities: Is the piece clean? And do the pieces to be joined fit PERFECTLY together? If not, file them until they align perfectly, and clean them thoroughly. Then slowly heat the entire piece, then focus on the joint and try to **pull** the solder along the joint and a little bit away.
It’s amazing what a bit of filing and shape manipulation will do — neither copper solder nor silver solder is designed to fill gaps.
I would guess it might not be clean. Often it looks clean, but isn’t. use some sandpaper on all pieces you want to join with the solder. I agree with your friend that you need to heat the entire piece and then once it is close focus on the areas your are trying to connect. For videos, I recommend watching Andrew Berry on YouTube.
Today I used the copper wire solder to create a coppering,when I was hammering the ring to size with my leather mallet I found the copper solder join did not hold. When the join was soldered it flowed beautifully with no visible seam. What did I do wrong here?
Thank in advance
Hi Teena,
Copper solder is more brittle than silver solder, so you need to do your hammering before you solder. See the “Caution” in step 12 of Copper Soldering Tutorial Part 2 for some tips. ~Polly
Is copper solder available in South Africa?? I am a goldsmith and also have had much experience with silver and would like to experiment with coper
Hi Valerie,
We are happy to ship copper solder to South Africa. (We can’t ship some chemicals outside North America, but copper solder is safe to ship anywhere in the world.)
~Polly
Have you used copper solder for multiple solders on one piece. For example with silver your use hard, medium, and easy. How will the solder react or hold up if I need to do several steps. Will the first join remelt? Have you used stop-flow on joints. If I had to go with silver solder on other joints, will the copper react more like easy, med., or hard?
Hi Peggy,
Excellent questions. No, I haven’t used copper solder for multiple solders on one piece, and the idea is daunting using just one grade of solder. I would suggest using some of the hard silver solders to make it more feasible.
Easy grade silver solder: 1240°F melting point, 1325°F flow point.
Medium grade silver solder: 1275°F melting point, 1360°F flow point.
Copper solder: 1310°F melting point, 1460°F flow point.
Hard grade silver solder: 1365°F (741°C) melting point.
And to toss a few more into the mix:
Brass wire solder: Melt temperature: 1200°F. Flow temperature: 1330°F.
Bronze wire solder: Melt temperature: 1250°F. Flow temperature: 1410°F.
I haven’t used these last two yet, so I don’t have any good advice on them yet, but they might be better color matches for copper.
All of these solders are in this category:
http://www.rings-things.com/Products/Hard-Jewelry-Solder-Flux-and-Pickle/
~Polly
Peggy, please see the post I added regarding making a piece that has silver components color to copper plate, this might help.
Hi I am so glad I found your page! I am wanting to learn how to solder and make jewelry and I would like to know of your Nickel, Gold Plated, Brass and Bronze wire which one can you solder with a torch. Also can you solder your Brass and Copper tubing to add stones?
Thank you
Jazz
Hi Jazz,
You can (carefully) solder all of those with a torch, but you can’t solder plated items with hard (high-temp) solder. You can only use soft solder for plated items. The “trick” here is that if you gently apply your torch, you can easily melt soft solder (the type of solder you normally use with a soldering iron), as long as you are careful not to overheat either your solder or your items-to-be-joined. I thought we had a blog article on using a torch with soft solder, but I can’t find it right now. Try this for some general info though: http://www.rings-things.com/Learn/Soldering-101/
Yes, it should not be a problem to solder the brass and copper tubing, but I personally haven’t done that since I don’t work with little stones.
You can solder nickel silver with silver solder (hard solder). We have brass and bronze solders, that fairly closely match brass and bronze color. Their solder is hard solder like silver solder and copper solder; they all melt at similar temperatures.
I hope this helps!
~Polly
I’m not really sure if this will help all of you who are having trouble with your copper joins turning a silver color, but it might be worth a shot.
When you solder a silver component to a copper one & want both to look copper, OR if you use a silver solder on copper and want it to look copper, follow these steps:
Take some old bluish-green pickle and place it in a glass jar. Add a piece of iron or steel – NOT STAINLESS – add your piece and put the lid on. The piece will all turn copper plate.
Hope this helps!
That is a great tip, Rae!
p.s. For those who don’t know: This is exactly why you NEVER EVER use steel tongs or tweezers to grab stuff from your normal pickle pot…. you’ll copper plate any silver stuff that you put into the pickle pot afterwards. So using this process intentionally is brilliant.
I’m using copper solder but still get a grey seam showing. How do I avoid this? Is my pickle not hot enough? Do I need to use super pickle?
Hi Michelle,
Try using just plain water instead of pickle. Probably filtered or distilled water, if the water in your area has a lot of unwanted extras like some areas. I wasn’t using pickle at all, and only had a gray seam showing when I globbed on too much solder and then tried filing some off. So I think the pickle might be taking off the surface, like I was doing with my file. ~Polly
Hi Polly, any chance you can tell me where you get your copper solder from? I am in the UK and cannot find it anywhere! I bought some from Ebay and it is so hard I can’t even hammer it flat enough to snip some off! Thanks Tanya
Hi Tanya,
That sounds identical to ours. Copper solder is very brittle. I have not tried hammering it before soldering, but I have hammered the solder join after soldering … and it snapped and I had to re-solder it.
When I’ve needed little snips, I’ve just used heavy-duty cutters (I used my old pair of memory wire cutters because they are rated for cutting steel wire), and snipped off the smallest pieces I could, into a container. Wear eye protection or otherwise use a lot of caution – because it’s so brittle, it’s unpredictable. I know, this isn’t the same as nice neat little pallions of silver solder, but you just aren’t going to be able to get those nice little flat squares with copper solder.
We fabricate copper flowers and wall hangings and also make copper jewelry i think this product would save time and money. Please reply. @hankdouven@yahoo.ca thanks
Hi Hank,
I have replied to the email address you listed…. but haven’t heard back yet! If you have any questions, you are welcome to post the questions here in our blog.
~Polly
What is your resource for copper solder?
Hi Vicki,
https://www.rings-things.com/ sells copper solder in 4-ounce packs (about 55 feet of copper wire solder):
https://www.rings-things.com/Products/Hard-Jewelry-Solder-Flux-and-Pickle/Solder-Copper-Wire.html
18-gauge copper wire for hard soldering. The phosphorous in this copper solder makes it self fluxing (you can use flux if you choose, but it is not required). Melt temperature: 1310°F. Flow temperature: 1460°F. With this temperature range, small items (jump rings, wire bangle bracelets, rings, approx. 10mm bezels, etc.) can easily be soldered with a butane micro torch. The 4-oz pack is approx. 55 feet!
–Polly