

One of these things is not like the others…
Hello, bloglandia! Today, I failed repeatedly at the project I undertook with the Crafted Findings semi-tubular riveting tool. But, as many wise people have stated, wisdom rarely comes from success. It is our failures that we learn the most from. And besides, these particular failures were actually wins in a way.

Top: standard riveting tool. Bottom: Long-reach version.
The riveting tool by Crafted Findings is now available in both regular and long-reach models.* “Long reach” is a misnomer, in my opinion – the tool doesn’t reach any further from the edge of a piece (darn!). Instead, the tool opening is 0.2″ (5mm) “deeper” (taller) which allows thicker pieces to be stacked and riveted together.
The Crafted Findings riveting setup is really quite nifty. When you make rivets the traditional way, there is a lot work involved in making the holes the right size for the rivets, and the rivets the right size and height for the holes. This tool eliminates that challenge. Simply pierce the metal with one side of the tool, then set the rivet with the other side. All the parts are designed to fit perfectly together. Here is a sneak peek at the instruction book included with the tool.
I’ve used the standard tool on several thin brass fairy door pieces, but nothing very thick. So, my goal today was to make something that could only be riveted with the new long reach riveting tool.

Riveted enameled copper ring. I stamped “eternal” on the band – hoping for eternal summer I guess!
First, I made a ring using C-Koop enameled flowers and a 1/4″ strip of copper sheet metal. It seemed like it was fairly thick (about 1/3″ or 9mm at the outside high points), but it actually fit just fine in the standard riveting tool. (I did have to use an eyelet instead of a rivet, though – the longest eyelet available is 7/32″, while the rivets only go up to 5/32″ … [2018 edit: actually, the rivets now go up to 15/32″, almost half an inch!].)

Be gentle when you rivet breakable items – enamel is a coating of glass, so it can crack if you are overly enthusiastic with the rivet tool.
Second, I made a ring using a domed brass disk, a domed copper gear and a strip of copper. Seemed thick! But again, I was able to rivet it together with the standard tool (and a 5/32″ rivet). (My rivet is kinda squashed looking – unfortunately, the only way to rivet rings is with the unfinished side up. [Editor’s Note: now Crafted Findings added a new tool option: the reverse rivet flaring set.] Normally I put the tube side of the rivet on the back of a piece in case it doesn’t look so nice. It is less likely to look squashed if you have the correct length rivet, too. And I learned…**)

Get in Gear – domed copper and brass.
By now I was both pleased and annoyed: pleased that the standard riveting tool is actually quite versatile, yet annoyed that I had failed at my mission. I didn’t want to make my own eyelets from tubing, so my project needed to fit the 7/32″ eyelet, yet be taller than the standard riveting tool.

The coin already had this lovely patina right out of the bag, so I left the raw brass elements plain for contrast.
Third time’s a charm! I stacked a pin back, brass petal wheel, Chinese coin, domed brass gear and a couple rivet accents together for this pin. Too tall for the standard riveting tool, yet short enough at the center to fit a 7/32″ eyelet. Finally!

The back of the pin – just one eyelet secures it all together. No glue!
Once I found the magic combination of parts, I began thinking of all types of designs where the “long reach” riveting tool would be handy. 3/32″ long-reach attachments are coming soon, so if you haven’t purchased a Crafted Findings riveting system yet, I’d recommend getting the long reach version.*** For a couple extra bucks, it will ensure you have the most design options. But, as my failures demonstrate, there is still a lot you can do with the standard riveting tool!

This picture shows the height difference between the long reach and regular riveting tools.
Have you made something with the Crafted Findings riveting tool? We’d love to see pictures! ~Cindy
_________________
*The tool is also available in both 1/16″ and 3/32″ diameter options. I used 1/16″ for all of my examples today, but if you plan to use your eyelet holes as connection points (like for jump rings), get the 3/32″ size components (sold separately). Only very fine gauge wire will fit through the 1/16″ eyelets, and no jump rings that I could find!
** One last riveting tip: if (like me) you choose to not put the Crafted Findings tool into a vise (as the manufacturer recommends), hold it flat on the edge of your tabletop. It will help ensure that everything stays lined up correctly when you flare that rivet!
***Or, if you have the standard/original 1/16″ setup, you could purchase the long-reach body with 3/32″ attachments. The convenience of not swapping out parts will easily pay for the extra tool purchase.
~***~
Here is another riveting suggestion for the Crafted Findings Long Reach Riveting Tool:
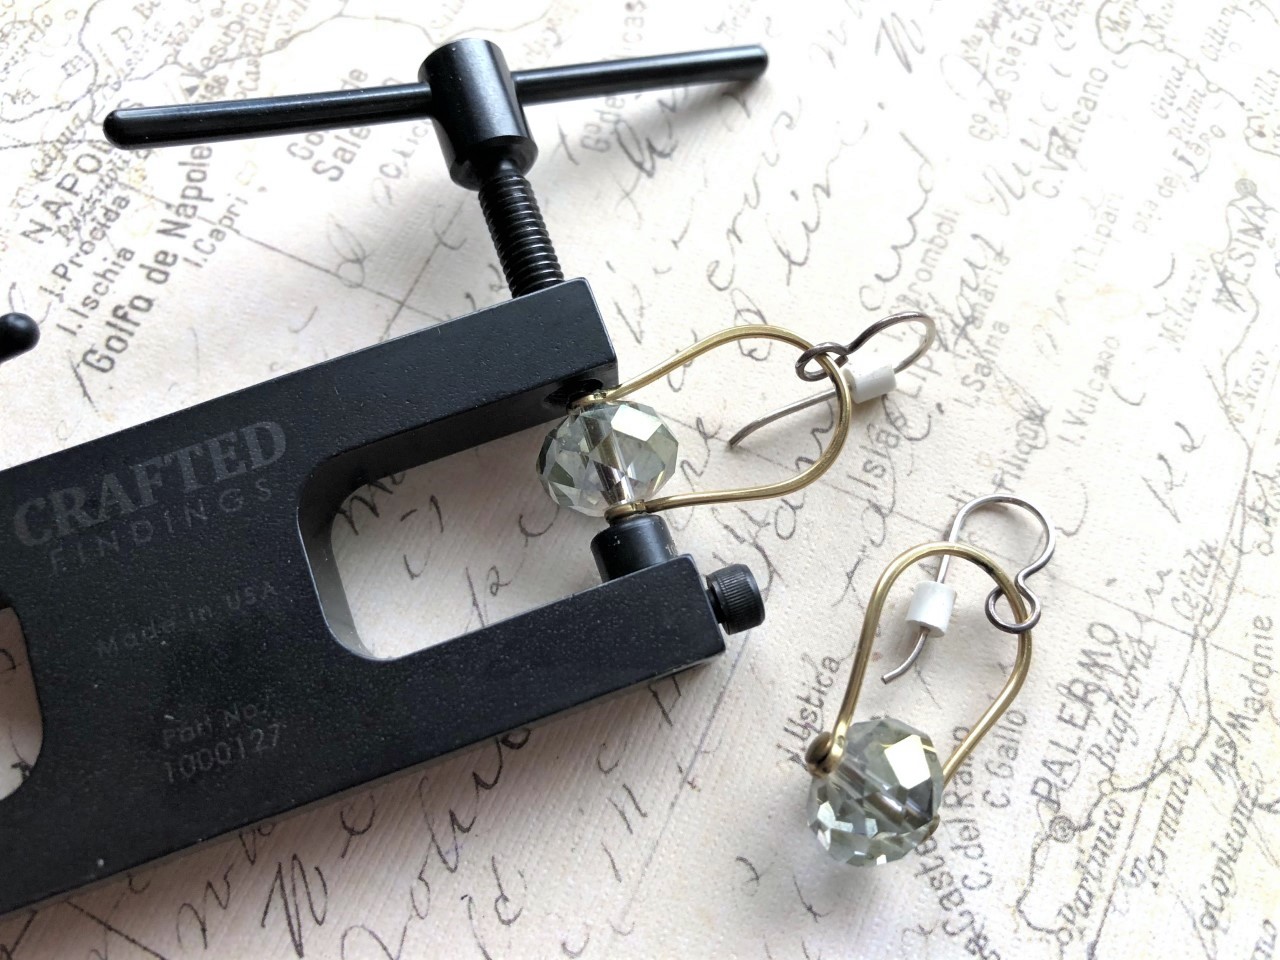
Riveting through a large-hole bead is easy with the long reach riveting tool–even glass beads! Just use the tool to gently tighten down the semi-tubular rivet (no hammering involved).
Mollie

5 Comments
Awesome post! The ring looks really amazing thanks for the share! Keep going…
thank you for testing this tool out and posting about it. can i ask what the diameter is of the outer rim of the setting tip? wondering if it is narrow enough to fit inside some of the components i have…
Hi jewelryvixen – I’m not exactly sure which measurement you are asking about … the “setting tip” is just *slightly* larger than the size rivet or eyelet that it sets, if that is any help!
I purchased this riveting tool. You included a rectangular brass piece. I would love to buy 2 dozen more of these brass pieces if possible.
Hi J.,
What size was the rectangle? I will try to track it down for you.
~P.