I love briolettes! I love them in all shapes, sizes, colors and materials. So what is a briolette? A briolette is a pear or teardrop-shaped bead that is faceted and tip-drilled. Some briolettes are flat and some are round, kind of like a ball that comes to a point on one end. When they are flat, the hole can either be front to back or side to side. No matter the type, briolettes are super versatile and great for making all kinds of beautiful jewelry.

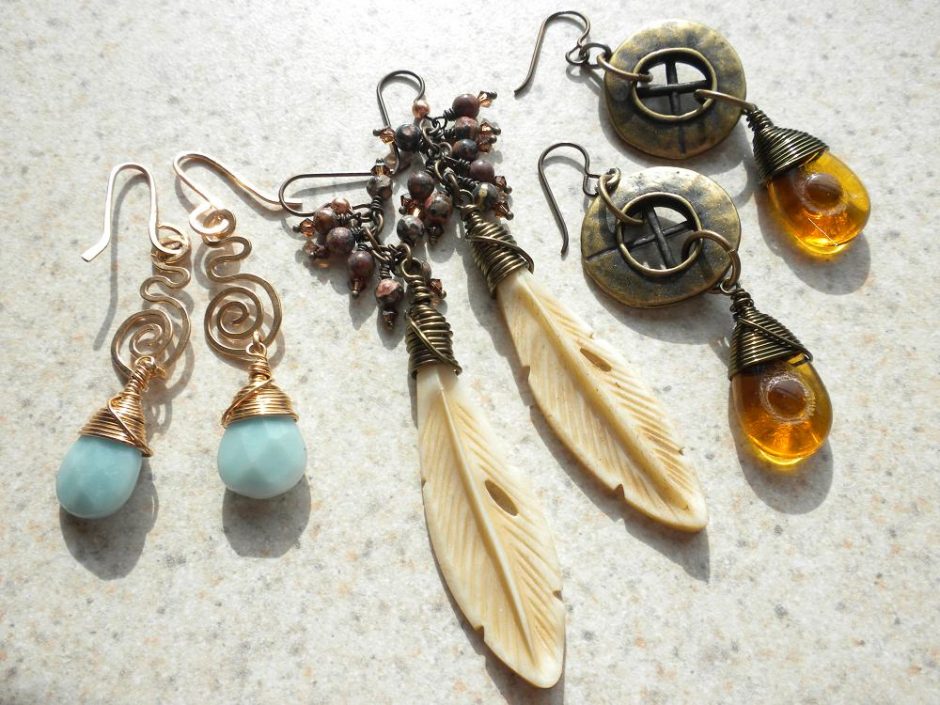
Wire-wrapped Aurora Borealis Swarovski crystal pear pendant earrings – Pear-shaped pendants are another variety of briolette!
There are several great ways to make jewelry using briolettes. You can use pinch bails and triangle bails to simply string them onto necklaces (big ones make great center pendants). Or you can take it to the next level with wire-wrapping! Wire-wrapping a briolette, or any tip-drilled bead or pendant, really transforms a piece into a one-of-kind creation. And though it’s a little tricky to get the hang of at first, the payoff is well worth it.

My favorite wire to work with is 22 gauge Artistic Wire in Antique Brass finish. The color of this wire looks great paired with antique brass findings such as those found in the Vintaj line.
The first thing to consider when wire-wrapping is what kind of wire you want to use. If you are new to wire -wrapping I recommend using an inexpensive Artistic Wire to practice. Anything from a 20 gauge to a 24 gauge works well. (20 gauge being the thickest, 24 gauge being the thinnest, and 22 gauge in the middle). Because this technique takes practice, it is good to learn on an affordable wire, since you will inevitably have to re-do your wraps several times to reach perfection.

An assortment of briolettes in crystal and gemstones
The next thing to consider is the briolette that you want to wrap. Flat shapes are the easiest to learn on because the edge on the pendant will hold your wire in place better. It is also good to start with a larger briolette, something that is over 15mm in length is ideal.
To begin you will need your choice of briolette, plus jewelry wire, round-nose pliers, chain-nose pliers, and a semi-flush cutter.

1. Cut a piece of wire about 18 inches in length. It is better to have too much wire than too little. On one side of the wire, create a bend of about 45 degrees using your chain nose pliers two inches in.

2. Slide your briolette down the wire until it is snug against the angle you have made in the wire.

3. Bring the long side of the wire up and using your chain nose pliers, and pinch the two pieces of wire together snugly against the point of the briolette.
")
(Alternate view of step 3)

4. Take the longer piece of wire and fold it over so it is horizontal. The short piece of wire should be vertical from the center of the top of the briolette and the long piece of wire should be perpendicular to the short piece. Begin wrapping the long piece of wire around the short piece, using your finger to guide the wire and keep it snug.

5. Slowly work the wire downward. Let the previous wire guide you down the briolette. I like to wrap the wire down until you have covered the hole in the briolette, but it is your preference.

6. Once you have wrapped down the pendant as far as you like, you want to bring that wire back up to the top of the pendant to secure it. The easiest way to do this is in one swift movement, using your finger to guide the wire after you come around an edge on the briolette. Wrap the wire around the shorter segment of wire at the top a few times to secure your wrap in place.

7. Use your semi-flush cutters to cut the wire short, and use your chain nose pliers to tuck any excess wire.

8. You are now left with a wrapped briolette that has a 2 inch piece of wire coming out vertically from the center of the pendant. Simply use your round nose pliers to make a wrapped loop with this piece of wire. Again use your semi-flush cutters to trim the excess wire and use your chain nose pliers to tuck the excess piece of wire.

Finished wire-wrapped briolette!
Now you can take your completed piece and add it your jewelry however you like! Pair it with some sparkly crystals or use a wire wrapped briolette as a large focal pendant on a necklace. The possibilities are endless. Once you get your wire wrapping skills down, you can wrap all different beads and pendants that are tip-drilled.

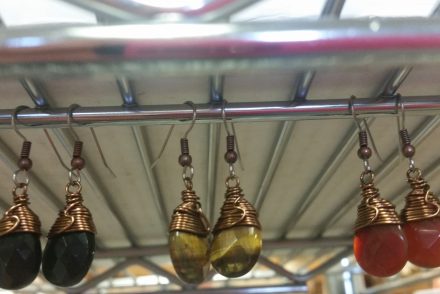
Completed Wire-wrapped Briolettes

Wire-wrapped Briolettes topped off with clusters of Swarovski Crystal Rondelles!

Wire-wrapped bone pendants, amazonite gemstone briolettes with bronze wire, and Czech Glass Teardrops with antique bronze buttons from the craft store!
Please feel free to ask any questions you may have about wire-wrapping or any of the beads pictured here! Have fun wrapping!
Tiffany

33 Comments
Those earrings are fabulous! They are downright inspiring, I am going to write about this post on my blog. http://gemtrails.blogspot.com/
very nice tutorial and very nice wraps!
Such a clear and thorough tutorial! Very good photos 🙂
Well done, Tiffany, I like having nice big pictures to see detailed work like this wire wrapping. Glad we finally got this blogged!
Very consise clear tutorial. Well done!
AWESOME tutorial, Tiffany!!!
Are you using chain on top of the when you top them off with clusters of swarovski crystal rondelles?briolettes
Joni,
I simply used 5mm antique brass jump rings and attached two rondelles to each jump ring. I used our ball end headpins to hang the crystal rondelles. You could certainly use chain here though instead of jump rings. Use a chain with consistent links that are about 3x5mm or 4x6mm in size. Good luck! 🙂
Tiffany
Thanks for the quick response. I’m going to try it right now.
What a great tutorial. Thanks for sharing 🙂
Hi! Great tute! I will be linking at http://www.handmade-jewelry-club.com/ in future post.
Thanks!
Jane
http://www.handmade-jewelry-club.com/
Thank you SO much! I’ve been practicing my little fingers to the bone trying to get this technique right. Now I actually know what I’m doing. I can’t wait to try your way and see what happens. Thank you, thank you, thank you. 🙂
Thank you Tiffany!! I love wire wrapping but I am still trying to get the hang of it. My Husband makes is look like a breeze like you do! No worries though I have not given up. You helped me to understand the process better.
Thanks for the tutorial! I saw you demo this at the Rings and Things sale in the Valley and wasn’t sure that I would use the technique! But I bought some briolettes and wanted to give it a try! Of course I couldn’t remember what you did and how you made it look so easy! The tutorial was great and a great reminder of your demo!
I love this tutorial, it was passed on to me through Pinterest. I would like to know if you have a tutorial on how you made the wire shapes above the Amazonite Briolettes with Bronze wire earrings? I can do some shapes but yours are so crisp and exact…any tips? Thanks so much for sharing your time and your talents, it is much appreciated.
Mary, I just used 18 gauge wire to create the shapes. I used round nose pliers to make the swirls and to make the design really smooth looking I pounded them flat on a steel block. If you want to make a matching pair for earrings, make sure you cut both pieces of wire the same size before you begin. Also, you can draw the design on a piece of paper and then try to make your wire line up with the design. I hope this helps!
Tiffany
Thanks for the tutorial Tiffany, it is exactly what I wanted to learn about. I am about to try my first wire wrapped briolette!
Hi Sharon, I hope it turned out great!
I also love briolettes The tutorial is perfect. So easy to follow. Thanks!
Aha, this answers the question I’ve always had about this type of wire-wrapped bead cap — namely, what do you do with the end of the wire when you’ve wrapped it down as far as you want to go? The pictures in bead magazines never show you the back of the wrap, with the wire coming back up to the top! Thank you for this.
Best wrapping Tutorial i’ve seen yet!
(and i’ve watched loads). 😉
Excellent!
Thank you so much! This tutorial is great!!! I am so happy!!! When I am able and my pocket allows it, I hope to buy supplies from your company. A simple, yet much needed tutorial as this is a perk to make a purchase!!!
Without a doubt the very best brio wrapping tutorial I have found. Every step is clearly laid out with clear photos in just the right places. Wonderful inspirations for other ideas, too.
Thanks Nancy!
What color and gauge is the artistic wire shown on the green briolette?
The wire I used on that briolette is 22 gauge non-tarnish silver plated artistic wire. Here is the link 🙂
https://www.rings-things.com/Products/22-Gauge-Artistic-Wire-reg/Artistic-Wire-reg-Silver-Plated-Copper-Jewelry-Wire-22ga-30ft.html
This link doesn’t work. I can’t seem to find it in a search either. Is it still available?
Another must is to use dead soft wire. I used copper wire.
Hi Raylene, It’s fixed now, thanks! We upgraded our website in 2015 and a bunch of the previous links no longer work. ~Polly
What can I do with undrilled briolettes? I didnt realize they werent drilled when I bought them but they are so beautiful ( sapphires) that i figured there must be something I can make with them or if there isnt then is there a way i can drill them myself or have it done somewhere? Im new to this so any suggestions would be helpful. Thanks a bunch!
Hi,
I think your best bet would be to take a local wire working class (the more in-depth types of wire working that are basically a form of setting stones). I have to admit none of us at Rings & Things do that type of wire work, or I would offer up a more concrete “make this” type of answer =)
If none of your local bead stores offer this type of class, see if you have a local rockhound / lapidary group to join – they often have classes, and I know they’d love to see your briolettes! Also, seed bead weavers have some great techniques for capturing no-hole stones — usually round stones or flat cabochons, but I bet some of the techniques can be modified. But I think your best bet is wire. Seed beading hides some of the item, and it would probably hide too much of your briolettes. ~Polly
Hey,
Nice job with your earring design. i originally wrapped to perfection!!! Then my customers (close ones) showed me examples of “roughly/inaccurately” wired ones that they preferred. Lately I’ve mostly done rough wired and “tucked” the end in a run or two from the bottom.
This is a great tutorial on wire wrapping briolettes, thank you