null

Head & Eye Pins

Shop head and eye pins, essentials for making your own jewelry. Choose plain or fancy, ball-end, sterling silver, raw copper, bright gold plate, black gunmetal and more. Wholesale price options.

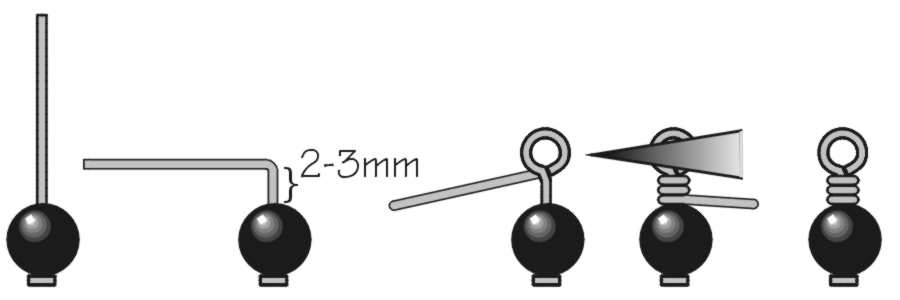
Head pins are one of the most frequently used jewelry findings around and are many a jewelry maker's best pal. Basically, a headpin is a piece of wire with a "head" (stopper) at one end that stops beads from sliding off. Once beads are strung onto your head pin, use jewelry pliers to make either a simple loop or wrapped loop with the remaining length of wire. Head pins allow you to make your own beady charms to add to bracelets, necklaces, earrings, and (let's face it) just about anything else you want to adorn!

Use eye pins to make your own beaded charms and dangles, create links to make rosaries and handmade chain, and to connect separate jewelry components together.


Choose from several sizes, metals and styles of these basic jewelry findings. Keep in mind that the larger the gauge number, the thinner the wire.

  • 20-gauge (0.032", 0.813mm) is Heavy
  • 21-gauge (0.029", 0.737mm) is Standard diameter
  • 22-gauge (0.025", 0.635mm) is Thin
  • 24-gauge (0.020", 0.508mm) is Extra Thin

Filters
  • Product
  • Qty in Cart
  • Quantity
  • Price
  • Subtotal
  • This unprecedented, patented material is redefining the jewelry  industry. Argentium sterling silver has dramatically better tarnish  resistance than standard sterling silver and is much more durable.  While it still contains the 92.5% fine silver legally required for  sterling, Argentium replaces about 1% of the normal copper content  in sterling with germanium, significantly altering the alloy's  properties.   Benefits of Argentium® Sterling  Silver      Tarnish resistant: A light dusting or  occasional wipe with a soft cloth is all you need to keep its  shine. The resistance actually increases over time (the germanium  atoms migrate to the surface, which allows the protective germanium  oxide layer to regenerate).    Resistant to dents, scratches and  abrasion.    Better for the environment because it doesn't  develop firescale (a reddish patina) when heated, which eliminates  processes that use hazardous materials needed to strip firescale  from standard sterling materials.    Laser weldable, opening new design  possibilities.    Can be hardened (through thermal conditioning)  to be almost twice as tough as standard sterling.    See Related Products links (below) for similar items and additional jewelry-making supplies that are often used with this item.

    Argentium Sterling Silver Head Pin, 1", 0.020" Diameter (10 Pieces)

    $1.44
    This unprecedented, patented material is redefining the jewelry industry. Argentium sterling silver has dramatically better tarnish resistance than standard sterling silver and is much more durable. While it still contains the 92.5% fine silver...
    Qty in Cart: 0
    Quantity:
    Price:
    $1.44
    Subtotal:
  •      Basic Loops         The loop size will depend on how much wire you leave past the  end of your beads, and around which part of your pliers you bend  the loop. A good loop size is usually about 1/3 of the way from the  tip of your pliers, with about 8mm of wire.    Use round needle-nose pliers.    If using an eye pin, decide which way you want the loop to go -  the same direction as the premade loop on the other end, or  90º off. Keep this direction in mind as you bend the rest of  the wire.    Cut off any excess wire (we suggest retaining 8mm above the top  of your beads).    Grip the pin just above the top bead (at the arrow above), and  bend the wire sharply toward you.    Grasp the tip of the wire with pliers, and bend smoothly away  from you, around the pliers.               Wrapped Loops       Use chain-nose pliers to grasp the wire just above the top of  the bead.    Use your fingers to bend the wire sharply over the top of the  pliers, at a 90° angle. You should have 2-3mm of straight wire  between the bead and the bend.    Use round-nose pliers to grasp a spot just above the bend, and  use your fingers to smoothly bend the wire all the way around the  tip of the pliers.    Now use pliers to grasp the wire firmly across the loop. Use  your fingers or chain-nose pliers to carefully wrap the wire around  the stem. For best control, experts recommend you break this step  into a series of half wraps.    Trim excess with flush cutters.                See Related Products links (below) for similar items and additional jewelry-making supplies that are often used with this item.

    Antiqued Copper Plated Ball End Head Pin, Standard, 1" (100 Pieces)

    $3.30
    Basic Loops The loop size will depend on how much wire you leave past the end of your beads, and around which part of your pliers you bend the loop. A good loop size is usually about 1/3 of the way from the tip of your pliers, with about...
    Qty in Cart: 0
    Quantity:
    Price:
    $3.30
    Subtotal:
  •      Basic Loops         The loop size will depend on how much wire you leave past the  end of your beads, and around which part of your pliers you bend  the loop. A good loop size is usually about 1/3 of the way from the  tip of your pliers, with about 8mm of wire.    Use round needle-nose pliers.    If using an eye pin, decide which way you want the loop to go -  the same direction as the premade loop on the other end, or  90º off. Keep this direction in mind as you bend the rest of  the wire.    Cut off any excess wire (we suggest retaining 8mm above the top  of your beads).    Grip the pin just above the top bead (at the arrow above), and  bend the wire sharply toward you.    Grasp the tip of the wire with pliers, and bend smoothly away  from you, around the pliers.               Wrapped Loops       Use chain-nose pliers to grasp the wire just above the top of  the bead.    Use your fingers to bend the wire sharply over the top of the  pliers, at a 90° angle. You should have 2-3mm of straight wire  between the bead and the bend.    Use round-nose pliers to grasp a spot just above the bend, and  use your fingers to smoothly bend the wire all the way around the  tip of the pliers.    Now use pliers to grasp the wire firmly across the loop. Use  your fingers or chain-nose pliers to carefully wrap the wire around  the stem. For best control, experts recommend you break this step  into a series of half wraps.    Trim excess with flush cutters.                See Related Products links (below) for similar items and additional jewelry-making supplies that are often used with this item.

    Gunmetal Head Pin, 7/8", Thin (ounce)

    $9.01
    Basic Loops The loop size will depend on how much wire you leave past the end of your beads, and around which part of your pliers you bend the loop. A good loop size is usually about 1/3 of the way from the tip of your pliers, with about...
    Qty in Cart: 0
    Quantity:
    Price:
    $9.01
    Subtotal:
  •      Basic Loops         The loop size will depend on how much wire you leave past the  end of your beads, and around which part of your pliers you bend  the loop. A good loop size is usually about 1/3 of the way from the  tip of your pliers, with about 8mm of wire.    Use round needle-nose pliers.    If using an eye pin, decide which way you want the loop to go -  the same direction as the premade loop on the other end, or  90º off. Keep this direction in mind as you bend the rest of  the wire.    Cut off any excess wire (we suggest retaining 8mm above the top  of your beads).    Grip the pin just above the top bead (at the arrow above), and  bend the wire sharply toward you.    Grasp the tip of the wire with pliers, and bend smoothly away  from you, around the pliers.               Wrapped Loops       Use chain-nose pliers to grasp the wire just above the top of  the bead.    Use your fingers to bend the wire sharply over the top of the  pliers, at a 90° angle. You should have 2-3mm of straight wire  between the bead and the bend.    Use round-nose pliers to grasp a spot just above the bend, and  use your fingers to smoothly bend the wire all the way around the  tip of the pliers.    Now use pliers to grasp the wire firmly across the loop. Use  your fingers or chain-nose pliers to carefully wrap the wire around  the stem. For best control, experts recommend you break this step  into a series of half wraps.    Trim excess with flush cutters.                See Related Products links (below) for similar items and additional jewelry-making supplies that are often used with this item.      Basic Loops         The loop size will depend on how much wire you leave past the  end of your beads, and around which part of your pliers you bend  the loop. A good loop size is usually about 1/3 of the way from the  tip of your pliers, with about 8mm of wire.    Use round needle-nose pliers.    If using an eye pin, decide which way you want the loop to go -  the same direction as the premade loop on the other end, or  90º off. Keep this direction in mind as you bend the rest of  the wire.    Cut off any excess wire (we suggest retaining 8mm above the top  of your beads).    Grip the pin just above the top bead (at the arrow above), and  bend the wire sharply toward you.    Grasp the tip of the wire with pliers, and bend smoothly away  from you, around the pliers.               Wrapped Loops       Use chain-nose pliers to grasp the wire just above the top of  the bead.    Use your fingers to bend the wire sharply over the top of the  pliers, at a 90° angle. You should have 2-3mm of straight wire  between the bead and the bend.    Use round-nose pliers to grasp a spot just above the bend, and  use your fingers to smoothly bend the wire all the way around the  tip of the pliers.    Now use pliers to grasp the wire firmly across the loop. Use  your fingers or chain-nose pliers to carefully wrap the wire around  the stem. For best control, experts recommend you break this step  into a series of half wraps.    Trim excess with flush cutters.                See Related Products links (below) for similar items and additional jewelry-making supplies that are often used with this item.

    Gunmetal Eye Pin, 2", Standard (ounce)

    $9.57
    Basic Loops The loop size will depend on how much wire you leave past the end of your beads, and around which part of your pliers you bend the loop. A good loop size is usually about 1/3 of the way from the tip of your pliers, with about...
    Qty in Cart: 0
    Price:
    $9.57
    Subtotal:
  • This unprecedented, patented material is redefining the jewelry  industry. Argentium sterling silver has dramatically better tarnish  resistance than standard sterling silver and is much more durable.  While it still contains the 92.5% fine silver legally required for  sterling, Argentium replaces about 1% of the normal copper content  in sterling with germanium, significantly altering the alloy's  properties.   Benefits of Argentium® Sterling  Silver      Tarnish resistant: A light dusting or  occasional wipe with a soft cloth is all you need to keep its  shine. The resistance actually increases over time (the germanium  atoms migrate to the surface, which allows the protective germanium  oxide layer to regenerate).    Resistant to dents, scratches and  abrasion.    Better for the environment because it doesn't  develop firescale (a reddish patina) when heated, which eliminates  processes that use hazardous materials needed to strip firescale  from standard sterling materials.    Laser weldable, opening new design  possibilities.    Can be hardened (through thermal conditioning)  to be almost twice as tough as standard sterling.    See Related Products links (below) for similar items and additional jewelry-making supplies that are often used with this item.

    Argentium Sterling Silver Eye Pin, 1-1/2", 0.025" Diameter (10 Pieces)

    $6.19
    This unprecedented, patented material is redefining the jewelry industry. Argentium sterling silver has dramatically better tarnish resistance than standard sterling silver and is much more durable. While it still contains the 92.5% fine silver...
    Qty in Cart: 0
    Quantity:
    Price:
    $6.19
    Subtotal:
  • See Related Products links (below) for similar items and additional jewelry-making supplies that are often used with this item. (At the top of the "Head Pins & Eye Pins" page, you'll find instructions on finishing the ends.)   Green Silver  All our sterling silver items are nickel free. And this sterling silver item is even better! This item is made from environmentally responsible green silver. See Related Products links (below) for similar items and additional jewelry-making supplies that are often used with this item. (At the top of the "Head Pins & Eye Pins" page, you'll find instructions on finishing the ends.)   Green Silver  All our sterling silver items are nickel free. And this sterling silver item is even better! This item is made from environmentally responsible green silver.

    Sterling Silver Eye Pin, 1-1/2", 0.020" Diameter (10 Pieces)

    $2.60
    See Related Products links (below) for similar items and additional jewelry-making supplies that are often used with this item. (At the top of the "Head Pins & Eye Pins" page, you'll find instructions on finishing the ends.) Green Silver All our...
    Qty in Cart: 0
    Quantity:
    Price:
    $2.60
    Subtotal:
  •      Basic Loops         The loop size will depend on how much wire you leave past the  end of your beads, and around which part of your pliers you bend  the loop. A good loop size is usually about 1/3 of the way from the  tip of your pliers, with about 8mm of wire.    Use round needle-nose pliers.    If using an eye pin, decide which way you want the loop to go -  the same direction as the premade loop on the other end, or  90º off. Keep this direction in mind as you bend the rest of  the wire.    Cut off any excess wire (we suggest retaining 8mm above the top  of your beads).    Grip the pin just above the top bead (at the arrow above), and  bend the wire sharply toward you.    Grasp the tip of the wire with pliers, and bend smoothly away  from you, around the pliers.               Wrapped Loops       Use chain-nose pliers to grasp the wire just above the top of  the bead.    Use your fingers to bend the wire sharply over the top of the  pliers, at a 90° angle. You should have 2-3mm of straight wire  between the bead and the bend.    Use round-nose pliers to grasp a spot just above the bend, and  use your fingers to smoothly bend the wire all the way around the  tip of the pliers.    Now use pliers to grasp the wire firmly across the loop. Use  your fingers or chain-nose pliers to carefully wrap the wire around  the stem. For best control, experts recommend you break this step  into a series of half wraps.    Trim excess with flush cutters.                See Related Products links (below) for similar items and additional jewelry-making supplies that are often used with this item.

    Antiqued Brass Plated Ball End Head Pin, Standard, 1" (100 Pieces)

    $3.30
    Basic Loops The loop size will depend on how much wire you leave past the end of your beads, and around which part of your pliers you bend the loop. A good loop size is usually about 1/3 of the way from the tip of your pliers, with about...
    Qty in Cart: 0
    Quantity:
    Price:
    $3.30
    Subtotal:
  •      Basic Loops         The loop size will depend on how much wire you leave past the  end of your beads, and around which part of your pliers you bend  the loop. A good loop size is usually about 1/3 of the way from the  tip of your pliers, with about 8mm of wire.    Use round needle-nose pliers.    If using an eye pin, decide which way you want the loop to go -  the same direction as the premade loop on the other end, or  90º off. Keep this direction in mind as you bend the rest of  the wire.    Cut off any excess wire (we suggest retaining 8mm above the top  of your beads).    Grip the pin just above the top bead (at the arrow above), and  bend the wire sharply toward you.    Grasp the tip of the wire with pliers, and bend smoothly away  from you, around the pliers.               Wrapped Loops       Use chain-nose pliers to grasp the wire just above the top of  the bead.    Use your fingers to bend the wire sharply over the top of the  pliers, at a 90° angle. You should have 2-3mm of straight wire  between the bead and the bend.    Use round-nose pliers to grasp a spot just above the bend, and  use your fingers to smoothly bend the wire all the way around the  tip of the pliers.    Now use pliers to grasp the wire firmly across the loop. Use  your fingers or chain-nose pliers to carefully wrap the wire around  the stem. For best control, experts recommend you break this step  into a series of half wraps.    Trim excess with flush cutters.                See Related Products links (below) for similar items and additional jewelry-making supplies that are often used with this item.      Basic Loops         The loop size will depend on how much wire you leave past the  end of your beads, and around which part of your pliers you bend  the loop. A good loop size is usually about 1/3 of the way from the  tip of your pliers, with about 8mm of wire.    Use round needle-nose pliers.    If using an eye pin, decide which way you want the loop to go -  the same direction as the premade loop on the other end, or  90º off. Keep this direction in mind as you bend the rest of  the wire.    Cut off any excess wire (we suggest retaining 8mm above the top  of your beads).    Grip the pin just above the top bead (at the arrow above), and  bend the wire sharply toward you.    Grasp the tip of the wire with pliers, and bend smoothly away  from you, around the pliers.               Wrapped Loops       Use chain-nose pliers to grasp the wire just above the top of  the bead.    Use your fingers to bend the wire sharply over the top of the  pliers, at a 90° angle. You should have 2-3mm of straight wire  between the bead and the bend.    Use round-nose pliers to grasp a spot just above the bend, and  use your fingers to smoothly bend the wire all the way around the  tip of the pliers.    Now use pliers to grasp the wire firmly across the loop. Use  your fingers or chain-nose pliers to carefully wrap the wire around  the stem. For best control, experts recommend you break this step  into a series of half wraps.    Trim excess with flush cutters.                See Related Products links (below) for similar items and additional jewelry-making supplies that are often used with this item.

    Antiqued Brass Plated Head Pin, 2", Standard (ounce)

    $7.77
    Basic Loops The loop size will depend on how much wire you leave past the end of your beads, and around which part of your pliers you bend the loop. A good loop size is usually about 1/3 of the way from the tip of your pliers, with about...
    Qty in Cart: 0
    Price:
    $7.77
    Subtotal:
  •      Basic Loops         The loop size will depend on how much wire you leave past the  end of your beads, and around which part of your pliers you bend  the loop. A good loop size is usually about 1/3 of the way from the  tip of your pliers, with about 8mm of wire.    Use round needle-nose pliers.    If using an eye pin, decide which way you want the loop to go -  the same direction as the premade loop on the other end, or  90º off. Keep this direction in mind as you bend the rest of  the wire.    Cut off any excess wire (we suggest retaining 8mm above the top  of your beads).    Grip the pin just above the top bead (at the arrow above), and  bend the wire sharply toward you.    Grasp the tip of the wire with pliers, and bend smoothly away  from you, around the pliers.               Wrapped Loops       Use chain-nose pliers to grasp the wire just above the top of  the bead.    Use your fingers to bend the wire sharply over the top of the  pliers, at a 90° angle. You should have 2-3mm of straight wire  between the bead and the bend.    Use round-nose pliers to grasp a spot just above the bend, and  use your fingers to smoothly bend the wire all the way around the  tip of the pliers.    Now use pliers to grasp the wire firmly across the loop. Use  your fingers or chain-nose pliers to carefully wrap the wire around  the stem. For best control, experts recommend you break this step  into a series of half wraps.    Trim excess with flush cutters.                See Related Products links (below) for similar items and additional jewelry-making supplies that are often used with this item.      Basic Loops         The loop size will depend on how much wire you leave past the  end of your beads, and around which part of your pliers you bend  the loop. A good loop size is usually about 1/3 of the way from the  tip of your pliers, with about 8mm of wire.    Use round needle-nose pliers.    If using an eye pin, decide which way you want the loop to go -  the same direction as the premade loop on the other end, or  90º off. Keep this direction in mind as you bend the rest of  the wire.    Cut off any excess wire (we suggest retaining 8mm above the top  of your beads).    Grip the pin just above the top bead (at the arrow above), and  bend the wire sharply toward you.    Grasp the tip of the wire with pliers, and bend smoothly away  from you, around the pliers.               Wrapped Loops       Use chain-nose pliers to grasp the wire just above the top of  the bead.    Use your fingers to bend the wire sharply over the top of the  pliers, at a 90° angle. You should have 2-3mm of straight wire  between the bead and the bend.    Use round-nose pliers to grasp a spot just above the bend, and  use your fingers to smoothly bend the wire all the way around the  tip of the pliers.    Now use pliers to grasp the wire firmly across the loop. Use  your fingers or chain-nose pliers to carefully wrap the wire around  the stem. For best control, experts recommend you break this step  into a series of half wraps.    Trim excess with flush cutters.                See Related Products links (below) for similar items and additional jewelry-making supplies that are often used with this item.

    Yellow Plated Head Pin, 1-1/2", Thin (Pack)

    $6.89
    Basic Loops The loop size will depend on how much wire you leave past the end of your beads, and around which part of your pliers you bend the loop. A good loop size is usually about 1/3 of the way from the tip of your pliers, with about...
    Qty in Cart: 0
    Price:
    $6.89
    Subtotal:
  •      Basic Loops         The loop size will depend on how much wire you leave past the  end of your beads, and around which part of your pliers you bend  the loop. A good loop size is usually about 1/3 of the way from the  tip of your pliers, with about 8mm of wire.    Use round needle-nose pliers.    If using an eye pin, decide which way you want the loop to go -  the same direction as the premade loop on the other end, or  90º off. Keep this direction in mind as you bend the rest of  the wire.    Cut off any excess wire (we suggest retaining 8mm above the top  of your beads).    Grip the pin just above the top bead (at the arrow above), and  bend the wire sharply toward you.    Grasp the tip of the wire with pliers, and bend smoothly away  from you, around the pliers.               Wrapped Loops       Use chain-nose pliers to grasp the wire just above the top of  the bead.    Use your fingers to bend the wire sharply over the top of the  pliers, at a 90° angle. You should have 2-3mm of straight wire  between the bead and the bend.    Use round-nose pliers to grasp a spot just above the bend, and  use your fingers to smoothly bend the wire all the way around the  tip of the pliers.    Now use pliers to grasp the wire firmly across the loop. Use  your fingers or chain-nose pliers to carefully wrap the wire around  the stem. For best control, experts recommend you break this step  into a series of half wraps.    Trim excess with flush cutters.                See Related Products links (below) for similar items and additional jewelry-making supplies that are often used with this item.

    Antiqued Pewter Plated Head Pin, 1-1/2", Thin (Pack)

    $8.55
    Basic Loops The loop size will depend on how much wire you leave past the end of your beads, and around which part of your pliers you bend the loop. A good loop size is usually about 1/3 of the way from the tip of your pliers, with about...
    Qty in Cart: 0
    Price:
    $8.55
    Subtotal:
  •      Basic Loops         The loop size will depend on how much wire you leave past the  end of your beads, and around which part of your pliers you bend  the loop. A good loop size is usually about 1/3 of the way from the  tip of your pliers, with about 8mm of wire.    Use round needle-nose pliers.    If using an eye pin, decide which way you want the loop to go -  the same direction as the premade loop on the other end, or  90º off. Keep this direction in mind as you bend the rest of  the wire.    Cut off any excess wire (we suggest retaining 8mm above the top  of your beads).    Grip the pin just above the top bead (at the arrow above), and  bend the wire sharply toward you.    Grasp the tip of the wire with pliers, and bend smoothly away  from you, around the pliers.               Wrapped Loops       Use chain-nose pliers to grasp the wire just above the top of  the bead.    Use your fingers to bend the wire sharply over the top of the  pliers, at a 90° angle. You should have 2-3mm of straight wire  between the bead and the bend.    Use round-nose pliers to grasp a spot just above the bend, and  use your fingers to smoothly bend the wire all the way around the  tip of the pliers.    Now use pliers to grasp the wire firmly across the loop. Use  your fingers or chain-nose pliers to carefully wrap the wire around  the stem. For best control, experts recommend you break this step  into a series of half wraps.    Trim excess with flush cutters.                See Related Products links (below) for similar items and additional jewelry-making supplies that are often used with this item.      Basic Loops         The loop size will depend on how much wire you leave past the  end of your beads, and around which part of your pliers you bend  the loop. A good loop size is usually about 1/3 of the way from the  tip of your pliers, with about 8mm of wire.    Use round needle-nose pliers.    If using an eye pin, decide which way you want the loop to go -  the same direction as the premade loop on the other end, or  90º off. Keep this direction in mind as you bend the rest of  the wire.    Cut off any excess wire (we suggest retaining 8mm above the top  of your beads).    Grip the pin just above the top bead (at the arrow above), and  bend the wire sharply toward you.    Grasp the tip of the wire with pliers, and bend smoothly away  from you, around the pliers.               Wrapped Loops       Use chain-nose pliers to grasp the wire just above the top of  the bead.    Use your fingers to bend the wire sharply over the top of the  pliers, at a 90° angle. You should have 2-3mm of straight wire  between the bead and the bend.    Use round-nose pliers to grasp a spot just above the bend, and  use your fingers to smoothly bend the wire all the way around the  tip of the pliers.    Now use pliers to grasp the wire firmly across the loop. Use  your fingers or chain-nose pliers to carefully wrap the wire around  the stem. For best control, experts recommend you break this step  into a series of half wraps.    Trim excess with flush cutters.                See Related Products links (below) for similar items and additional jewelry-making supplies that are often used with this item.

    Silver Plated Eye Pin, 7/8", Thin (ounce)

    $6.41
    Basic Loops The loop size will depend on how much wire you leave past the end of your beads, and around which part of your pliers you bend the loop. A good loop size is usually about 1/3 of the way from the tip of your pliers, with about...
    Qty in Cart: 0
    Price:
    $6.41
    Subtotal:
  •      Basic Loops         The loop size will depend on how much wire you leave past the  end of your beads, and around which part of your pliers you bend  the loop. A good loop size is usually about 1/3 of the way from the  tip of your pliers, with about 8mm of wire.    Use round needle-nose pliers.    If using an eye pin, decide which way you want the loop to go -  the same direction as the premade loop on the other end, or  90º off. Keep this direction in mind as you bend the rest of  the wire.    Cut off any excess wire (we suggest retaining 8mm above the top  of your beads).    Grip the pin just above the top bead (at the arrow above), and  bend the wire sharply toward you.    Grasp the tip of the wire with pliers, and bend smoothly away  from you, around the pliers.               Wrapped Loops       Use chain-nose pliers to grasp the wire just above the top of  the bead.    Use your fingers to bend the wire sharply over the top of the  pliers, at a 90° angle. You should have 2-3mm of straight wire  between the bead and the bend.    Use round-nose pliers to grasp a spot just above the bend, and  use your fingers to smoothly bend the wire all the way around the  tip of the pliers.    Now use pliers to grasp the wire firmly across the loop. Use  your fingers or chain-nose pliers to carefully wrap the wire around  the stem. For best control, experts recommend you break this step  into a series of half wraps.    Trim excess with flush cutters.                See Related Products links (below) for similar items and additional jewelry-making supplies that are often used with this item.      Basic Loops         The loop size will depend on how much wire you leave past the  end of your beads, and around which part of your pliers you bend  the loop. A good loop size is usually about 1/3 of the way from the  tip of your pliers, with about 8mm of wire.    Use round needle-nose pliers.    If using an eye pin, decide which way you want the loop to go -  the same direction as the premade loop on the other end, or  90º off. Keep this direction in mind as you bend the rest of  the wire.    Cut off any excess wire (we suggest retaining 8mm above the top  of your beads).    Grip the pin just above the top bead (at the arrow above), and  bend the wire sharply toward you.    Grasp the tip of the wire with pliers, and bend smoothly away  from you, around the pliers.               Wrapped Loops       Use chain-nose pliers to grasp the wire just above the top of  the bead.    Use your fingers to bend the wire sharply over the top of the  pliers, at a 90° angle. You should have 2-3mm of straight wire  between the bead and the bend.    Use round-nose pliers to grasp a spot just above the bend, and  use your fingers to smoothly bend the wire all the way around the  tip of the pliers.    Now use pliers to grasp the wire firmly across the loop. Use  your fingers or chain-nose pliers to carefully wrap the wire around  the stem. For best control, experts recommend you break this step  into a series of half wraps.    Trim excess with flush cutters.                See Related Products links (below) for similar items and additional jewelry-making supplies that are often used with this item.

    White Plated Eye Pin, 1-1/2", Thin (Pack)

    $6.48
    Basic Loops The loop size will depend on how much wire you leave past the end of your beads, and around which part of your pliers you bend the loop. A good loop size is usually about 1/3 of the way from the tip of your pliers, with about...
    Qty in Cart: 0
    Quantity:
    Price:
    $6.48
    Subtotal:
  •      Basic Loops         The loop size will depend on how much wire you leave past the  end of your beads, and around which part of your pliers you bend  the loop. A good loop size is usually about 1/3 of the way from the  tip of your pliers, with about 8mm of wire.    Use round needle-nose pliers.    If using an eye pin, decide which way you want the loop to go -  the same direction as the premade loop on the other end, or  90º off. Keep this direction in mind as you bend the rest of  the wire.    Cut off any excess wire (we suggest retaining 8mm above the top  of your beads).    Grip the pin just above the top bead (at the arrow above), and  bend the wire sharply toward you.    Grasp the tip of the wire with pliers, and bend smoothly away  from you, around the pliers.               Wrapped Loops       Use chain-nose pliers to grasp the wire just above the top of  the bead.    Use your fingers to bend the wire sharply over the top of the  pliers, at a 90° angle. You should have 2-3mm of straight wire  between the bead and the bend.    Use round-nose pliers to grasp a spot just above the bend, and  use your fingers to smoothly bend the wire all the way around the  tip of the pliers.    Now use pliers to grasp the wire firmly across the loop. Use  your fingers or chain-nose pliers to carefully wrap the wire around  the stem. For best control, experts recommend you break this step  into a series of half wraps.    Trim excess with flush cutters.                See Related Products links (below) for similar items and additional jewelry-making supplies that are often used with this item.

    White Plated Head Pin, 3", Standard (ounce)

    $6.89
    Basic Loops The loop size will depend on how much wire you leave past the end of your beads, and around which part of your pliers you bend the loop. A good loop size is usually about 1/3 of the way from the tip of your pliers, with about...
    Qty in Cart: 0
    Price:
    $6.89
    Subtotal:
  •      Basic Loops         The loop size will depend on how much wire you leave past the  end of your beads, and around which part of your pliers you bend  the loop. A good loop size is usually about 1/3 of the way from the  tip of your pliers, with about 8mm of wire.    Use round needle-nose pliers.    If using an eye pin, decide which way you want the loop to go -  the same direction as the premade loop on the other end, or  90º off. Keep this direction in mind as you bend the rest of  the wire.    Cut off any excess wire (we suggest retaining 8mm above the top  of your beads).    Grip the pin just above the top bead (at the arrow above), and  bend the wire sharply toward you.    Grasp the tip of the wire with pliers, and bend smoothly away  from you, around the pliers.               Wrapped Loops       Use chain-nose pliers to grasp the wire just above the top of  the bead.    Use your fingers to bend the wire sharply over the top of the  pliers, at a 90° angle. You should have 2-3mm of straight wire  between the bead and the bend.    Use round-nose pliers to grasp a spot just above the bend, and  use your fingers to smoothly bend the wire all the way around the  tip of the pliers.    Now use pliers to grasp the wire firmly across the loop. Use  your fingers or chain-nose pliers to carefully wrap the wire around  the stem. For best control, experts recommend you break this step  into a series of half wraps.    Trim excess with flush cutters.                See Related Products links (below) for similar items and additional jewelry-making supplies that are often used with this item.      Basic Loops         The loop size will depend on how much wire you leave past the  end of your beads, and around which part of your pliers you bend  the loop. A good loop size is usually about 1/3 of the way from the  tip of your pliers, with about 8mm of wire.    Use round needle-nose pliers.    If using an eye pin, decide which way you want the loop to go -  the same direction as the premade loop on the other end, or  90º off. Keep this direction in mind as you bend the rest of  the wire.    Cut off any excess wire (we suggest retaining 8mm above the top  of your beads).    Grip the pin just above the top bead (at the arrow above), and  bend the wire sharply toward you.    Grasp the tip of the wire with pliers, and bend smoothly away  from you, around the pliers.               Wrapped Loops       Use chain-nose pliers to grasp the wire just above the top of  the bead.    Use your fingers to bend the wire sharply over the top of the  pliers, at a 90° angle. You should have 2-3mm of straight wire  between the bead and the bend.    Use round-nose pliers to grasp a spot just above the bend, and  use your fingers to smoothly bend the wire all the way around the  tip of the pliers.    Now use pliers to grasp the wire firmly across the loop. Use  your fingers or chain-nose pliers to carefully wrap the wire around  the stem. For best control, experts recommend you break this step  into a series of half wraps.    Trim excess with flush cutters.                See Related Products links (below) for similar items and additional jewelry-making supplies that are often used with this item.

    Antiqued Brass Eye Pin, 1-1/2", Thin (Pack)

    $6.75
    Basic Loops The loop size will depend on how much wire you leave past the end of your beads, and around which part of your pliers you bend the loop. A good loop size is usually about 1/3 of the way from the tip of your pliers, with about...
    Qty in Cart: 0
    Quantity:
    Price:
    $6.75
    Subtotal:
  •      Basic Loops         The loop size will depend on how much wire you leave past the  end of your beads, and around which part of your pliers you bend  the loop. A good loop size is usually about 1/3 of the way from the  tip of your pliers, with about 8mm of wire.    Use round needle-nose pliers.    If using an eye pin, decide which way you want the loop to go -  the same direction as the premade loop on the other end, or  90º off. Keep this direction in mind as you bend the rest of  the wire.    Cut off any excess wire (we suggest retaining 8mm above the top  of your beads).    Grip the pin just above the top bead (at the arrow above), and  bend the wire sharply toward you.    Grasp the tip of the wire with pliers, and bend smoothly away  from you, around the pliers.               Wrapped Loops       Use chain-nose pliers to grasp the wire just above the top of  the bead.    Use your fingers to bend the wire sharply over the top of the  pliers, at a 90° angle. You should have 2-3mm of straight wire  between the bead and the bend.    Use round-nose pliers to grasp a spot just above the bend, and  use your fingers to smoothly bend the wire all the way around the  tip of the pliers.    Now use pliers to grasp the wire firmly across the loop. Use  your fingers or chain-nose pliers to carefully wrap the wire around  the stem. For best control, experts recommend you break this step  into a series of half wraps.    Trim excess with flush cutters.                See Related Products links (below) for similar items and additional jewelry-making supplies that are often used with this item.

    Gunmetal Eye Pin, 1-1/2", Thin (Pack)

    $10.29
    Basic Loops The loop size will depend on how much wire you leave past the end of your beads, and around which part of your pliers you bend the loop. A good loop size is usually about 1/3 of the way from the tip of your pliers, with about...
    Qty in Cart: 0
    Quantity:
    Price:
    $10.29
    Subtotal:
  •      Basic Loops         The loop size will depend on how much wire you leave past the  end of your beads, and around which part of your pliers you bend  the loop. A good loop size is usually about 1/3 of the way from the  tip of your pliers, with about 8mm of wire.    Use round needle-nose pliers.    If using an eye pin, decide which way you want the loop to go -  the same direction as the premade loop on the other end, or  90º off. Keep this direction in mind as you bend the rest of  the wire.    Cut off any excess wire (we suggest retaining 8mm above the top  of your beads).    Grip the pin just above the top bead (at the arrow above), and  bend the wire sharply toward you.    Grasp the tip of the wire with pliers, and bend smoothly away  from you, around the pliers.               Wrapped Loops       Use chain-nose pliers to grasp the wire just above the top of  the bead.    Use your fingers to bend the wire sharply over the top of the  pliers, at a 90° angle. You should have 2-3mm of straight wire  between the bead and the bend.    Use round-nose pliers to grasp a spot just above the bend, and  use your fingers to smoothly bend the wire all the way around the  tip of the pliers.    Now use pliers to grasp the wire firmly across the loop. Use  your fingers or chain-nose pliers to carefully wrap the wire around  the stem. For best control, experts recommend you break this step  into a series of half wraps.    Trim excess with flush cutters.                See Related Products links (below) for similar items and additional jewelry-making supplies that are often used with this item.      Basic Loops         The loop size will depend on how much wire you leave past the  end of your beads, and around which part of your pliers you bend  the loop. A good loop size is usually about 1/3 of the way from the  tip of your pliers, with about 8mm of wire.    Use round needle-nose pliers.    If using an eye pin, decide which way you want the loop to go -  the same direction as the premade loop on the other end, or  90º off. Keep this direction in mind as you bend the rest of  the wire.    Cut off any excess wire (we suggest retaining 8mm above the top  of your beads).    Grip the pin just above the top bead (at the arrow above), and  bend the wire sharply toward you.    Grasp the tip of the wire with pliers, and bend smoothly away  from you, around the pliers.               Wrapped Loops       Use chain-nose pliers to grasp the wire just above the top of  the bead.    Use your fingers to bend the wire sharply over the top of the  pliers, at a 90° angle. You should have 2-3mm of straight wire  between the bead and the bend.    Use round-nose pliers to grasp a spot just above the bend, and  use your fingers to smoothly bend the wire all the way around the  tip of the pliers.    Now use pliers to grasp the wire firmly across the loop. Use  your fingers or chain-nose pliers to carefully wrap the wire around  the stem. For best control, experts recommend you break this step  into a series of half wraps.    Trim excess with flush cutters.                See Related Products links (below) for similar items and additional jewelry-making supplies that are often used with this item.

    Yellow Plated Eye Pin, 7/8", Standard (ounce)

    $6.48
    Basic Loops The loop size will depend on how much wire you leave past the end of your beads, and around which part of your pliers you bend the loop. A good loop size is usually about 1/3 of the way from the tip of your pliers, with about...
    Qty in Cart: 0
    Quantity:
    Price:
    $6.48
    Subtotal:
  •      Basic Loops         The loop size will depend on how much wire you leave past the  end of your beads, and around which part of your pliers you bend  the loop. A good loop size is usually about 1/3 of the way from the  tip of your pliers, with about 8mm of wire.    Use round needle-nose pliers.    If using an eye pin, decide which way you want the loop to go -  the same direction as the premade loop on the other end, or  90º off. Keep this direction in mind as you bend the rest of  the wire.    Cut off any excess wire (we suggest retaining 8mm above the top  of your beads).    Grip the pin just above the top bead (at the arrow above), and  bend the wire sharply toward you.    Grasp the tip of the wire with pliers, and bend smoothly away  from you, around the pliers.               Wrapped Loops       Use chain-nose pliers to grasp the wire just above the top of  the bead.    Use your fingers to bend the wire sharply over the top of the  pliers, at a 90° angle. You should have 2-3mm of straight wire  between the bead and the bend.    Use round-nose pliers to grasp a spot just above the bend, and  use your fingers to smoothly bend the wire all the way around the  tip of the pliers.    Now use pliers to grasp the wire firmly across the loop. Use  your fingers or chain-nose pliers to carefully wrap the wire around  the stem. For best control, experts recommend you break this step  into a series of half wraps.    Trim excess with flush cutters.                See Related Products links (below) for similar items and additional jewelry-making supplies that are often used with this item.

    Yellow Plated Eye Pin, 3", Standard (ounce)

    $6.55
    Basic Loops The loop size will depend on how much wire you leave past the end of your beads, and around which part of your pliers you bend the loop. A good loop size is usually about 1/3 of the way from the tip of your pliers, with about...
    Qty in Cart: 0
    Quantity:
    Price:
    $6.55
    Subtotal:
  •       What is Crystal "AB"?        Aurora Borealis (AB) adds a gorgeous pastel rainbow sheen to the sparkle of Austrian Crystal's premium-cut facets. This iridescent coating is named after the beautiful Northern Lights that decorate the arctic skies - you'll find these crystals to be similarly stunning! This iridescent AB coating can be difficult to perfectly capture in crystal photos and illustrations: some images may capture the blue flash, others may capture a yellow or pink flash, but all of these sparkling crystal AB components perfectly match each other in real life. Plus, their subtle iridescence blends nearly effortlessly with most other colors!      Austria's world-famous PRESTIGE Crystal brand has been the original crystal pedigree for more than a century. Their outstanding quality is the result of special polishing, perfect cut, exact geometry and precise angles, which draw out maximum brilliance. For your finest designs, it is well worth choosing PRESTIGE Crystal's unmatched quality and color palette with hundreds of glittering crystal colors.       What is Crystal "AB"?        Aurora Borealis (AB) adds a gorgeous pastel rainbow sheen to the sparkle of Austrian Crystal's premium-cut facets. This iridescent coating is named after the beautiful Northern Lights that decorate the arctic skies - you'll find these crystals to be similarly stunning! This iridescent AB coating can be difficult to perfectly capture in crystal photos and illustrations: some images may capture the blue flash, others may capture a yellow or pink flash, but all of these sparkling crystal AB components perfectly match each other in real life. Plus, their subtle iridescence blends nearly effortlessly with most other colors!      Austria's world-famous PRESTIGE Crystal brand has been the original crystal pedigree for more than a century. Their outstanding quality is the result of special polishing, perfect cut, exact geometry and precise angles, which draw out maximum brilliance. For your finest designs, it is well worth choosing PRESTIGE Crystal's unmatched quality and color palette with hundreds of glittering crystal colors.

    1.5" Sterling Silver Head Pin with 24pp, 3mm, Austrian Crystal AB Faceted Stone (pair)

    PRESTIGE Crystal
    $3.00
    What is Crystal "AB"? Aurora Borealis (AB) adds a gorgeous pastel rainbow sheen to the sparkle of Austrian Crystal's premium-cut facets. This iridescent coating is named after the beautiful Northern Lights that decorate the arctic skies -...
    Qty in Cart: 0
    Quantity:
    Price:
    $3.00
    Subtotal:
  •      Basic Loops         The loop size will depend on how much wire you leave past the  end of your beads, and around which part of your pliers you bend  the loop. A good loop size is usually about 1/3 of the way from the  tip of your pliers, with about 8mm of wire.    Use round needle-nose pliers.    If using an eye pin, decide which way you want the loop to go -  the same direction as the premade loop on the other end, or  90º off. Keep this direction in mind as you bend the rest of  the wire.    Cut off any excess wire (we suggest retaining 8mm above the top  of your beads).    Grip the pin just above the top bead (at the arrow above), and  bend the wire sharply toward you.    Grasp the tip of the wire with pliers, and bend smoothly away  from you, around the pliers.               Wrapped Loops       Use chain-nose pliers to grasp the wire just above the top of  the bead.    Use your fingers to bend the wire sharply over the top of the  pliers, at a 90° angle. You should have 2-3mm of straight wire  between the bead and the bend.    Use round-nose pliers to grasp a spot just above the bend, and  use your fingers to smoothly bend the wire all the way around the  tip of the pliers.    Now use pliers to grasp the wire firmly across the loop. Use  your fingers or chain-nose pliers to carefully wrap the wire around  the stem. For best control, experts recommend you break this step  into a series of half wraps.    Trim excess with flush cutters.                See Related Products links (below) for similar items and additional jewelry-making supplies that are often used with this item.      Basic Loops         The loop size will depend on how much wire you leave past the  end of your beads, and around which part of your pliers you bend  the loop. A good loop size is usually about 1/3 of the way from the  tip of your pliers, with about 8mm of wire.    Use round needle-nose pliers.    If using an eye pin, decide which way you want the loop to go -  the same direction as the premade loop on the other end, or  90º off. Keep this direction in mind as you bend the rest of  the wire.    Cut off any excess wire (we suggest retaining 8mm above the top  of your beads).    Grip the pin just above the top bead (at the arrow above), and  bend the wire sharply toward you.    Grasp the tip of the wire with pliers, and bend smoothly away  from you, around the pliers.               Wrapped Loops       Use chain-nose pliers to grasp the wire just above the top of  the bead.    Use your fingers to bend the wire sharply over the top of the  pliers, at a 90° angle. You should have 2-3mm of straight wire  between the bead and the bend.    Use round-nose pliers to grasp a spot just above the bend, and  use your fingers to smoothly bend the wire all the way around the  tip of the pliers.    Now use pliers to grasp the wire firmly across the loop. Use  your fingers or chain-nose pliers to carefully wrap the wire around  the stem. For best control, experts recommend you break this step  into a series of half wraps.    Trim excess with flush cutters.                See Related Products links (below) for similar items and additional jewelry-making supplies that are often used with this item.

    Antiqued Brass Eye Pin, 2", Standard (Pack)

    $7.34
    Basic Loops The loop size will depend on how much wire you leave past the end of your beads, and around which part of your pliers you bend the loop. A good loop size is usually about 1/3 of the way from the tip of your pliers, with about...
    Qty in Cart: 0
    Price:
    $7.34
    Subtotal:
  •      Basic Loops         The loop size will depend on how much wire you leave past the  end of your beads, and around which part of your pliers you bend  the loop. A good loop size is usually about 1/3 of the way from the  tip of your pliers, with about 8mm of wire.    Use round needle-nose pliers.    If using an eye pin, decide which way you want the loop to go -  the same direction as the premade loop on the other end, or  90º off. Keep this direction in mind as you bend the rest of  the wire.    Cut off any excess wire (we suggest retaining 8mm above the top  of your beads).    Grip the pin just above the top bead (at the arrow above), and  bend the wire sharply toward you.    Grasp the tip of the wire with pliers, and bend smoothly away  from you, around the pliers.               Wrapped Loops       Use chain-nose pliers to grasp the wire just above the top of  the bead.    Use your fingers to bend the wire sharply over the top of the  pliers, at a 90° angle. You should have 2-3mm of straight wire  between the bead and the bend.    Use round-nose pliers to grasp a spot just above the bend, and  use your fingers to smoothly bend the wire all the way around the  tip of the pliers.    Now use pliers to grasp the wire firmly across the loop. Use  your fingers or chain-nose pliers to carefully wrap the wire around  the stem. For best control, experts recommend you break this step  into a series of half wraps.    Trim excess with flush cutters.                See Related Products links (below) for similar items and additional jewelry-making supplies that are often used with this item.      Basic Loops         The loop size will depend on how much wire you leave past the  end of your beads, and around which part of your pliers you bend  the loop. A good loop size is usually about 1/3 of the way from the  tip of your pliers, with about 8mm of wire.    Use round needle-nose pliers.    If using an eye pin, decide which way you want the loop to go -  the same direction as the premade loop on the other end, or  90º off. Keep this direction in mind as you bend the rest of  the wire.    Cut off any excess wire (we suggest retaining 8mm above the top  of your beads).    Grip the pin just above the top bead (at the arrow above), and  bend the wire sharply toward you.    Grasp the tip of the wire with pliers, and bend smoothly away  from you, around the pliers.               Wrapped Loops       Use chain-nose pliers to grasp the wire just above the top of  the bead.    Use your fingers to bend the wire sharply over the top of the  pliers, at a 90° angle. You should have 2-3mm of straight wire  between the bead and the bend.    Use round-nose pliers to grasp a spot just above the bend, and  use your fingers to smoothly bend the wire all the way around the  tip of the pliers.    Now use pliers to grasp the wire firmly across the loop. Use  your fingers or chain-nose pliers to carefully wrap the wire around  the stem. For best control, experts recommend you break this step  into a series of half wraps.    Trim excess with flush cutters.                See Related Products links (below) for similar items and additional jewelry-making supplies that are often used with this item.

    Sterling Silver Head Pin, 1-1/2", 0.020" Diameter (10 Pieces)

    $4.35
    Basic Loops The loop size will depend on how much wire you leave past the end of your beads, and around which part of your pliers you bend the loop. A good loop size is usually about 1/3 of the way from the tip of your pliers, with about...
    Qty in Cart: 0
    Quantity:
    Price:
    $4.35
    Subtotal:
  •      Basic Loops         The loop size will depend on how much wire you leave past the  end of your beads, and around which part of your pliers you bend  the loop. A good loop size is usually about 1/3 of the way from the  tip of your pliers, with about 8mm of wire.    Use round needle-nose pliers.    If using an eye pin, decide which way you want the loop to go -  the same direction as the premade loop on the other end, or  90º off. Keep this direction in mind as you bend the rest of  the wire.    Cut off any excess wire (we suggest retaining 8mm above the top  of your beads).    Grip the pin just above the top bead (at the arrow above), and  bend the wire sharply toward you.    Grasp the tip of the wire with pliers, and bend smoothly away  from you, around the pliers.               Wrapped Loops       Use chain-nose pliers to grasp the wire just above the top of  the bead.    Use your fingers to bend the wire sharply over the top of the  pliers, at a 90° angle. You should have 2-3mm of straight wire  between the bead and the bend.    Use round-nose pliers to grasp a spot just above the bend, and  use your fingers to smoothly bend the wire all the way around the  tip of the pliers.    Now use pliers to grasp the wire firmly across the loop. Use  your fingers or chain-nose pliers to carefully wrap the wire around  the stem. For best control, experts recommend you break this step  into a series of half wraps.    Trim excess with flush cutters.                See Related Products links (below) for similar items and additional jewelry-making supplies that are often used with this item.      Basic Loops         The loop size will depend on how much wire you leave past the  end of your beads, and around which part of your pliers you bend  the loop. A good loop size is usually about 1/3 of the way from the  tip of your pliers, with about 8mm of wire.    Use round needle-nose pliers.    If using an eye pin, decide which way you want the loop to go -  the same direction as the premade loop on the other end, or  90º off. Keep this direction in mind as you bend the rest of  the wire.    Cut off any excess wire (we suggest retaining 8mm above the top  of your beads).    Grip the pin just above the top bead (at the arrow above), and  bend the wire sharply toward you.    Grasp the tip of the wire with pliers, and bend smoothly away  from you, around the pliers.               Wrapped Loops       Use chain-nose pliers to grasp the wire just above the top of  the bead.    Use your fingers to bend the wire sharply over the top of the  pliers, at a 90° angle. You should have 2-3mm of straight wire  between the bead and the bend.    Use round-nose pliers to grasp a spot just above the bend, and  use your fingers to smoothly bend the wire all the way around the  tip of the pliers.    Now use pliers to grasp the wire firmly across the loop. Use  your fingers or chain-nose pliers to carefully wrap the wire around  the stem. For best control, experts recommend you break this step  into a series of half wraps.    Trim excess with flush cutters.                See Related Products links (below) for similar items and additional jewelry-making supplies that are often used with this item.

    White Plated Head Pin, 2", Standard (ounce)

    $6.89
    Basic Loops The loop size will depend on how much wire you leave past the end of your beads, and around which part of your pliers you bend the loop. A good loop size is usually about 1/3 of the way from the tip of your pliers, with about...
    Qty in Cart: 0
    Price:
    $6.89
    Subtotal:
  •      Basic Loops         The loop size will depend on how much wire you leave past the  end of your beads, and around which part of your pliers you bend  the loop. A good loop size is usually about 1/3 of the way from the  tip of your pliers, with about 8mm of wire.    Use round needle-nose pliers.    If using an eye pin, decide which way you want the loop to go -  the same direction as the premade loop on the other end, or  90º off. Keep this direction in mind as you bend the rest of  the wire.    Cut off any excess wire (we suggest retaining 8mm above the top  of your beads).    Grip the pin just above the top bead (at the arrow above), and  bend the wire sharply toward you.    Grasp the tip of the wire with pliers, and bend smoothly away  from you, around the pliers.               Wrapped Loops       Use chain-nose pliers to grasp the wire just above the top of  the bead.    Use your fingers to bend the wire sharply over the top of the  pliers, at a 90° angle. You should have 2-3mm of straight wire  between the bead and the bend.    Use round-nose pliers to grasp a spot just above the bend, and  use your fingers to smoothly bend the wire all the way around the  tip of the pliers.    Now use pliers to grasp the wire firmly across the loop. Use  your fingers or chain-nose pliers to carefully wrap the wire around  the stem. For best control, experts recommend you break this step  into a series of half wraps.    Trim excess with flush cutters.                See Related Products links (below) for similar items and additional jewelry-making supplies that are often used with this item.

    Yellow Plated Head Pin, 3", Standard (ounce)

    $5.18
    Basic Loops The loop size will depend on how much wire you leave past the end of your beads, and around which part of your pliers you bend the loop. A good loop size is usually about 1/3 of the way from the tip of your pliers, with about...
    Qty in Cart: 0
    Price:
    $5.18
    Subtotal:
  •      Basic Loops         The loop size will depend on how much wire you leave past the  end of your beads, and around which part of your pliers you bend  the loop. A good loop size is usually about 1/3 of the way from the  tip of your pliers, with about 8mm of wire.    Use round needle-nose pliers.    If using an eye pin, decide which way you want the loop to go -  the same direction as the premade loop on the other end, or  90º off. Keep this direction in mind as you bend the rest of  the wire.    Cut off any excess wire (we suggest retaining 8mm above the top  of your beads).    Grip the pin just above the top bead (at the arrow above), and  bend the wire sharply toward you.    Grasp the tip of the wire with pliers, and bend smoothly away  from you, around the pliers.               Wrapped Loops       Use chain-nose pliers to grasp the wire just above the top of  the bead.    Use your fingers to bend the wire sharply over the top of the  pliers, at a 90° angle. You should have 2-3mm of straight wire  between the bead and the bend.    Use round-nose pliers to grasp a spot just above the bend, and  use your fingers to smoothly bend the wire all the way around the  tip of the pliers.    Now use pliers to grasp the wire firmly across the loop. Use  your fingers or chain-nose pliers to carefully wrap the wire around  the stem. For best control, experts recommend you break this step  into a series of half wraps.    Trim excess with flush cutters.                See Related Products links (below) for similar items and additional jewelry-making supplies that are often used with this item.      Basic Loops         The loop size will depend on how much wire you leave past the  end of your beads, and around which part of your pliers you bend  the loop. A good loop size is usually about 1/3 of the way from the  tip of your pliers, with about 8mm of wire.    Use round needle-nose pliers.    If using an eye pin, decide which way you want the loop to go -  the same direction as the premade loop on the other end, or  90º off. Keep this direction in mind as you bend the rest of  the wire.    Cut off any excess wire (we suggest retaining 8mm above the top  of your beads).    Grip the pin just above the top bead (at the arrow above), and  bend the wire sharply toward you.    Grasp the tip of the wire with pliers, and bend smoothly away  from you, around the pliers.               Wrapped Loops       Use chain-nose pliers to grasp the wire just above the top of  the bead.    Use your fingers to bend the wire sharply over the top of the  pliers, at a 90° angle. You should have 2-3mm of straight wire  between the bead and the bend.    Use round-nose pliers to grasp a spot just above the bend, and  use your fingers to smoothly bend the wire all the way around the  tip of the pliers.    Now use pliers to grasp the wire firmly across the loop. Use  your fingers or chain-nose pliers to carefully wrap the wire around  the stem. For best control, experts recommend you break this step  into a series of half wraps.    Trim excess with flush cutters.                See Related Products links (below) for similar items and additional jewelry-making supplies that are often used with this item.

    14kt Gold-Filled Ball End Head Pin, 2" (10 Pieces)

    $13.09
    Basic Loops The loop size will depend on how much wire you leave past the end of your beads, and around which part of your pliers you bend the loop. A good loop size is usually about 1/3 of the way from the tip of your pliers, with about...
    Qty in Cart: 0
    Price:
    $13.09
    Subtotal:
  •      Basic Loops         The loop size will depend on how much wire you leave past the  end of your beads, and around which part of your pliers you bend  the loop. A good loop size is usually about 1/3 of the way from the  tip of your pliers, with about 8mm of wire.    Use round needle-nose pliers.    If using an eye pin, decide which way you want the loop to go -  the same direction as the premade loop on the other end, or  90º off. Keep this direction in mind as you bend the rest of  the wire.    Cut off any excess wire (we suggest retaining 8mm above the top  of your beads).    Grip the pin just above the top bead (at the arrow above), and  bend the wire sharply toward you.    Grasp the tip of the wire with pliers, and bend smoothly away  from you, around the pliers.               Wrapped Loops       Use chain-nose pliers to grasp the wire just above the top of  the bead.    Use your fingers to bend the wire sharply over the top of the  pliers, at a 90° angle. You should have 2-3mm of straight wire  between the bead and the bend.    Use round-nose pliers to grasp a spot just above the bend, and  use your fingers to smoothly bend the wire all the way around the  tip of the pliers.    Now use pliers to grasp the wire firmly across the loop. Use  your fingers or chain-nose pliers to carefully wrap the wire around  the stem. For best control, experts recommend you break this step  into a series of half wraps.    Trim excess with flush cutters.                See Related Products links (below) for similar items and additional jewelry-making supplies that are often used with this item.

    Antiqued Copper Plated Head Pin, 1-1/2", Thin (ounce)

    $7.66
    Basic Loops The loop size will depend on how much wire you leave past the end of your beads, and around which part of your pliers you bend the loop. A good loop size is usually about 1/3 of the way from the tip of your pliers, with about...
    Qty in Cart: 0
    Quantity:
    Price:
    $7.66
    Subtotal:
  •      Basic Loops         The loop size will depend on how much wire you leave past the  end of your beads, and around which part of your pliers you bend  the loop. A good loop size is usually about 1/3 of the way from the  tip of your pliers, with about 8mm of wire.    Use round needle-nose pliers.    If using an eye pin, decide which way you want the loop to go -  the same direction as the premade loop on the other end, or  90º off. Keep this direction in mind as you bend the rest of  the wire.    Cut off any excess wire (we suggest retaining 8mm above the top  of your beads).    Grip the pin just above the top bead (at the arrow above), and  bend the wire sharply toward you.    Grasp the tip of the wire with pliers, and bend smoothly away  from you, around the pliers.               Wrapped Loops       Use chain-nose pliers to grasp the wire just above the top of  the bead.    Use your fingers to bend the wire sharply over the top of the  pliers, at a 90° angle. You should have 2-3mm of straight wire  between the bead and the bend.    Use round-nose pliers to grasp a spot just above the bend, and  use your fingers to smoothly bend the wire all the way around the  tip of the pliers.    Now use pliers to grasp the wire firmly across the loop. Use  your fingers or chain-nose pliers to carefully wrap the wire around  the stem. For best control, experts recommend you break this step  into a series of half wraps.    Trim excess with flush cutters.                See Related Products links (below) for similar items and additional jewelry-making supplies that are often used with this item.

    Antiqued Pewter Plated Head Pin, 2", Dotted Flower End (100 Pieces)

    $11.48
    Basic Loops The loop size will depend on how much wire you leave past the end of your beads, and around which part of your pliers you bend the loop. A good loop size is usually about 1/3 of the way from the tip of your pliers, with about...
    Qty in Cart: 0
    Quantity:
    Price:
    $11.48
    Subtotal:
  •      Basic Loops         The loop size will depend on how much wire you leave past the  end of your beads, and around which part of your pliers you bend  the loop. A good loop size is usually about 1/3 of the way from the  tip of your pliers, with about 8mm of wire.    Use round needle-nose pliers.    If using an eye pin, decide which way you want the loop to go -  the same direction as the premade loop on the other end, or  90º off. Keep this direction in mind as you bend the rest of  the wire.    Cut off any excess wire (we suggest retaining 8mm above the top  of your beads).    Grip the pin just above the top bead (at the arrow above), and  bend the wire sharply toward you.    Grasp the tip of the wire with pliers, and bend smoothly away  from you, around the pliers.               Wrapped Loops       Use chain-nose pliers to grasp the wire just above the top of  the bead.    Use your fingers to bend the wire sharply over the top of the  pliers, at a 90° angle. You should have 2-3mm of straight wire  between the bead and the bend.    Use round-nose pliers to grasp a spot just above the bend, and  use your fingers to smoothly bend the wire all the way around the  tip of the pliers.    Now use pliers to grasp the wire firmly across the loop. Use  your fingers or chain-nose pliers to carefully wrap the wire around  the stem. For best control, experts recommend you break this step  into a series of half wraps.    Trim excess with flush cutters.                See Related Products links (below) for similar items and additional jewelry-making supplies that are often used with this item.

    Assorted Color Head Pin, 1-1/2", Thin (ounce)

    $8.53
    Basic Loops The loop size will depend on how much wire you leave past the end of your beads, and around which part of your pliers you bend the loop. A good loop size is usually about 1/3 of the way from the tip of your pliers, with about...
    Qty in Cart: 0
    Quantity:
    Price:
    $8.53
    Subtotal:
  •      Basic Loops         The loop size will depend on how much wire you leave past the  end of your beads, and around which part of your pliers you bend  the loop. A good loop size is usually about 1/3 of the way from the  tip of your pliers, with about 8mm of wire.    Use round needle-nose pliers.    If using an eye pin, decide which way you want the loop to go -  the same direction as the premade loop on the other end, or  90º off. Keep this direction in mind as you bend the rest of  the wire.    Cut off any excess wire (we suggest retaining 8mm above the top  of your beads).    Grip the pin just above the top bead (at the arrow above), and  bend the wire sharply toward you.    Grasp the tip of the wire with pliers, and bend smoothly away  from you, around the pliers.               Wrapped Loops       Use chain-nose pliers to grasp the wire just above the top of  the bead.    Use your fingers to bend the wire sharply over the top of the  pliers, at a 90° angle. You should have 2-3mm of straight wire  between the bead and the bend.    Use round-nose pliers to grasp a spot just above the bend, and  use your fingers to smoothly bend the wire all the way around the  tip of the pliers.    Now use pliers to grasp the wire firmly across the loop. Use  your fingers or chain-nose pliers to carefully wrap the wire around  the stem. For best control, experts recommend you break this step  into a series of half wraps.    Trim excess with flush cutters.                See Related Products links (below) for similar items and additional jewelry-making supplies that are often used with this item.

    Assorted Color Head Pin, 7/8", Standard (ounce)

    $5.54
    Basic Loops The loop size will depend on how much wire you leave past the end of your beads, and around which part of your pliers you bend the loop. A good loop size is usually about 1/3 of the way from the tip of your pliers, with about...
    Qty in Cart: 0
    Price:
    $5.54
    Subtotal:
  •      Basic Loops         The loop size will depend on how much wire you leave past the  end of your beads, and around which part of your pliers you bend  the loop. A good loop size is usually about 1/3 of the way from the  tip of your pliers, with about 8mm of wire.    Use round needle-nose pliers.    If using an eye pin, decide which way you want the loop to go -  the same direction as the premade loop on the other end, or  90º off. Keep this direction in mind as you bend the rest of  the wire.    Cut off any excess wire (we suggest retaining 8mm above the top  of your beads).    Grip the pin just above the top bead (at the arrow above), and  bend the wire sharply toward you.    Grasp the tip of the wire with pliers, and bend smoothly away  from you, around the pliers.               Wrapped Loops       Use chain-nose pliers to grasp the wire just above the top of  the bead.    Use your fingers to bend the wire sharply over the top of the  pliers, at a 90° angle. You should have 2-3mm of straight wire  between the bead and the bend.    Use round-nose pliers to grasp a spot just above the bend, and  use your fingers to smoothly bend the wire all the way around the  tip of the pliers.    Now use pliers to grasp the wire firmly across the loop. Use  your fingers or chain-nose pliers to carefully wrap the wire around  the stem. For best control, experts recommend you break this step  into a series of half wraps.    Trim excess with flush cutters.                See Related Products links (below) for similar items and additional jewelry-making supplies that are often used with this item.

    Copper Head Pin, 2", Extra-Thin (100 Pieces)

    $4.67
    Basic Loops The loop size will depend on how much wire you leave past the end of your beads, and around which part of your pliers you bend the loop. A good loop size is usually about 1/3 of the way from the tip of your pliers, with about...
    Qty in Cart: 0
    Quantity:
    Price:
    $4.67
    Subtotal:
  •      Basic Loops         The loop size will depend on how much wire you leave past the  end of your beads, and around which part of your pliers you bend  the loop. A good loop size is usually about 1/3 of the way from the  tip of your pliers, with about 8mm of wire.    Use round needle-nose pliers.    If using an eye pin, decide which way you want the loop to go -  the same direction as the premade loop on the other end, or  90º off. Keep this direction in mind as you bend the rest of  the wire.    Cut off any excess wire (we suggest retaining 8mm above the top  of your beads).    Grip the pin just above the top bead (at the arrow above), and  bend the wire sharply toward you.    Grasp the tip of the wire with pliers, and bend smoothly away  from you, around the pliers.               Wrapped Loops       Use chain-nose pliers to grasp the wire just above the top of  the bead.    Use your fingers to bend the wire sharply over the top of the  pliers, at a 90° angle. You should have 2-3mm of straight wire  between the bead and the bend.    Use round-nose pliers to grasp a spot just above the bend, and  use your fingers to smoothly bend the wire all the way around the  tip of the pliers.    Now use pliers to grasp the wire firmly across the loop. Use  your fingers or chain-nose pliers to carefully wrap the wire around  the stem. For best control, experts recommend you break this step  into a series of half wraps.    Trim excess with flush cutters.                See Related Products links (below) for similar items and additional jewelry-making supplies that are often used with this item.      Basic Loops         The loop size will depend on how much wire you leave past the  end of your beads, and around which part of your pliers you bend  the loop. A good loop size is usually about 1/3 of the way from the  tip of your pliers, with about 8mm of wire.    Use round needle-nose pliers.    If using an eye pin, decide which way you want the loop to go -  the same direction as the premade loop on the other end, or  90º off. Keep this direction in mind as you bend the rest of  the wire.    Cut off any excess wire (we suggest retaining 8mm above the top  of your beads).    Grip the pin just above the top bead (at the arrow above), and  bend the wire sharply toward you.    Grasp the tip of the wire with pliers, and bend smoothly away  from you, around the pliers.               Wrapped Loops       Use chain-nose pliers to grasp the wire just above the top of  the bead.    Use your fingers to bend the wire sharply over the top of the  pliers, at a 90° angle. You should have 2-3mm of straight wire  between the bead and the bend.    Use round-nose pliers to grasp a spot just above the bend, and  use your fingers to smoothly bend the wire all the way around the  tip of the pliers.    Now use pliers to grasp the wire firmly across the loop. Use  your fingers or chain-nose pliers to carefully wrap the wire around  the stem. For best control, experts recommend you break this step  into a series of half wraps.    Trim excess with flush cutters.                See Related Products links (below) for similar items and additional jewelry-making supplies that are often used with this item.

    Silver Plated Eye Pin, 2", Standard (Pack)

    $9.38
    Basic Loops The loop size will depend on how much wire you leave past the end of your beads, and around which part of your pliers you bend the loop. A good loop size is usually about 1/3 of the way from the tip of your pliers, with about...
    Qty in Cart: 0
    Quantity:
    Price:
    $9.38
    Subtotal:
  •      Basic Loops         The loop size will depend on how much wire you leave past the  end of your beads, and around which part of your pliers you bend  the loop. A good loop size is usually about 1/3 of the way from the  tip of your pliers, with about 8mm of wire.    Use round needle-nose pliers.    If using an eye pin, decide which way you want the loop to go -  the same direction as the premade loop on the other end, or  90º off. Keep this direction in mind as you bend the rest of  the wire.    Cut off any excess wire (we suggest retaining 8mm above the top  of your beads).    Grip the pin just above the top bead (at the arrow above), and  bend the wire sharply toward you.    Grasp the tip of the wire with pliers, and bend smoothly away  from you, around the pliers.               Wrapped Loops       Use chain-nose pliers to grasp the wire just above the top of  the bead.    Use your fingers to bend the wire sharply over the top of the  pliers, at a 90° angle. You should have 2-3mm of straight wire  between the bead and the bend.    Use round-nose pliers to grasp a spot just above the bend, and  use your fingers to smoothly bend the wire all the way around the  tip of the pliers.    Now use pliers to grasp the wire firmly across the loop. Use  your fingers or chain-nose pliers to carefully wrap the wire around  the stem. For best control, experts recommend you break this step  into a series of half wraps.    Trim excess with flush cutters.                See Related Products links (below) for similar items and additional jewelry-making supplies that are often used with this item.

    White Plated Head Pin, 2-1/2", Standard (ounce)

    $6.26
    Basic Loops The loop size will depend on how much wire you leave past the end of your beads, and around which part of your pliers you bend the loop. A good loop size is usually about 1/3 of the way from the tip of your pliers, with about...
    Qty in Cart: 0
    Price:
    $6.26
    Subtotal:
  •      Basic Loops         The loop size will depend on how much wire you leave past the  end of your beads, and around which part of your pliers you bend  the loop. A good loop size is usually about 1/3 of the way from the  tip of your pliers, with about 8mm of wire.    Use round needle-nose pliers.    If using an eye pin, decide which way you want the loop to go -  the same direction as the premade loop on the other end, or  90º off. Keep this direction in mind as you bend the rest of  the wire.    Cut off any excess wire (we suggest retaining 8mm above the top  of your beads).    Grip the pin just above the top bead (at the arrow above), and  bend the wire sharply toward you.    Grasp the tip of the wire with pliers, and bend smoothly away  from you, around the pliers.               Wrapped Loops       Use chain-nose pliers to grasp the wire just above the top of  the bead.    Use your fingers to bend the wire sharply over the top of the  pliers, at a 90° angle. You should have 2-3mm of straight wire  between the bead and the bend.    Use round-nose pliers to grasp a spot just above the bend, and  use your fingers to smoothly bend the wire all the way around the  tip of the pliers.    Now use pliers to grasp the wire firmly across the loop. Use  your fingers or chain-nose pliers to carefully wrap the wire around  the stem. For best control, experts recommend you break this step  into a series of half wraps.    Trim excess with flush cutters.                See Related Products links (below) for similar items and additional jewelry-making supplies that are often used with this item.

    Copper Head Pin, 1.5", Extra-Thin (hundred)

    $3.55
    Basic Loops The loop size will depend on how much wire you leave past the end of your beads, and around which part of your pliers you bend the loop. A good loop size is usually about 1/3 of the way from the tip of your pliers, with about...
    Qty in Cart: 0
    Quantity:
    Price:
    $3.55
    Subtotal:
  •      Basic Loops         The loop size will depend on how much wire you leave past the  end of your beads, and around which part of your pliers you bend  the loop. A good loop size is usually about 1/3 of the way from the  tip of your pliers, with about 8mm of wire.    Use round needle-nose pliers.    If using an eye pin, decide which way you want the loop to go -  the same direction as the premade loop on the other end, or  90º off. Keep this direction in mind as you bend the rest of  the wire.    Cut off any excess wire (we suggest retaining 8mm above the top  of your beads).    Grip the pin just above the top bead (at the arrow above), and  bend the wire sharply toward you.    Grasp the tip of the wire with pliers, and bend smoothly away  from you, around the pliers.               Wrapped Loops       Use chain-nose pliers to grasp the wire just above the top of  the bead.    Use your fingers to bend the wire sharply over the top of the  pliers, at a 90° angle. You should have 2-3mm of straight wire  between the bead and the bend.    Use round-nose pliers to grasp a spot just above the bend, and  use your fingers to smoothly bend the wire all the way around the  tip of the pliers.    Now use pliers to grasp the wire firmly across the loop. Use  your fingers or chain-nose pliers to carefully wrap the wire around  the stem. For best control, experts recommend you break this step  into a series of half wraps.    Trim excess with flush cutters.                See Related Products links (below) for similar items and additional jewelry-making supplies that are often used with this item.

    Gunmetal Ball End Head Pin, Standard, 1" (100 Pieces)

    $3.30
    Basic Loops The loop size will depend on how much wire you leave past the end of your beads, and around which part of your pliers you bend the loop. A good loop size is usually about 1/3 of the way from the tip of your pliers, with about...
    Qty in Cart: 0
    Quantity:
    Price:
    $3.30
    Subtotal:
  •      Basic Loops         The loop size will depend on how much wire you leave past the  end of your beads, and around which part of your pliers you bend  the loop. A good loop size is usually about 1/3 of the way from the  tip of your pliers, with about 8mm of wire.    Use round needle-nose pliers.    If using an eye pin, decide which way you want the loop to go -  the same direction as the premade loop on the other end, or  90º off. Keep this direction in mind as you bend the rest of  the wire.    Cut off any excess wire (we suggest retaining 8mm above the top  of your beads).    Grip the pin just above the top bead (at the arrow above), and  bend the wire sharply toward you.    Grasp the tip of the wire with pliers, and bend smoothly away  from you, around the pliers.               Wrapped Loops       Use chain-nose pliers to grasp the wire just above the top of  the bead.    Use your fingers to bend the wire sharply over the top of the  pliers, at a 90° angle. You should have 2-3mm of straight wire  between the bead and the bend.    Use round-nose pliers to grasp a spot just above the bend, and  use your fingers to smoothly bend the wire all the way around the  tip of the pliers.    Now use pliers to grasp the wire firmly across the loop. Use  your fingers or chain-nose pliers to carefully wrap the wire around  the stem. For best control, experts recommend you break this step  into a series of half wraps.    Trim excess with flush cutters.                See Related Products links (below) for similar items and additional jewelry-making supplies that are often used with this item.      Basic Loops         The loop size will depend on how much wire you leave past the  end of your beads, and around which part of your pliers you bend  the loop. A good loop size is usually about 1/3 of the way from the  tip of your pliers, with about 8mm of wire.    Use round needle-nose pliers.    If using an eye pin, decide which way you want the loop to go -  the same direction as the premade loop on the other end, or  90º off. Keep this direction in mind as you bend the rest of  the wire.    Cut off any excess wire (we suggest retaining 8mm above the top  of your beads).    Grip the pin just above the top bead (at the arrow above), and  bend the wire sharply toward you.    Grasp the tip of the wire with pliers, and bend smoothly away  from you, around the pliers.               Wrapped Loops       Use chain-nose pliers to grasp the wire just above the top of  the bead.    Use your fingers to bend the wire sharply over the top of the  pliers, at a 90° angle. You should have 2-3mm of straight wire  between the bead and the bend.    Use round-nose pliers to grasp a spot just above the bend, and  use your fingers to smoothly bend the wire all the way around the  tip of the pliers.    Now use pliers to grasp the wire firmly across the loop. Use  your fingers or chain-nose pliers to carefully wrap the wire around  the stem. For best control, experts recommend you break this step  into a series of half wraps.    Trim excess with flush cutters.                See Related Products links (below) for similar items and additional jewelry-making supplies that are often used with this item.

    Silver Plated Head Pin, 7/8", Thin (Pack)

    $6.94
    Basic Loops The loop size will depend on how much wire you leave past the end of your beads, and around which part of your pliers you bend the loop. A good loop size is usually about 1/3 of the way from the tip of your pliers, with about...
    Qty in Cart: 0
    Quantity:
    Price:
    $6.94
    Subtotal:
  •      Basic Loops         The loop size will depend on how much wire you leave past the  end of your beads, and around which part of your pliers you bend  the loop. A good loop size is usually about 1/3 of the way from the  tip of your pliers, with about 8mm of wire.    Use round needle-nose pliers.    If using an eye pin, decide which way you want the loop to go -  the same direction as the premade loop on the other end, or  90º off. Keep this direction in mind as you bend the rest of  the wire.    Cut off any excess wire (we suggest retaining 8mm above the top  of your beads).    Grip the pin just above the top bead (at the arrow above), and  bend the wire sharply toward you.    Grasp the tip of the wire with pliers, and bend smoothly away  from you, around the pliers.               Wrapped Loops       Use chain-nose pliers to grasp the wire just above the top of  the bead.    Use your fingers to bend the wire sharply over the top of the  pliers, at a 90° angle. You should have 2-3mm of straight wire  between the bead and the bend.    Use round-nose pliers to grasp a spot just above the bend, and  use your fingers to smoothly bend the wire all the way around the  tip of the pliers.    Now use pliers to grasp the wire firmly across the loop. Use  your fingers or chain-nose pliers to carefully wrap the wire around  the stem. For best control, experts recommend you break this step  into a series of half wraps.    Trim excess with flush cutters.                See Related Products links (below) for similar items and additional jewelry-making supplies that are often used with this item.      Basic Loops         The loop size will depend on how much wire you leave past the  end of your beads, and around which part of your pliers you bend  the loop. A good loop size is usually about 1/3 of the way from the  tip of your pliers, with about 8mm of wire.    Use round needle-nose pliers.    If using an eye pin, decide which way you want the loop to go -  the same direction as the premade loop on the other end, or  90º off. Keep this direction in mind as you bend the rest of  the wire.    Cut off any excess wire (we suggest retaining 8mm above the top  of your beads).    Grip the pin just above the top bead (at the arrow above), and  bend the wire sharply toward you.    Grasp the tip of the wire with pliers, and bend smoothly away  from you, around the pliers.               Wrapped Loops       Use chain-nose pliers to grasp the wire just above the top of  the bead.    Use your fingers to bend the wire sharply over the top of the  pliers, at a 90° angle. You should have 2-3mm of straight wire  between the bead and the bend.    Use round-nose pliers to grasp a spot just above the bend, and  use your fingers to smoothly bend the wire all the way around the  tip of the pliers.    Now use pliers to grasp the wire firmly across the loop. Use  your fingers or chain-nose pliers to carefully wrap the wire around  the stem. For best control, experts recommend you break this step  into a series of half wraps.    Trim excess with flush cutters.                See Related Products links (below) for similar items and additional jewelry-making supplies that are often used with this item.

    Sterling Silver Ball End Head Pin, 1.25" (10 Pieces)

    $6.00
    Basic Loops The loop size will depend on how much wire you leave past the end of your beads, and around which part of your pliers you bend the loop. A good loop size is usually about 1/3 of the way from the tip of your pliers, with about...
    Qty in Cart: 0
    Quantity:
    Price:
    $6.00
    Subtotal:
  •      Basic Loops         The loop size will depend on how much wire you leave past the  end of your beads, and around which part of your pliers you bend  the loop. A good loop size is usually about 1/3 of the way from the  tip of your pliers, with about 8mm of wire.    Use round needle-nose pliers.    If using an eye pin, decide which way you want the loop to go -  the same direction as the premade loop on the other end, or  90º off. Keep this direction in mind as you bend the rest of  the wire.    Cut off any excess wire (we suggest retaining 8mm above the top  of your beads).    Grip the pin just above the top bead (at the arrow above), and  bend the wire sharply toward you.    Grasp the tip of the wire with pliers, and bend smoothly away  from you, around the pliers.               Wrapped Loops       Use chain-nose pliers to grasp the wire just above the top of  the bead.    Use your fingers to bend the wire sharply over the top of the  pliers, at a 90° angle. You should have 2-3mm of straight wire  between the bead and the bend.    Use round-nose pliers to grasp a spot just above the bend, and  use your fingers to smoothly bend the wire all the way around the  tip of the pliers.    Now use pliers to grasp the wire firmly across the loop. Use  your fingers or chain-nose pliers to carefully wrap the wire around  the stem. For best control, experts recommend you break this step  into a series of half wraps.    Trim excess with flush cutters.                See Related Products links (below) for similar items and additional jewelry-making supplies that are often used with this item.      Basic Loops         The loop size will depend on how much wire you leave past the  end of your beads, and around which part of your pliers you bend  the loop. A good loop size is usually about 1/3 of the way from the  tip of your pliers, with about 8mm of wire.    Use round needle-nose pliers.    If using an eye pin, decide which way you want the loop to go -  the same direction as the premade loop on the other end, or  90º off. Keep this direction in mind as you bend the rest of  the wire.    Cut off any excess wire (we suggest retaining 8mm above the top  of your beads).    Grip the pin just above the top bead (at the arrow above), and  bend the wire sharply toward you.    Grasp the tip of the wire with pliers, and bend smoothly away  from you, around the pliers.               Wrapped Loops       Use chain-nose pliers to grasp the wire just above the top of  the bead.    Use your fingers to bend the wire sharply over the top of the  pliers, at a 90° angle. You should have 2-3mm of straight wire  between the bead and the bend.    Use round-nose pliers to grasp a spot just above the bend, and  use your fingers to smoothly bend the wire all the way around the  tip of the pliers.    Now use pliers to grasp the wire firmly across the loop. Use  your fingers or chain-nose pliers to carefully wrap the wire around  the stem. For best control, experts recommend you break this step  into a series of half wraps.    Trim excess with flush cutters.                See Related Products links (below) for similar items and additional jewelry-making supplies that are often used with this item.

    White Plated Eye Pin, 7/8", Standard (ounce)

    $6.89
    Basic Loops The loop size will depend on how much wire you leave past the end of your beads, and around which part of your pliers you bend the loop. A good loop size is usually about 1/3 of the way from the tip of your pliers, with about...
    Qty in Cart: 0
    Price:
    $6.89
    Subtotal:
  •      Basic Loops         The loop size will depend on how much wire you leave past the  end of your beads, and around which part of your pliers you bend  the loop. A good loop size is usually about 1/3 of the way from the  tip of your pliers, with about 8mm of wire.    Use round needle-nose pliers.    If using an eye pin, decide which way you want the loop to go -  the same direction as the premade loop on the other end, or  90º off. Keep this direction in mind as you bend the rest of  the wire.    Cut off any excess wire (we suggest retaining 8mm above the top  of your beads).    Grip the pin just above the top bead (at the arrow above), and  bend the wire sharply toward you.    Grasp the tip of the wire with pliers, and bend smoothly away  from you, around the pliers.               Wrapped Loops       Use chain-nose pliers to grasp the wire just above the top of  the bead.    Use your fingers to bend the wire sharply over the top of the  pliers, at a 90° angle. You should have 2-3mm of straight wire  between the bead and the bend.    Use round-nose pliers to grasp a spot just above the bend, and  use your fingers to smoothly bend the wire all the way around the  tip of the pliers.    Now use pliers to grasp the wire firmly across the loop. Use  your fingers or chain-nose pliers to carefully wrap the wire around  the stem. For best control, experts recommend you break this step  into a series of half wraps.    Trim excess with flush cutters.                See Related Products links (below) for similar items and additional jewelry-making supplies that are often used with this item.      Basic Loops         The loop size will depend on how much wire you leave past the  end of your beads, and around which part of your pliers you bend  the loop. A good loop size is usually about 1/3 of the way from the  tip of your pliers, with about 8mm of wire.    Use round needle-nose pliers.    If using an eye pin, decide which way you want the loop to go -  the same direction as the premade loop on the other end, or  90º off. Keep this direction in mind as you bend the rest of  the wire.    Cut off any excess wire (we suggest retaining 8mm above the top  of your beads).    Grip the pin just above the top bead (at the arrow above), and  bend the wire sharply toward you.    Grasp the tip of the wire with pliers, and bend smoothly away  from you, around the pliers.               Wrapped Loops       Use chain-nose pliers to grasp the wire just above the top of  the bead.    Use your fingers to bend the wire sharply over the top of the  pliers, at a 90° angle. You should have 2-3mm of straight wire  between the bead and the bend.    Use round-nose pliers to grasp a spot just above the bend, and  use your fingers to smoothly bend the wire all the way around the  tip of the pliers.    Now use pliers to grasp the wire firmly across the loop. Use  your fingers or chain-nose pliers to carefully wrap the wire around  the stem. For best control, experts recommend you break this step  into a series of half wraps.    Trim excess with flush cutters.                See Related Products links (below) for similar items and additional jewelry-making supplies that are often used with this item.

    Yellow Plated Eye Pin, 1-1/2", Thin (ounce)

    $6.41
    Basic Loops The loop size will depend on how much wire you leave past the end of your beads, and around which part of your pliers you bend the loop. A good loop size is usually about 1/3 of the way from the tip of your pliers, with about...
    Qty in Cart: 0
    Quantity:
    Price:
    $6.41
    Subtotal:
  •      Basic Loops         The loop size will depend on how much wire you leave past the  end of your beads, and around which part of your pliers you bend  the loop. A good loop size is usually about 1/3 of the way from the  tip of your pliers, with about 8mm of wire.    Use round needle-nose pliers.    If using an eye pin, decide which way you want the loop to go -  the same direction as the premade loop on the other end, or  90º off. Keep this direction in mind as you bend the rest of  the wire.    Cut off any excess wire (we suggest retaining 8mm above the top  of your beads).    Grip the pin just above the top bead (at the arrow above), and  bend the wire sharply toward you.    Grasp the tip of the wire with pliers, and bend smoothly away  from you, around the pliers.               Wrapped Loops       Use chain-nose pliers to grasp the wire just above the top of  the bead.    Use your fingers to bend the wire sharply over the top of the  pliers, at a 90° angle. You should have 2-3mm of straight wire  between the bead and the bend.    Use round-nose pliers to grasp a spot just above the bend, and  use your fingers to smoothly bend the wire all the way around the  tip of the pliers.    Now use pliers to grasp the wire firmly across the loop. Use  your fingers or chain-nose pliers to carefully wrap the wire around  the stem. For best control, experts recommend you break this step  into a series of half wraps.    Trim excess with flush cutters.                See Related Products links (below) for similar items and additional jewelry-making supplies that are often used with this item.      Basic Loops         The loop size will depend on how much wire you leave past the  end of your beads, and around which part of your pliers you bend  the loop. A good loop size is usually about 1/3 of the way from the  tip of your pliers, with about 8mm of wire.    Use round needle-nose pliers.    If using an eye pin, decide which way you want the loop to go -  the same direction as the premade loop on the other end, or  90º off. Keep this direction in mind as you bend the rest of  the wire.    Cut off any excess wire (we suggest retaining 8mm above the top  of your beads).    Grip the pin just above the top bead (at the arrow above), and  bend the wire sharply toward you.    Grasp the tip of the wire with pliers, and bend smoothly away  from you, around the pliers.               Wrapped Loops       Use chain-nose pliers to grasp the wire just above the top of  the bead.    Use your fingers to bend the wire sharply over the top of the  pliers, at a 90° angle. You should have 2-3mm of straight wire  between the bead and the bend.    Use round-nose pliers to grasp a spot just above the bend, and  use your fingers to smoothly bend the wire all the way around the  tip of the pliers.    Now use pliers to grasp the wire firmly across the loop. Use  your fingers or chain-nose pliers to carefully wrap the wire around  the stem. For best control, experts recommend you break this step  into a series of half wraps.    Trim excess with flush cutters.                See Related Products links (below) for similar items and additional jewelry-making supplies that are often used with this item.

    Yellow Plated Head Pin, 2", Standard (ounce)

    $6.41
    Basic Loops The loop size will depend on how much wire you leave past the end of your beads, and around which part of your pliers you bend the loop. A good loop size is usually about 1/3 of the way from the tip of your pliers, with about...
    Qty in Cart: 0
    Price:
    $6.41
    Subtotal:
  •      Basic Loops         The loop size will depend on how much wire you leave past the  end of your beads, and around which part of your pliers you bend  the loop. A good loop size is usually about 1/3 of the way from the  tip of your pliers, with about 8mm of wire.    Use round needle-nose pliers.    If using an eye pin, decide which way you want the loop to go -  the same direction as the premade loop on the other end, or  90º off. Keep this direction in mind as you bend the rest of  the wire.    Cut off any excess wire (we suggest retaining 8mm above the top  of your beads).    Grip the pin just above the top bead (at the arrow above), and  bend the wire sharply toward you.    Grasp the tip of the wire with pliers, and bend smoothly away  from you, around the pliers.               Wrapped Loops       Use chain-nose pliers to grasp the wire just above the top of  the bead.    Use your fingers to bend the wire sharply over the top of the  pliers, at a 90° angle. You should have 2-3mm of straight wire  between the bead and the bend.    Use round-nose pliers to grasp a spot just above the bend, and  use your fingers to smoothly bend the wire all the way around the  tip of the pliers.    Now use pliers to grasp the wire firmly across the loop. Use  your fingers or chain-nose pliers to carefully wrap the wire around  the stem. For best control, experts recommend you break this step  into a series of half wraps.    Trim excess with flush cutters.                See Related Products links (below) for similar items and additional jewelry-making supplies that are often used with this item.

    Antiqued Pewter Plated Head Pin, 2", Small Ball and Rope End (100 Pieces)

    $6.75
    Basic Loops The loop size will depend on how much wire you leave past the end of your beads, and around which part of your pliers you bend the loop. A good loop size is usually about 1/3 of the way from the tip of your pliers, with about...
    Qty in Cart: 0
    Quantity:
    Price:
    $6.75
    Subtotal:
  •      Basic Loops         The loop size will depend on how much wire you leave past the  end of your beads, and around which part of your pliers you bend  the loop. A good loop size is usually about 1/3 of the way from the  tip of your pliers, with about 8mm of wire.    Use round needle-nose pliers.    If using an eye pin, decide which way you want the loop to go -  the same direction as the premade loop on the other end, or  90º off. Keep this direction in mind as you bend the rest of  the wire.    Cut off any excess wire (we suggest retaining 8mm above the top  of your beads).    Grip the pin just above the top bead (at the arrow above), and  bend the wire sharply toward you.    Grasp the tip of the wire with pliers, and bend smoothly away  from you, around the pliers.               Wrapped Loops       Use chain-nose pliers to grasp the wire just above the top of  the bead.    Use your fingers to bend the wire sharply over the top of the  pliers, at a 90° angle. You should have 2-3mm of straight wire  between the bead and the bend.    Use round-nose pliers to grasp a spot just above the bend, and  use your fingers to smoothly bend the wire all the way around the  tip of the pliers.    Now use pliers to grasp the wire firmly across the loop. Use  your fingers or chain-nose pliers to carefully wrap the wire around  the stem. For best control, experts recommend you break this step  into a series of half wraps.    Trim excess with flush cutters.                See Related Products links (below) for similar items and additional jewelry-making supplies that are often used with this item.

    Assorted Eye Pins, 7/8", Standard (ounce)

    $6.00
    Basic Loops The loop size will depend on how much wire you leave past the end of your beads, and around which part of your pliers you bend the loop. A good loop size is usually about 1/3 of the way from the tip of your pliers, with about...
    Qty in Cart: 0
    Price:
    $6.00
    Subtotal:
  •      Basic Loops         The loop size will depend on how much wire you leave past the  end of your beads, and around which part of your pliers you bend  the loop. A good loop size is usually about 1/3 of the way from the  tip of your pliers, with about 8mm of wire.    Use round needle-nose pliers.    If using an eye pin, decide which way you want the loop to go -  the same direction as the premade loop on the other end, or  90º off. Keep this direction in mind as you bend the rest of  the wire.    Cut off any excess wire (we suggest retaining 8mm above the top  of your beads).    Grip the pin just above the top bead (at the arrow above), and  bend the wire sharply toward you.    Grasp the tip of the wire with pliers, and bend smoothly away  from you, around the pliers.               Wrapped Loops       Use chain-nose pliers to grasp the wire just above the top of  the bead.    Use your fingers to bend the wire sharply over the top of the  pliers, at a 90° angle. You should have 2-3mm of straight wire  between the bead and the bend.    Use round-nose pliers to grasp a spot just above the bend, and  use your fingers to smoothly bend the wire all the way around the  tip of the pliers.    Now use pliers to grasp the wire firmly across the loop. Use  your fingers or chain-nose pliers to carefully wrap the wire around  the stem. For best control, experts recommend you break this step  into a series of half wraps.    Trim excess with flush cutters.                See Related Products links (below) for similar items and additional jewelry-making supplies that are often used with this item.      Basic Loops         The loop size will depend on how much wire you leave past the  end of your beads, and around which part of your pliers you bend  the loop. A good loop size is usually about 1/3 of the way from the  tip of your pliers, with about 8mm of wire.    Use round needle-nose pliers.    If using an eye pin, decide which way you want the loop to go -  the same direction as the premade loop on the other end, or  90º off. Keep this direction in mind as you bend the rest of  the wire.    Cut off any excess wire (we suggest retaining 8mm above the top  of your beads).    Grip the pin just above the top bead (at the arrow above), and  bend the wire sharply toward you.    Grasp the tip of the wire with pliers, and bend smoothly away  from you, around the pliers.               Wrapped Loops       Use chain-nose pliers to grasp the wire just above the top of  the bead.    Use your fingers to bend the wire sharply over the top of the  pliers, at a 90° angle. You should have 2-3mm of straight wire  between the bead and the bend.    Use round-nose pliers to grasp a spot just above the bend, and  use your fingers to smoothly bend the wire all the way around the  tip of the pliers.    Now use pliers to grasp the wire firmly across the loop. Use  your fingers or chain-nose pliers to carefully wrap the wire around  the stem. For best control, experts recommend you break this step  into a series of half wraps.    Trim excess with flush cutters.                See Related Products links (below) for similar items and additional jewelry-making supplies that are often used with this item.

    Gunmetal Ball End Head Pin, Standard, 1.5" (100 Pieces)

    $9.23
    Basic Loops The loop size will depend on how much wire you leave past the end of your beads, and around which part of your pliers you bend the loop. A good loop size is usually about 1/3 of the way from the tip of your pliers, with about...
    Qty in Cart: 0
    Quantity:
    Price:
    $9.23
    Subtotal:
  •      Basic Loops         The loop size will depend on how much wire you leave past the  end of your beads, and around which part of your pliers you bend  the loop. A good loop size is usually about 1/3 of the way from the  tip of your pliers, with about 8mm of wire.    Use round needle-nose pliers.    If using an eye pin, decide which way you want the loop to go -  the same direction as the premade loop on the other end, or  90º off. Keep this direction in mind as you bend the rest of  the wire.    Cut off any excess wire (we suggest retaining 8mm above the top  of your beads).    Grip the pin just above the top bead (at the arrow above), and  bend the wire sharply toward you.    Grasp the tip of the wire with pliers, and bend smoothly away  from you, around the pliers.               Wrapped Loops       Use chain-nose pliers to grasp the wire just above the top of  the bead.    Use your fingers to bend the wire sharply over the top of the  pliers, at a 90° angle. You should have 2-3mm of straight wire  between the bead and the bend.    Use round-nose pliers to grasp a spot just above the bend, and  use your fingers to smoothly bend the wire all the way around the  tip of the pliers.    Now use pliers to grasp the wire firmly across the loop. Use  your fingers or chain-nose pliers to carefully wrap the wire around  the stem. For best control, experts recommend you break this step  into a series of half wraps.    Trim excess with flush cutters.                See Related Products links (below) for similar items and additional jewelry-making supplies that are often used with this item.

    Antiqued Pewter Plated Head Pin, 2", Woven End (100 Pieces)

    $6.75
    Basic Loops The loop size will depend on how much wire you leave past the end of your beads, and around which part of your pliers you bend the loop. A good loop size is usually about 1/3 of the way from the tip of your pliers, with about...
    Qty in Cart: 0
    Quantity:
    Price:
    $6.75
    Subtotal:
  •      Basic Loops         The loop size will depend on how much wire you leave past the  end of your beads, and around which part of your pliers you bend  the loop. A good loop size is usually about 1/3 of the way from the  tip of your pliers, with about 8mm of wire.    Use round needle-nose pliers.    If using an eye pin, decide which way you want the loop to go -  the same direction as the premade loop on the other end, or  90º off. Keep this direction in mind as you bend the rest of  the wire.    Cut off any excess wire (we suggest retaining 8mm above the top  of your beads).    Grip the pin just above the top bead (at the arrow above), and  bend the wire sharply toward you.    Grasp the tip of the wire with pliers, and bend smoothly away  from you, around the pliers.               Wrapped Loops       Use chain-nose pliers to grasp the wire just above the top of  the bead.    Use your fingers to bend the wire sharply over the top of the  pliers, at a 90° angle. You should have 2-3mm of straight wire  between the bead and the bend.    Use round-nose pliers to grasp a spot just above the bend, and  use your fingers to smoothly bend the wire all the way around the  tip of the pliers.    Now use pliers to grasp the wire firmly across the loop. Use  your fingers or chain-nose pliers to carefully wrap the wire around  the stem. For best control, experts recommend you break this step  into a series of half wraps.    Trim excess with flush cutters.                See Related Products links (below) for similar items and additional jewelry-making supplies that are often used with this item.      Basic Loops         The loop size will depend on how much wire you leave past the  end of your beads, and around which part of your pliers you bend  the loop. A good loop size is usually about 1/3 of the way from the  tip of your pliers, with about 8mm of wire.    Use round needle-nose pliers.    If using an eye pin, decide which way you want the loop to go -  the same direction as the premade loop on the other end, or  90º off. Keep this direction in mind as you bend the rest of  the wire.    Cut off any excess wire (we suggest retaining 8mm above the top  of your beads).    Grip the pin just above the top bead (at the arrow above), and  bend the wire sharply toward you.    Grasp the tip of the wire with pliers, and bend smoothly away  from you, around the pliers.               Wrapped Loops       Use chain-nose pliers to grasp the wire just above the top of  the bead.    Use your fingers to bend the wire sharply over the top of the  pliers, at a 90° angle. You should have 2-3mm of straight wire  between the bead and the bend.    Use round-nose pliers to grasp a spot just above the bend, and  use your fingers to smoothly bend the wire all the way around the  tip of the pliers.    Now use pliers to grasp the wire firmly across the loop. Use  your fingers or chain-nose pliers to carefully wrap the wire around  the stem. For best control, experts recommend you break this step  into a series of half wraps.    Trim excess with flush cutters.                See Related Products links (below) for similar items and additional jewelry-making supplies that are often used with this item.

    Assorted Brass Eye Pins, 2", Standard (ounce)

    $7.10
    Basic Loops The loop size will depend on how much wire you leave past the end of your beads, and around which part of your pliers you bend the loop. A good loop size is usually about 1/3 of the way from the tip of your pliers, with about...
    Qty in Cart: 0
    Quantity:
    Price:
    $7.10
    Subtotal:
  • What is niobium?    Niobium is a nickel-free inert metal. It is very resistant to  corrosion and other reactions, and is used in medical implants.  Niobium is not plated or painted, so will not flake or chip. It is  anodized, meaning it is colored by dipping it into an electrically  charged "bath." Because it contains no nickel, lead, or other  additives, most people with metal allergies can safely wear  niobium.     Niobium Colors will vary: Colors from different  batches, especially teal, may not exactly match. Teal ear wires and  teal jump rings will look nice together, but are almost guaranteed  to be different shades.     See Related Products links (below) for similar items and additional jewelry-making supplies that are often used with this item.

    Blue Niobium Head Pin, 1.5", Standard (10 Pieces)

    $4.65
    What is niobium? Niobium is a nickel-free inert metal. It is very resistant to corrosion and other reactions, and is used in medical implants. Niobium is not plated or painted, so will not flake or chip. It is anodized, meaning it is colored by...
    Qty in Cart: 0
    Quantity:
    Price:
    $4.65
    Subtotal:
  • What is niobium?    Niobium is a nickel-free inert metal. It is very resistant to  corrosion and other reactions, and is used in medical implants.  Niobium is not plated or painted, so will not flake or chip. It is  anodized, meaning it is colored by dipping it into an electrically  charged "bath." Because it contains no nickel, lead, or other  additives, most people with metal allergies can safely wear  niobium.     Niobium Colors will vary: Colors from different  batches, especially teal, may not exactly match. Teal ear wires and  teal jump rings will look nice together, but are almost guaranteed  to be different shades.     See Related Products links (below) for similar items and additional jewelry-making supplies that are often used with this item.

    Niobium Head Pin, 1.5", Standard 21ga - Steel Blue (10 Pieces)

    $4.96
    What is niobium? Niobium is a nickel-free inert metal. It is very resistant to corrosion and other reactions, and is used in medical implants. Niobium is not plated or painted, so will not flake or chip. It is anodized, meaning it is colored by...
    Qty in Cart: 0
    Quantity:
    Price:
    $4.96
    Subtotal:
  •      Basic Loops         The loop size will depend on how much wire you leave past the  end of your beads, and around which part of your pliers you bend  the loop. A good loop size is usually about 1/3 of the way from the  tip of your pliers, with about 8mm of wire.    Use round needle-nose pliers.    If using an eye pin, decide which way you want the loop to go -  the same direction as the premade loop on the other end, or  90º off. Keep this direction in mind as you bend the rest of  the wire.    Cut off any excess wire (we suggest retaining 8mm above the top  of your beads).    Grip the pin just above the top bead (at the arrow above), and  bend the wire sharply toward you.    Grasp the tip of the wire with pliers, and bend smoothly away  from you, around the pliers.               Wrapped Loops       Use chain-nose pliers to grasp the wire just above the top of  the bead.    Use your fingers to bend the wire sharply over the top of the  pliers, at a 90° angle. You should have 2-3mm of straight wire  between the bead and the bend.    Use round-nose pliers to grasp a spot just above the bend, and  use your fingers to smoothly bend the wire all the way around the  tip of the pliers.    Now use pliers to grasp the wire firmly across the loop. Use  your fingers or chain-nose pliers to carefully wrap the wire around  the stem. For best control, experts recommend you break this step  into a series of half wraps.    Trim excess with flush cutters.                See Related Products links (below) for similar items and additional jewelry-making supplies that are often used with this item.      Basic Loops         The loop size will depend on how much wire you leave past the  end of your beads, and around which part of your pliers you bend  the loop. A good loop size is usually about 1/3 of the way from the  tip of your pliers, with about 8mm of wire.    Use round needle-nose pliers.    If using an eye pin, decide which way you want the loop to go -  the same direction as the premade loop on the other end, or  90º off. Keep this direction in mind as you bend the rest of  the wire.    Cut off any excess wire (we suggest retaining 8mm above the top  of your beads).    Grip the pin just above the top bead (at the arrow above), and  bend the wire sharply toward you.    Grasp the tip of the wire with pliers, and bend smoothly away  from you, around the pliers.               Wrapped Loops       Use chain-nose pliers to grasp the wire just above the top of  the bead.    Use your fingers to bend the wire sharply over the top of the  pliers, at a 90° angle. You should have 2-3mm of straight wire  between the bead and the bend.    Use round-nose pliers to grasp a spot just above the bend, and  use your fingers to smoothly bend the wire all the way around the  tip of the pliers.    Now use pliers to grasp the wire firmly across the loop. Use  your fingers or chain-nose pliers to carefully wrap the wire around  the stem. For best control, experts recommend you break this step  into a series of half wraps.    Trim excess with flush cutters.                See Related Products links (below) for similar items and additional jewelry-making supplies that are often used with this item.

    Silver Plated Head Pin, 2", Standard (ounce)

    $7.45
    Basic Loops The loop size will depend on how much wire you leave past the end of your beads, and around which part of your pliers you bend the loop. A good loop size is usually about 1/3 of the way from the tip of your pliers, with about...
    Qty in Cart: 0
    Price:
    $7.45
    Subtotal:
  •      Basic Loops         The loop size will depend on how much wire you leave past the  end of your beads, and around which part of your pliers you bend  the loop. A good loop size is usually about 1/3 of the way from the  tip of your pliers, with about 8mm of wire.    Use round needle-nose pliers.    If using an eye pin, decide which way you want the loop to go -  the same direction as the premade loop on the other end, or  90º off. Keep this direction in mind as you bend the rest of  the wire.    Cut off any excess wire (we suggest retaining 8mm above the top  of your beads).    Grip the pin just above the top bead (at the arrow above), and  bend the wire sharply toward you.    Grasp the tip of the wire with pliers, and bend smoothly away  from you, around the pliers.               Wrapped Loops       Use chain-nose pliers to grasp the wire just above the top of  the bead.    Use your fingers to bend the wire sharply over the top of the  pliers, at a 90° angle. You should have 2-3mm of straight wire  between the bead and the bend.    Use round-nose pliers to grasp a spot just above the bend, and  use your fingers to smoothly bend the wire all the way around the  tip of the pliers.    Now use pliers to grasp the wire firmly across the loop. Use  your fingers or chain-nose pliers to carefully wrap the wire around  the stem. For best control, experts recommend you break this step  into a series of half wraps.    Trim excess with flush cutters.                See Related Products links (below) for similar items and additional jewelry-making supplies that are often used with this item.

    White Plated Head Pin, Size Assortment (ounce)

    $5.46
    Basic Loops The loop size will depend on how much wire you leave past the end of your beads, and around which part of your pliers you bend the loop. A good loop size is usually about 1/3 of the way from the tip of your pliers, with about...
    Qty in Cart: 0
    Price:
    $5.46
    Subtotal:
  •      Basic Loops         The loop size will depend on how much wire you leave past the  end of your beads, and around which part of your pliers you bend  the loop. A good loop size is usually about 1/3 of the way from the  tip of your pliers, with about 8mm of wire.    Use round needle-nose pliers.    If using an eye pin, decide which way you want the loop to go -  the same direction as the premade loop on the other end, or  90º off. Keep this direction in mind as you bend the rest of  the wire.    Cut off any excess wire (we suggest retaining 8mm above the top  of your beads).    Grip the pin just above the top bead (at the arrow above), and  bend the wire sharply toward you.    Grasp the tip of the wire with pliers, and bend smoothly away  from you, around the pliers.               Wrapped Loops       Use chain-nose pliers to grasp the wire just above the top of  the bead.    Use your fingers to bend the wire sharply over the top of the  pliers, at a 90° angle. You should have 2-3mm of straight wire  between the bead and the bend.    Use round-nose pliers to grasp a spot just above the bend, and  use your fingers to smoothly bend the wire all the way around the  tip of the pliers.    Now use pliers to grasp the wire firmly across the loop. Use  your fingers or chain-nose pliers to carefully wrap the wire around  the stem. For best control, experts recommend you break this step  into a series of half wraps.    Trim excess with flush cutters.                See Related Products links (below) for similar items and additional jewelry-making supplies that are often used with this item.

    Antiqued Pewter Plated Head Pin, 2", Ball and Rope End (100 Pieces)

    $11.48
    Basic Loops The loop size will depend on how much wire you leave past the end of your beads, and around which part of your pliers you bend the loop. A good loop size is usually about 1/3 of the way from the tip of your pliers, with about...
    Qty in Cart: 0
    Quantity:
    Price:
    $11.48
    Subtotal:
  •      Basic Loops         The loop size will depend on how much wire you leave past the  end of your beads, and around which part of your pliers you bend  the loop. A good loop size is usually about 1/3 of the way from the  tip of your pliers, with about 8mm of wire.    Use round needle-nose pliers.    If using an eye pin, decide which way you want the loop to go -  the same direction as the premade loop on the other end, or  90º off. Keep this direction in mind as you bend the rest of  the wire.    Cut off any excess wire (we suggest retaining 8mm above the top  of your beads).    Grip the pin just above the top bead (at the arrow above), and  bend the wire sharply toward you.    Grasp the tip of the wire with pliers, and bend smoothly away  from you, around the pliers.               Wrapped Loops       Use chain-nose pliers to grasp the wire just above the top of  the bead.    Use your fingers to bend the wire sharply over the top of the  pliers, at a 90° angle. You should have 2-3mm of straight wire  between the bead and the bend.    Use round-nose pliers to grasp a spot just above the bend, and  use your fingers to smoothly bend the wire all the way around the  tip of the pliers.    Now use pliers to grasp the wire firmly across the loop. Use  your fingers or chain-nose pliers to carefully wrap the wire around  the stem. For best control, experts recommend you break this step  into a series of half wraps.    Trim excess with flush cutters.                See Related Products links (below) for similar items and additional jewelry-making supplies that are often used with this item.

    Antiqued Pewter Plated Head Pin, 2", Standard (Pack)

    $4.91
    Basic Loops The loop size will depend on how much wire you leave past the end of your beads, and around which part of your pliers you bend the loop. A good loop size is usually about 1/3 of the way from the tip of your pliers, with about...
    Qty in Cart: 0
    Quantity:
    Price:
    $4.91
    Subtotal:
  •      Basic Loops         The loop size will depend on how much wire you leave past the  end of your beads, and around which part of your pliers you bend  the loop. A good loop size is usually about 1/3 of the way from the  tip of your pliers, with about 8mm of wire.    Use round needle-nose pliers.    If using an eye pin, decide which way you want the loop to go -  the same direction as the premade loop on the other end, or  90º off. Keep this direction in mind as you bend the rest of  the wire.    Cut off any excess wire (we suggest retaining 8mm above the top  of your beads).    Grip the pin just above the top bead (at the arrow above), and  bend the wire sharply toward you.    Grasp the tip of the wire with pliers, and bend smoothly away  from you, around the pliers.               Wrapped Loops       Use chain-nose pliers to grasp the wire just above the top of  the bead.    Use your fingers to bend the wire sharply over the top of the  pliers, at a 90° angle. You should have 2-3mm of straight wire  between the bead and the bend.    Use round-nose pliers to grasp a spot just above the bend, and  use your fingers to smoothly bend the wire all the way around the  tip of the pliers.    Now use pliers to grasp the wire firmly across the loop. Use  your fingers or chain-nose pliers to carefully wrap the wire around  the stem. For best control, experts recommend you break this step  into a series of half wraps.    Trim excess with flush cutters.                See Related Products links (below) for similar items and additional jewelry-making supplies that are often used with this item.

    Assorted Color Head Pin, 2", Standard (ounce)

    $7.15
    Basic Loops The loop size will depend on how much wire you leave past the end of your beads, and around which part of your pliers you bend the loop. A good loop size is usually about 1/3 of the way from the tip of your pliers, with about...
    Qty in Cart: 0
    Price:
    $7.15
    Subtotal:
  • Total: items /

Adding your products to cart