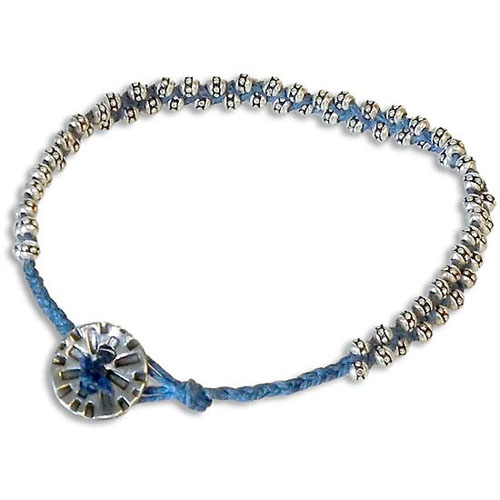
Thin Blue Line Friendship Bracelet Tutorial

Created by: Amy Mickelson
Designer Tips
- Create a loop large enough for the button to go through.
- A clipboard works well to anchor knotting projects. Clamp the loop under the clip.
- Braid a 3-strand braid with the cord for about 1" or as long as desired.
- String equal quantities of the beads on all 3 strands of cord. Secure each cord end with an overhand knot to keep the beads from falling off. Adding all the beads at once is easier than holding your work and trying to thread a bead on a cord as you go.
- The waxed linen is stiff enough that you won't need a needle to thread on the beads. Note: Waxed linen is no longer available in blue. Size #18 SuperLon is slightly thinner (0.5mm instead of 0.7mm) but is available in great shades of blue.
- Continue braiding, sliding a bead up to the each outside position (left and right) before crossing the cord over.
- Repeat until all the beads are gone.
- Braid about another 1" (or desired length) with just the cord, and tie an overhand knot.
- Add a button, secure with knots and cut the excess cord.
- Add a dab of Bead Fix™ adhesive to the cord ends to keep them from fraying.
- The finished length is 8.75". Adjust the number of beads and length as desired.
- Beads with a 1mm or larger hole size will work with the waxed linen cord.
- For detailed instructions for making this bracelet, see HonestlyWTF.com's DIY Braided Bead Bracelet.
Suggested Supplies
- 1 ea #60-242 Adhesive, Bead Fix™
- 1 pkg of 100 [use 72] #49-960-01-AS Bead, Seed
- 1 ea #59-100-11-AP Button, Cast, Radiant Round
- 1 spool [use two 30" and one 15" piece] #61-427-20 Cord, Waxed Linen, 5 ply, 25yd
Additional Supplies
- Clipboard
- Scissors
Jan 1st 2022
Our Bead Blog
-

Edgy Elegance Necklace
Mar 22nd 2024Created by: Guest Designer Deb FlorosSuggested Supplies 1 #20-111-204 TOHO Glass Seed Bead, Size 11
-

Elegant Button Earrings
Mar 22nd 2024Created by: Guest Designer Deb FlorosSuggested Supplies 1 #27-841-042-50 Beadalon Bead Bumper, 1.5m
-

Abstract Painted Cuffs
Feb 26th 2024Created by: Guest Designer Deb FlorosSuggested Supplies 1 #51-810-05-17 Leather Cuff Bracelet, 1/2"