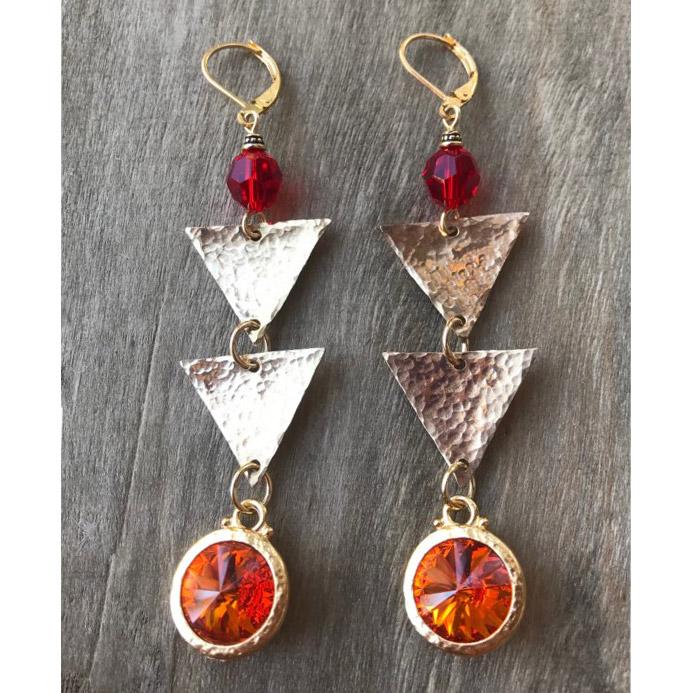
Tangerine Delta Earrings Tutorial

Created by: Megan Holden
Designer Tips
- Clean the inside of the rivoli settings with alcohol swabs, and allow to dry.
- Place a small drop of E-6000 or GS Hypo Cement into the cup of each setting and lightly but firmly press your Tangerine rivolis into the settings. Set aside and allow to dry.
- Use a ball peen hammer and metal block to texture the brass triangles.
- You can leave the brass blanks as-is, or polish them to a high shine, and then seal the surface to protect the high shine.
- Carefully find the center line (so the earrings hang properly), and punch a hole at the top and bottom of each brass triangle.
- See below for polishing & sealant options, before assembling earrings.
- Brass will naturally oxidize, which is great if you want a rustic look for these earrings. If you prefer a high shine, you have two basic options:
- If you're making just one or 2 pairs of earrings, use progressively finer grits of sanding sponges or polishing paper, and finish with an ULTRA polishing pad. (Or just jump right to the ULTRA polishing pad.)
- If you make a lot of jewelry, and you don't love hand polishing, sanding, filing, etc., then a tumbler is the way to go! Tumble just one type of metal at a time, or you may end up with strange results. (Trust me.) Toss your blanks into a tumbler with 2lbs of steel shot, a few drops of ShineBrite and just enough water to cover the steel shot, and tumble your components for approximately an hour (30 minutes to 3 hours). This removes small scratches and other blemishes, smooths any rough edges, and gives your patterned blanks a high shine. Rinse the blanks and dry them with a soft cloth.
- To seal your bright finish, follow the instructions on Ren Wax, or for the best, most durable jeweler-quality finish, use Nikolas Spray Lacquer.
- Allow the sealant to harden before assembling earrings.
- Add a Light Siam crystal and small bead cap to an eye pin, and make a simple loop. Create your eye pin loop perpendicular to the pre-made loop, to make the earrings hang straight. You may need to use 2 pairs of chain-nose pliers to turn the top and bottom loops perfectly perpendicular (90-degrees). New to jewelry-making? For looping instructions, and most secure way way to open and close jump rings, see Jewelry Basics 101 (PDF).
- Use medium-sized jump rings from the jump ring mix to assemble the earrings, making sure that all parts can swing freely.
Suggested Supplies
- 1 dozen (use 4 pieces) #44-722-03-0 Brass Stamping Blank, Triangle, 17x15mm
- 2 each #05-000-08-21 Swarovski 5000 Faceted Round Beads, 8mm - Light Siam
- 2 each #01-122-12-421 Swarovski 1122 Rivoli Stone, 12mm - Tangerine
- 2 each #41-865-912-GP TierraCast 12mm Hammered Rivoli Frame, 1 Loop - Gold Plate
- 1 half-gross (use 1 pair) #34-389-51-4 Gold Plated Leverback Ear Wire, Plain, 14x11mm
- 1 ounce (use 4) #37-100-2 Yellow Plated Jump Ring, Round, Assorted Sizes
- 1 100-pack (use 2 pieces) #43-132-AG TierraCast Antiqued Gold Plated Bead Caps, Cast, Beaded
- 1 ounce (use 2 pieces) #37-722-2 Yellow Plated Eye Pin, 2", Standard
or
1 ounce (use 2 pieces) #37-715-2 Yellow Plated Eye Pin, 1-1/2", Thin
(either size eye pin works fine for this design) - Adhesive: E-6000 or GS Hypo Cement
Tools
- Ball Peen Hammer
- Metal Block
- Hole Punch
- Wire Cutters
- Round-Nose Pliers
- Chain-Nose Pliers
- Optional: Polishing supplies (see options in text above)
- Optional: Sealant
- Alcohol wipes, or cotton swabs and isopropyl alcohol.
Jan 1st 2021
Our Bead Blog
-

Edgy Elegance Necklace
Mar 22nd 2024Created by: Guest Designer Deb FlorosSuggested Supplies 1 #20-111-204 TOHO Glass Seed Bead, Size 11
-

Elegant Button Earrings
Mar 22nd 2024Created by: Guest Designer Deb FlorosSuggested Supplies 1 #27-841-042-50 Beadalon Bead Bumper, 1.5m
-

Abstract Painted Cuffs
Feb 26th 2024Created by: Guest Designer Deb FlorosSuggested Supplies 1 #51-810-05-17 Leather Cuff Bracelet, 1/2"