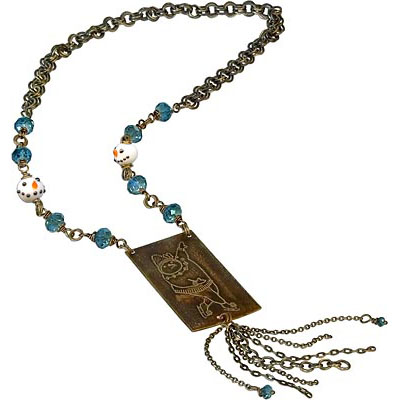
Sonya Snow Skater Necklace Tutorial

Created by: Amy Mickelson
Designer Tips
- Cut the metal sheet to the desired size. File the edges smooth and punch holes in corners and on the bottom. Sand the surfaces and clean.
- Place inked rubber stamp on flat surface, ink side up. Press the metal piece onto stamped image and remove.
- If you do not like the design placement or it smudges, use StazOn® Cleaner to remove the image.
- It may take a few stamping attempts to achieve success. Take your time getting a good stamp before you begin etching.
- Etch the stamped piece following the directions in the etching kit. Additional information can be found on the Rings & Things metal etching blog post (link below).
- Patina and sand the high points with the Vintaj® Metal Reliefing Block.
- Create wrapped loop bead connectors with 4mm, 6mm, and 8mm crystal, glass or gemstone beads and 6" pieces of 20-gauge wire. The long pieces of wire allows for large-looped rustic wraps.
- Use two jump rings to connect each of the wrapped loop connectors and to attach the etched pendant.
- Attach the double-link chain, or make your own with 8mm antiqued brass jump rings. No clasp is needed if you use a 12" (or longer) piece of chain.
- Cut short lengths (2-2.5") of various antiqued brass chain to create a tassel and attach them to the bottom of the pendant with 5mm jump rings.
- Optional: Add a few small sparkly bead dangles to the tassel.
Free Technique Sheets & How-Tos
Suggested Supplies
- 1 ea [use ten 6" pieces] #46-400-30 Artistic Wire®, 20ga, 45ft
- 1 dozen [use 1] #05-328-04-124 Faceted Crystal Bicone Beads, 4mm - Indicolite
- 1 dozen [use 8] #05-040-08-124 Swarovski 5040 Briolette Beads (Rondelles), 8mm - Indicolite (out of production)
- 1 dozen [use 1] #05-040-06-124 Swarovski 5040 Briolette Beads, (Rondelle) 6mm - Indicolite (out of production)
- 1 spool [use four 2" pieces, and two 2.5" pieces] #40-011-001-6-SP Antique Brass Color Cable Chain by the SPOOL, 2.2mm
- 1 foot [use one 2.25" piece] #Additional favorite Antiqued Brass Chain Scrap
- 1 oz [use approx. 120 pieces] #37-167-6 Antiqued Brass Plated Jump Ring, Round, 8mm or
1 foot #Favorite 8mm Double-Link Brass Chain - 1 ea #86-169-02 Cleaner, StazOn®, 2oz
- 1 pkg of 100 [use 2] #37-099-15-6 Head Pin, 1.5", Standard, Ball End
- 1 oz [use 3] #37-136-6 Jump Ring, Round, 5mm
- 1 oz [use 20] #37-145-6 Jump Ring, Round, 6mm
- 1 ea #45-210-001 Kit, Etching Supplies
- 1 pkg of 6 [use 1] #64-991-20-200 Sheet, 20 Gauge, 6x2"
Tools
- #69-047 Tool, File Set
- #69-271-06 Tool, Glitter, Bent Chain-Nose Pliers
- #69-271-99 Tool, Glitter, Four-Piece Set
- #69-235 Tool, Metal Punch, Two Hole
- #69-383 Tool, Safety Glasses
- #69-257 Tool, Sanding Sponges, Set
- #69-230 Tool, Shear, 7"
- #69-327 Vintaj® Metal Reliefing Block
Additional Supplies
- Apron or smock
- Baking soda
- Citric acid (from grocery store)
- Duct tape
- Fine point Sharpie
- Rubber gloves
- Rubber stamp of your choice (this design uses the "Ice Pond Princess" stamp from rubbermoon.com)
- Handmade glass or polymer clay snowman head beads (or other Christmas beads)
- Rubbing alcohol
- Scrubby sponge
- Styrofoam™ float (available from craft supplier or upcycled packing material)
Dec 1st 2021
Our Bead Blog
-

Edgy Elegance Necklace
Mar 22nd 2024Created by: Guest Designer Deb FlorosSuggested Supplies 1 #20-111-204 TOHO Glass Seed Bead, Size 11
-

Elegant Button Earrings
Mar 22nd 2024Created by: Guest Designer Deb FlorosSuggested Supplies 1 #27-841-042-50 Beadalon Bead Bumper, 1.5m
-

Abstract Painted Cuffs
Feb 26th 2024Created by: Guest Designer Deb FlorosSuggested Supplies 1 #51-810-05-17 Leather Cuff Bracelet, 1/2"