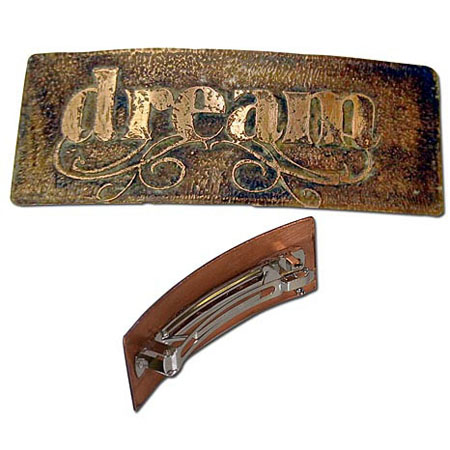
Pleasant Dream Etched Barrette Tutorial

Created by: Rita Hutchinson
Designer Tips
- Cut your metal sheet to desired size and use a file to round the corners and smooth all edges.
- Clean with Penny Brite® Copper Cleaner and scrubby until water sheets off. Only handle by the edges from this point on.
- Stamp your design once, cleanly, and lift the stamp straight off. Allow the ink to dry without disturbing further. If needed or desired, touch up the inked design with black or red Sharpie® marker.
- Etch as directed following instructions in the kit.
- File edges further if needed. Patina with Win-Ox™ and highlight with the sanding sponges.
- Gently curve the etched piece with bracelet bending pliers. Do not form to the full arc of the pliers, just use them along the length to create a gentle arc that matches the barrette back. To solder properly, the pieces must meet with little (if any) gap.
- Disassemble the barrette, coat the top with flux and add a layer of soft solder.
- Use sanding sponge to remove oxidation from back of piece, add flux, and use micro torch to sweat the soft solder to the barrette. When the piece is cool, clean thoroughly, and re-assemble the barrette.
- Apply Renaissance® wax to front and back of copper. Buff with cloth once it is set.
Free Technique Sheets & How-Tos
Suggested Supplies
- 1 dozen [use 1] #30-523 French Barette Back (60mm size shown is no longer available, but 40mm, 70mm, 80mm and 100mm are available)
- 1 ea #69-052 Flux, Stay-Clean Liquid - 4 oz (for Soft Solder)
- 1 each #45-210-001 Kit, Etching Supplies
- 1 each #86-915 Renaissance® Micro-Crystalline Wax Polish
- 1 pkg of 6 [use 1/2 of 1 strip] #64-981-20-100 Sheet, 20 Gauge, 6x1"
- 1 each #69-068 Solder, Choice™
- 1 each #86-343 Win-Ox™, 3 oz.
Tools
- #69-251-PL File Handle, Plastic
- #87-080 Rings & Things Micro Torch Kit
- #69-417 Soldering Iron, Hakko®, 60W
- #69-252-01-2 Tool, Flat File, 6", #2 Cut
- #69-341 Tool, Hammer, Nylon
- #69-306-P Tool, Pliers, Bracelet Bending, Nylon Jaw
- #69-257 Tool, Sanding Sponges, Set
- #69-230 Tool, Shear, 7"
- #69-389 Ranger Non-Stick Craft Sheet
- #69-125 Steel 4" Square Block
Additional Supplies
- Apron
- Baking Soda (from grocery store)
- Citric Acid (from grocery or health food store)
- Cloth or Rag
- Duct Tape (from hardware store)
- Green scrubby type sponge
- Plastic Containers
- Rubber Gloves
- Rubber Stamp (from hobby store)
- Styrofoam™ "float" (available from craft supplier or upcycled packing material)
- Extra fine-point Sharpie
Oct 27th 2021
Our Bead Blog
-

Simply Springy 2-Hole Bracelet
Apr 28th 2025Designed by: Guest Designer Deb Floros Suggested Supplies 1 #61-840-50-01 Beadalon Cord, WildFire,
-

Exotic Statement Necklace
Apr 28th 2025Designed by: Guest Designer Deb Floros Suggested Supplies 1 #88-400-003-5 58x50mm Pewter Connector,
-

Rubber Tubing Necklace and Memory Wire Bracelet Set
Mar 21st 2025Designed by: Guest Designer Deb Floros Suggested Supplies 1 #61-622-02 2mm Rubber Cord, Bulk, for J