Little Sprout Necklace Tutorial

Created by: Mollie Valente
Designer Tips
- For step-by-step illustrated instructions showing how to engrave the pendant, see Rings & Things blog post "Jewelry Making DIY – Make a Micro Engraved Pendant"
- Next, assemble the necklace:
- New to jewelry-making? See Basic Jewelry-Making Technique Sheet (PDF) for most secure method of opening and closing jump rings, and other basic jewelry-making information.
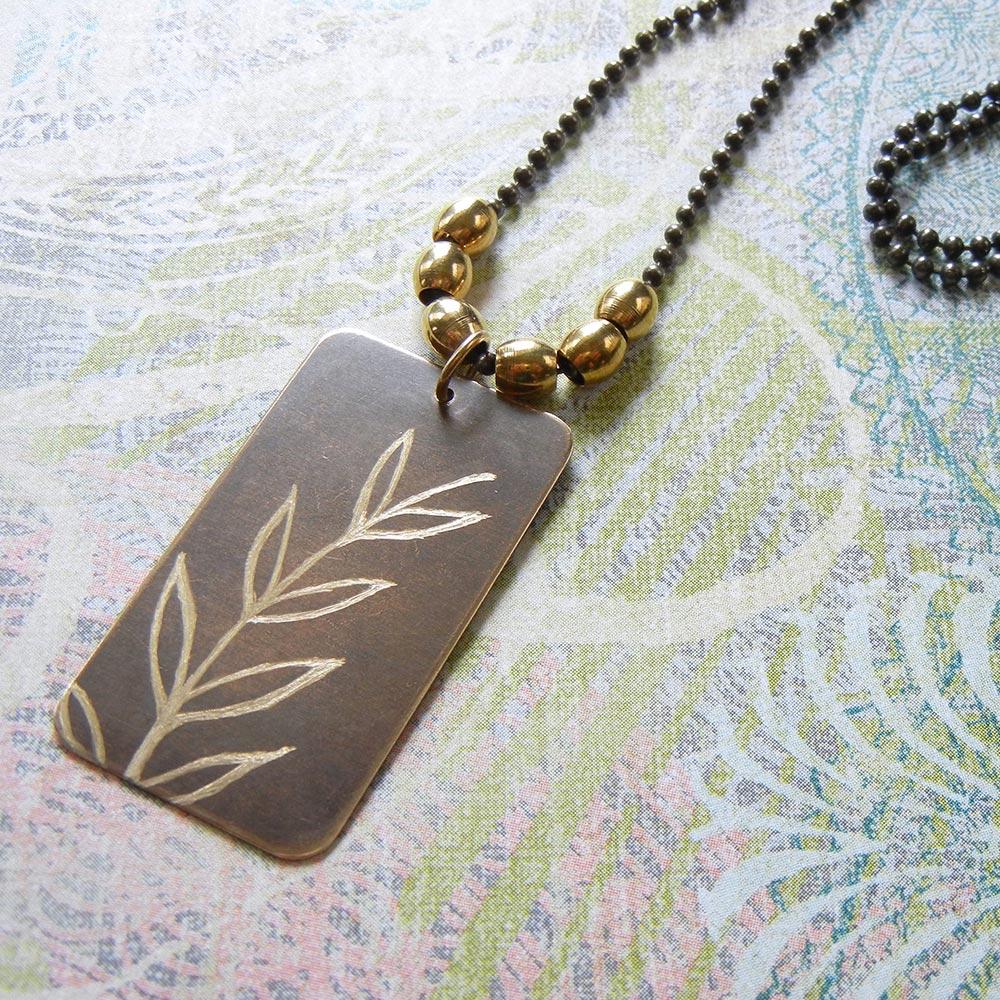
- Attach a 6mm jump ring to the completed pendant's hanging hole.
- Cut the ball chain to your desired length.
- String the pendant onto the ball chain and position it at the mid-way point.
- From each side of the necklace, string on 3 each large-hole beads (for a total of 6 beads).
- Attach a clasp to one end of the necklace chain.
- Connect the open end of the necklace chain to the clasp.
Suggested Supplies
- 1 pair (use 1 blank) #88-102-23-0 Vintaj Natural Brass Blank, Rectangle with Hole
- 2 feet (use 15"-to-24") #40-080-01-18-6 Antiqued Brass Plated Steel Ball Chain By The FOOT, 1.8mm
- 2 each #40-801-6-EA Antiqued Brass Plated Ball Chain Clasp, 1.8-2.4mm
- 1 ounce (use 1 piece) #37-145-6 Antiqued Brass Jump Ring, Round, 6mm
- 1 hundreds (use 6 beads) #26-114-0 Brass Metal Beads, 5x5mm Barrel, Large Hole
Tools
- #69-198 Micro Engraver
- #86-160-001 StazOn Ink Pad
- #69-118 Rubber Bench Block, 4x4x1"
- #63-537 EURO TOOL Polishing Cloth, Brilliant
- #63-528 EURO TOOL Polishing Pads, Ultra, 2×2"
- #69-275-58 Baby Wubbers Flat-Nose Jewelry Making Pliers
- #69-275-53 Baby Wubbers Chain-Nose Jewelry Making Pliers
- #69-056 EURO TOOL Side Flush Cutter
Additional Supplies
- rubber stamps from the craft store (stamps with a simple line drawing work best)
- low-tack masking tape
- isopropyl (rubbing) alcohol (for ink cleanup)
- paper towel (for ink cleanup)
Feb 22nd 2023
Our Bead Blog
-

Edgy Elegance Necklace
Mar 22nd 2024Created by: Guest Designer Deb FlorosSuggested Supplies 1 #20-111-204 TOHO Glass Seed Bead, Size 11
-

Elegant Button Earrings
Mar 22nd 2024Created by: Guest Designer Deb FlorosSuggested Supplies 1 #27-841-042-50 Beadalon Bead Bumper, 1.5m
-

Abstract Painted Cuffs
Feb 26th 2024Created by: Guest Designer Deb FlorosSuggested Supplies 1 #51-810-05-17 Leather Cuff Bracelet, 1/2"