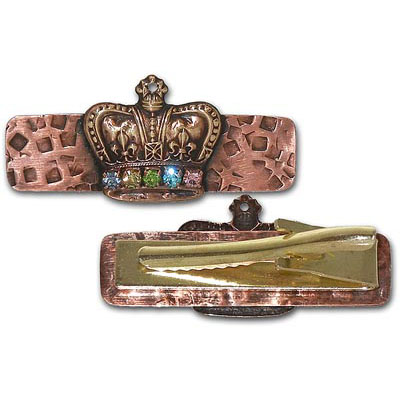
It's Good to Be King Tie Bar Tutorial

Created by: Mollie Valente
Designer Tips
- Cut the copper strip to about 2" in length. Use a texture hammer or pattern stamp to apply a random pattern. File the corners and sides until smooth.
- Soft solder the crown and rhinestone chain to the textured blank. Clean the piece with dish soap and water to remove the flux.
- Oxidize the piece with Win-Ox™, rinse piece, dry, and polish with the polishing cloth to desired appearance.
- Clean tie bar and decorative blank with rubbing alcohol.
- Cut a rectangle piece from the edge of the adhesive dot sheet to match the size of the tie bar. Apply the adhesive piece to the tie bar and attach it to the decorative blank, centering the design and making sure the clip operates in the correct direction.
- Alternate assembly method: Use a two-part epoxy to attach the parts, however all items must be oxidized first.
Free Technique Sheets & How-Tos
Suggested Supplies
- 1 doz [use 1] #44-448-0 Charm, Crown, 21x22mm
- 1 ea #69-052 Flux, Liquid, Stay-Clean - 4 oz
- 1 meter [use 3/4"] #46-349-30-004-9 Glass Rhinestone Chain, 3mm
- 1 pkg of 6 [use one, cut 2" piece ] #64-981-24-50 Sheet, 24 Gauge, 6x0.5"
- 1 ea #69-068 Solder, Choice™
- 1 doz [use 1] #30-992-01-2 Tie Bar, 1.6x0.3"
- 1 ea #86-343 Win-Ox™, 3 oz.
Tools
- #63-537 Polishing Cloth, Brilliant (Yellow) #69-417 Soldering Iron, Hakko®, 60W
- #69-429 Tool, Fiber-Grip Tweezer, 8"
- #69-252-01-4 Tool, Flat File, 6", #4 Cut
- #69-230 Tool, Shear, 7"
- #69-056 Tool, Side Flush Cutter
- #69-125 Tool, Steel 4" Square Block
- #69-245-301 Texture Stamp or Texture Hammer of your choice
- Paper towels
- Rubbing alcohol
- Scissors
- 10mm round double-stick adhesive dot
Jan 1st 2021
Our Bead Blog
-

Edgy Elegance Necklace
Mar 22nd 2024Created by: Guest Designer Deb FlorosSuggested Supplies 1 #20-111-204 TOHO Glass Seed Bead, Size 11
-

Elegant Button Earrings
Mar 22nd 2024Created by: Guest Designer Deb FlorosSuggested Supplies 1 #27-841-042-50 Beadalon Bead Bumper, 1.5m
-

Abstract Painted Cuffs
Feb 26th 2024Created by: Guest Designer Deb FlorosSuggested Supplies 1 #51-810-05-17 Leather Cuff Bracelet, 1/2"