Fold-Formed Earrings Tutorial

Created by: Polly Nobbs-LaRue
Designer Tips
- Jewelry Lab: 52 Experiments, Investigations and Explorations in Metal has a great tutorial on fold forming. Plus of course, Charles Lewton-Brain's book Foldforming is the definitive book on this technique (but is a bit intimidating). This earring project is a fun, simple type of fold-forming -- give it a try!
- To make a matching pair of earrings, cut 2 squares or rectangles of silver sheet, and fold each in half as precisely as possible. Use a nylon hammer to flatten the fold. Then cut a design (half an oval, half a teardrop, etc.) out of paper, and use the template to trace and cut out matching shapes on the folded edge of each piece of metal.
- Using the chisel end of a riveting hammer, hammer along either the folded side OR the non-folded side of both earrings until you decide you're done, BEFORE you unfold EITHER one. This helps your pair be a close match.
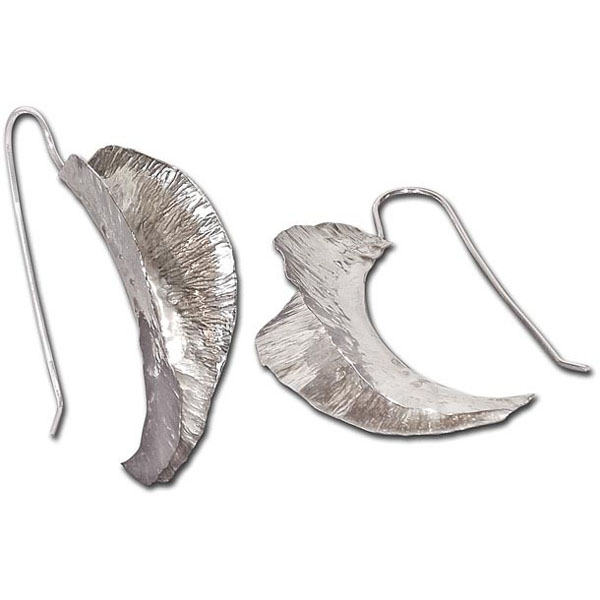
- This pair was half a teardrop, and hammered along the NON-folded side. Always keep the chisel tip perpendicular to the edge of the piece.
- As you hammer (remember you picked ONE: either the folded side OR the non-folded side, and your chisel tip is always perpendicular to your metal edge), watch with joy as your piece beings to fan out.
- Anneal and quench as necessary whenever the metal becomes too hard to move. If you don't, progress slows down, and even worse, the piece may shatter!
- You can solder your own custom-made fine-silver ear wires into the crevice of the fold, or (before unfolding the design) punch a hole 1-2mm from the top, on the fold line, and dangle these from pre-made ear wires.
- When you decide you're done, anneal and quench again, and unfold each piece to an amount that is pleasing to your eye. (An oyster knife is ideal to help you unfold the pieces. A butter knife, letter opener, or an old dull non-serrated knife can also work.)
- When soldering the ear wire onto the form, you might want to carve a groove into the fire brick to help hold the fold-formed piece.
- Use the tweezers for quenching the piece, and also for propping the ear wire when soldering. A "3rd Hand" tool can help properly position the tweezers when soldering.
- Other forms of solder are also fine for this, but paste solder is the easiest to get down into the crevice.
- When done, tumble for a bright finish, or antique with liver of sulfur for a vintage finish.
- For more information about soldering, see Soldering 101
Suggested Supplies
- 1 ozt [use two, 0.5" x 1.5-2" pieces] #64-518 Sheet, 22ga, Sterling Silver
- 1 1/4ozt #69-396-02 Solder, Hard, Medium Grade, Wire, 20ga
- 1 ozt [use two, 2" pieces] #64-899-20 Wire, Fine Silver, Round, 20ga
Tools
- #69-436 Hammer, Riveting, Chisel-Head
- Butane Micro Torch or Handy Flame Butane Torch (of course a classic oxy/acetylene torch setup is also great!)
- #69-428 Tool, Fiber-Grip Tweezer, 6.25"
- #69-182 Tool, Fire Block
- #69-230 Tool, Shear, 7"
- #69-125 Tool, Steel 4" Square Block
Additional Supplies
- Bowl or can of cool water (for quenching the torched piece)
- Triple-refined butane
- Oyster knife, butter knife, or old dull non-serrated knife: for opening the folded piece.
Optional Tools
- #69-234 EuroPunch Pliers, Round, 1.25mm Hole OR
- #69-235 Tool, Metal Punch, Two Hole
- #86-322 Liver of Sulfur, XL Gel, 2oz
- #69-167 Tool, Double-Clip Magnifying "3rd Hand"
- #69-427 Tool, Titanium Soldering Pick
- #69-282 Tool, Stainless Shot, 2lb AND
- #69-281 Tool, Tumbler, 3lb Capacity
Dec 1st 2021
Our Bead Blog
-

Simply Springy 2-Hole Bracelet
Apr 28th 2025Designed by: Guest Designer Deb Floros Suggested Supplies 1 #61-840-50-01 Beadalon Cord, WildFire,
-

Exotic Statement Necklace
Apr 28th 2025Designed by: Guest Designer Deb Floros Suggested Supplies 1 #88-400-003-5 58x50mm Pewter Connector,
-

Rubber Tubing Necklace and Memory Wire Bracelet Set
Mar 21st 2025Designed by: Guest Designer Deb Floros Suggested Supplies 1 #61-622-02 2mm Rubber Cord, Bulk, for J