Enameled Yellow Submarine Tutorial
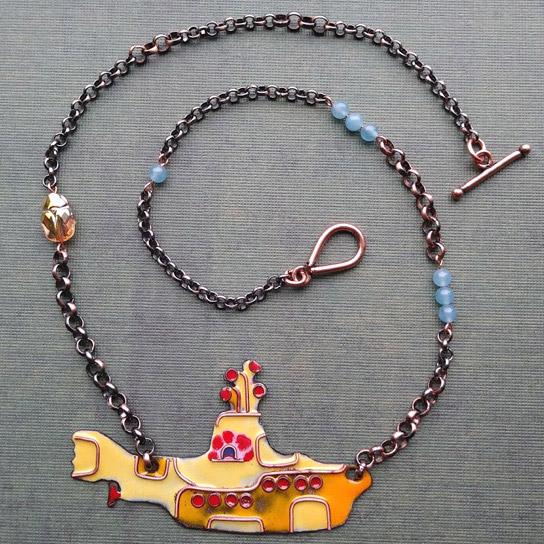
2018 was the 50th Anniversary of the Beatles' Yellow Submarine! Create your own yellow submarine using bright opaque vitreous (glass) enamels on copper sheet.
Created by: Polly Nobbs-LaRue
Designer Tips
- Make a few copies of your template. (You'll find many variations on the internet, or draw your own.) Mine is about 2-3/4 x 1-5/8" (70x40mm). Any larger, and it will be too hard to torch fire. Much smaller, and it will be too hard to add the details.
- Rubber cement a template to 24-gauge copper sheet. Cut out shape. See our article on using a jewelers saw. Need help? See bottom of this project!
- File off any rough edges. This needle file set allows you to get into pointy areas, as well as smoothing rounded areas and flattening areas that are supposed to be straight.
- Carefully decide on location for holes. Punch 3/32" holes for hanging. I punched a 3/32" hole near the back, and punched 2 overlapping 3/32" holes near the front, then filed the 2 overlapping holes into a smooth oval.
- Use raw (bare) copper wire to outline and separate the major portions and colors of your submarine, and 3mm raw brass jump rings for the portholes and other tiny round details. Do NOT use plated wire or plated jump rings or unknown/random materials.
- Cut all your pieces of 24-gauge copper wire, and shape them to match a copy of your template. Use a cup bur to smooth and round all wire ends. I used bent chain-nose pliers and small round-nose pliers for all my shaping.
- Cut one 3mm raw brass jump ring in half. Fully close and flatten 10 3mm raw brass jump rings. For best way to securely close jump rings, see Jump Ring Hint in Jewelry Basics 101 (PDF)
- Once all wires are shaped and smoothed, lay them out on your copper piece to make sure they fit. Adjust as necessary. Don't worry that they like to slide. Once you start painting, they'll stay in place.
- Thoroughly clean your blank with Penny Brite. See our enameling blog article for tips, precautions and basic instructions for preparing the piece for enamel, and for torch firing enamels.
- Set submarine blank on an enameling spatula (or other item that will allow you to carry it to your firing station without touching it with your fingers). Use tweezers and pliers to place all wires and jump rings into place.
- Painting with Enamel:
- Add scoops of desired colors of enamel into depressions in an artist's palette. Add a small amount of Klyr-Fire or distilled water (about 40% water to 60% enamel powder). (Use the pretty cobalt bottle to add drops of water!) It won't really mix like paints, but it will allow you to scoop / dab paintbrush blobs of wet enamel into your design. For more detailed instructions about painting with enamels, see the book, Discover Torch Enameling.
- Fill each jump ring with red enamel to hold them in place. The half jump rings are for 2 of the small red half-circles at the top of the design.
- As you are painting, if excess water oozes out past any of your lines, suck it up with the paintbrush, so you don't have a mess.
- Add your other colors, and make sure they are nice and thick and even. You can see the thinner spots in my finished piece -- they are the darker areas in the yellow. (I got impatient.) At first these made me sad ... but then I decided, hey, it's the 50th anniversary, of course the yellow submarine isn't quite as bright and new-looking as it was in 1968!
- Scoop up blobs of wet enamel with your paintbrush and push the enamel into place. Take your time, rinse your brush well between colors, and suck up excess water that oozes underneath your wires. (Otherwise your colors will mix.)
- The pink & red rainbow was tough. I should have let my pink dry a bit more before I dabbed the red dots on top of the pink (literally on top, just like lampwork dots-on-dots). An arc of wire on the outside might have been a good idea, too.
- Important:Allow your piece to dry before firing! Or the enamel will boil/volcano off!
- Depending on the size of your piece, you may be able to fire it in the basket (preferred). I fired mine on the mesh and because of the size of my blank (max that fits on the tripod! so it took a little longer to heat), it got teensy flecks of burnt mesh on it. (There are only a few, and you can only see them if you look very closely.)
- I highly recommend the Handy Flame II Torch Head for a piece this size.
- See "Pop of Color" for a good description of the torch firing process.
- It would be safest to allow this piece to cool slowly in a pan of warmed vermiculite, but I dropped it into a quenching bowl of water and nothing popped. (pshew!)
- After firing and cooling, create necklace:
- Use short sections of 2 sizes of round rolo chain, interspersed with 4mm blue quartz or aquamarine "bubbles" on eye pins, and Swarovski Crystal Scarab Beetle bead. You don't need to cut the chain; you can open the links, and use them like jump rings (see that Jewelry Basics 101 link above for created beaded eye pins and working with jump rings). Interspersing the 2 sizes of round rolo links gives a nice organic/underwater look.
- This necklace hangs best as a short (nearly choker-length) necklace, approx. 18" total.
- Use the larger (4.5mm) rolo chain to attach directly to the submarine, or use a large oval raw copper jump ring.
- Use the large oval raw copper jump rings to attach clasp.

Suggested Supplies
- 1 each #64-980-24 Copper Sheet, 24 Gauge, 6x6"
- 1 spool #47-405-24 Copper Jewelry Wire, 24ga, Round, 198'
- 1 ounce [use 11 pieces] #37-101-0 Raw Brass Jump Ring, Round, 3mm
Note: Raw copper or raw brass both work fine for this. Do NOT use plated jump rings. - 1 each #05-728-12-460 Swarovski 5728 Scarab Bead, 12mm - Crystal Metallic Sunshine -- limited availability
- 1 strand #21-884-248 Dyed Quartz Gemstone Bead, Round, 4mm - Limited Availability (or other small round translucent light blue beads)
- 1 ten-pack [use 1] #39-850-00 Solid Copper Toggle Clasp, Teardrop
- 1 hundred-pack [use 2ish] #37-050-54 Raw Copper Jump Ring, Oval, Heavy
- 1 each #86-220-07 Penny Brite Copper Cleaner
- 1 each #81-500-1830-S Thompson Opaque 80-mesh Enamel for Metals - Marigold Yellow, Sample
- 1 each #81-500-1237-02 Thompson Opaque 80-mesh Enamel for Metals - Butter Yellow, 2-oz.
- 1 each #81-500-1880-S Thompson Opaque 80-mesh Enamel for Metals - Flame Red, Sample
- 1 each #81-500-1715-S Thompson Opaque 80-mesh Enamel for Metals - Clover Pink, Sample
- 1 each #81-500-1560-S Thompson Opaque 80-mesh Enamel for Metals - Bluejay Blue, Sample
- 1 foot #40-071-002-0 3mm Raw Copper Curb Chain by the Foot
- 1 foot #40-071-001-0 4mm Raw Copper Cable Chain by the Foot
Tools
- Jeweler's Saw Frame
- Saw Blades
- Cut Lube (or beeswax)
- Bench Pin / Bench Block & Clamp
- Needle Files (handle is optional)
- EURO TOOL "Helicopter" punch - read the instructions!
- Flush Cutters
- Cup bur (wire rounder)
- Chain-nose pliers (I prefer bent chain-nose)
- Round-nose pliers
- Fiber-grip Tweezers (for carrying hot objects)
- Enameling Spatula
- Klyr-Fire (optional - you can use distilled water instead)
- Cobalt Dropper (optional - but it's pretty! and great for precise drops of distilled water)
- Torch Head
- Tripod with Mesh Screen
- Torching Basket (optional)
- Paper template(s)
- Rubber Cement (double-stick tape works too, but it gums up your blade a bit, making it more likely to break).
- Fine-tipped (sable?) paintbrush
- Distilled water
- Artist's palette (with small depressions for mixing enamel and water)
- Rinse cup
- Need help?
There are things teachers tell you, or that you read in books and tutorials, that don't fully make sense until you break a few blades or have to start over and use another one of those templates that I said to print a FEW copies of. I learned a few things while cutting this out, that sparked those memories!
If you have questions about using a jewelers saw or enameling, please post a comment/question on these blog articles:
- Tips on sawing metal sheet with a jewelers saw
- How to Choose a Knew Concepts Saw
- Tips on Torch Firing Enamels
Oct 27th 2021
Our Bead Blog
-
Edgy Elegance Necklace
Mar 22nd 2024Created by: Guest Designer Deb FlorosSuggested Supplies 1 #20-111-204 TOHO Glass Seed Bead, Size 11
-
Elegant Button Earrings
Mar 22nd 2024Created by: Guest Designer Deb FlorosSuggested Supplies 1 #27-841-042-50 Beadalon Bead Bumper, 1.5m
-
Abstract Painted Cuffs
Feb 26th 2024Created by: Guest Designer Deb FlorosSuggested Supplies 1 #51-810-05-17 Leather Cuff Bracelet, 1/2"


