Custom Anniversary Bracelet Tutorial

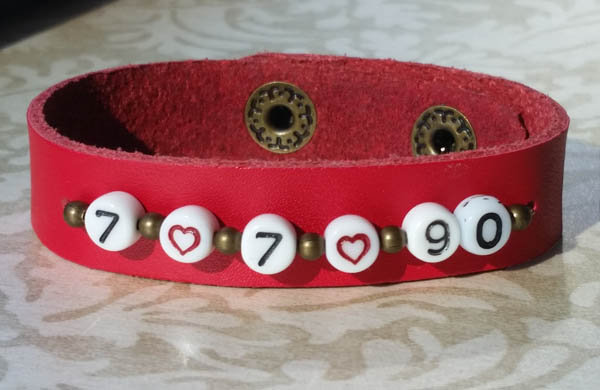
Learn how to make a leather anniversary bracelet using porcelain number beads to "spell out" a custom anniversary date (7/7/90).
Created by: Polly Nobbs-LaRue
Designer Tips
- Use a finished leather bracelet blank, or create the bracelet from scratch using a leather strip and clasp of your choice.
- Select your beads: Here I used black & white porcelain number beads, red & white porcelain heart beads, and 2mm round brass spacer beads.
- I used 26g non-tarnish brass Artistic wire to "stitch" the beads onto the bracelet.
- String beads in desired pattern on 26g wire. Measure total length of beads.
- Cut wire 6-7x longer than the length of the beads. If the strung beads are 55mm long, cut the wire at least 330mm long.
- On the back side of the leather, mark dots where to punch holes. If the strung beads are 55mm long, mark dots 57mm apart.
- Verify placement before punching.
- Punch holes. For a nice clean hole, use a 1/16" (1.59mm) metal hole punch. (If you use a 2mm hole punch, switch to 3mm brass beads, or the 2mm beads will fall through the hole.)
- Insert wire into right-side hole, and pull gently through, about 1.5x longer than the length of the beads. Where the wire goes through the bracelet, bend wire sharply back under the bracelet (to the left) to hold beads in place.
- Insert other wire into the left-side hole and pull gently all the way through.
- Holding right side firmly in place, pull left side tight, and bend wire sharply underneath, back to the right.
- Avoiding kinks, and keeping your wires smooth and straight under the bracelet, pull the long wire back up through the right side and pull tight.
- Run long wire through the entire row of beads, then back down through the left side hole. Pull all wires tight and make sure everything looks smooth and even. Flatten this wire down towards the right.
- Make sure the beads and all wires are all lying as smoothly and straight as possible.
- You should now have 3 parallel wires across the back side. Take one of these wires, and as close the hole as you can, "stitch" it under the 3 wires, and gently pull tight. (Chain-nose pliers can be helpful for this step.) Avoid kinks! Repeat until you have coiled this short end around the 3 base wires at least 6 times.
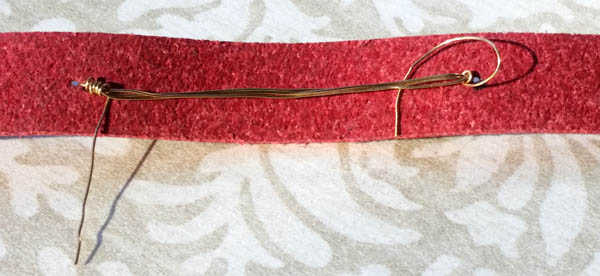
- Carefully trim the excess wire and use chain-nose pliers to tuck it underneath so it won't scratch the wearer.
- Repeat on other end of bracelet.
Tip: You may want to carefully add another stitch near the middle of the bracelet, holding the beads tightly in place. This helps prevent distortion if anyone (not me of course... oops!) allows the bracelet to go through the washing machine. (Surprisingly the leather still looks great, and it only took a little reshaping of the wire for the bracelet to look great again.)
 Suggested Parts
- 1 each #51-810-05-40 Genuine Leather Cuff Bracelet, 1/2" - Scarlet
- 1 spool [use about 13"] #46-406-27 Artistic Wire Brass Jewelry Wire, 26ga, 90ft - Tarnish Resistant Brass
- 1 fifty [use 2] #27-105-HEARTR Porcelain Beads, Heart - White/ Red
- 1 hundred [use 6] #26-819-02-6
- 4 to 8 porcelain number beads (#27-105).
Suggested Tools
- #69-235 EURO TOOL Metal Punch, Two Hole
- #69-271-03 EURO TOOL Glitter, Chain-Nose Jewelry Pliers
- #69-056 EURO TOOL Side Flush Cutter
Our Bead Blog
-

Edgy Elegance Necklace
Mar 22nd 2024Created by: Guest Designer Deb FlorosSuggested Supplies 1 #20-111-204 TOHO Glass Seed Bead, Size 11
-

Elegant Button Earrings
Mar 22nd 2024Created by: Guest Designer Deb FlorosSuggested Supplies 1 #27-841-042-50 Beadalon Bead Bumper, 1.5m
-

Abstract Painted Cuffs
Feb 26th 2024Created by: Guest Designer Deb FlorosSuggested Supplies 1 #51-810-05-17 Leather Cuff Bracelet, 1/2"