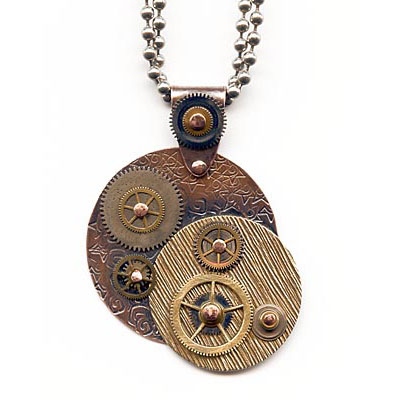
Cognitive Resonance Pendant Tutorial

Created by: Polly Nobbs-LaRue
Designer Tips
- When scouring yard sales and 2nd-hand stores for old watches, try to pick up a wide variety of brands and eras, for the best variety of gears. Or look for bulk watch gears on etsy, ebay or amazon. To get the widest variety of gears, consider both small tins and bulk bags from a few sources.
- Wear safety glasses when cutting, drilling or punching.
- Lay out pattern; carefully set aside, away from your hammering surface.
Decide the size rivets you'll need for each hole. This depends on two factors.
- The watch parts: Some have a large hole and will only work with larger gauge wire and/or in combination with other gears or beads used as spacers or fillers. Others have a small hole or are too hard to punch with the plier punch.
- The plier punch can only go through one sheet, and the 2-hole punch can go through both sheets. After determining rivet sizes for your pieces, make sure your tools and components will work together in their desired locations.
- Use 16-gauge wire and the 1.25mm plier punch for the smaller holes.
- Use 14-gauge wire and the smaller(1.6mm) side of the 2-hole punch for the larger holes.
- Antique each selected component after texturing, but before riveting.
Create a bail, using the oval connector blank
- Slightly enlarge both holes with the 1.25mm EuroPunch pliers.
- Decide where to rivet one or more gears (keeping in mind that you'll be folding this connector in half to make a bail).
- Using a centerpunch, mark the spot to punch a hole. Punch the hole with appropriately sized punch (designer used 14-gauge wire, or small side of the 2-hole punch).
- Use a ballpein hammer to texture the bail, avoiding the area that will be covered by gears. Rivet gears to this spot.
- Carefully curve center of bail around a small wooden dowel, or the correct-sized part of bail-making pliers or stepped wire-looping pliers (anything that is the right size to curve your oval blank into a bail -- don't use regular round-nose pliers, because the tapered tips will make a wonky bail). Make sure the small end holes will end up directly across from each other. Try to make the tips touch. Set aside.
Create the Pendant
- Stamp desired pattern on exposed area of copper stamping blank. (spiral star stamp was used in a random pattern on about 50% ofwhat is exposed, and a square spiral stamp was used on the remainder of the exposed section.)
- In this design, only 2 rivets go through both round stamping blanks. If one of these is 16 gauge, do it first. In this design,both are 14-gauge so can be done in either order. Line up gears and disks in desired pattern.
- Use a centerpunch to mark hole on top disk. Punch hole.
- Line up both disks, mark and punch bottom hole. Rivet these components.
- For next hole on both disks, line up gears, mark hole, and carefully punch. Rivet this set of components.
- One of the gears in this design had a hole that was too large. The designer added the rounded brass heishi bead to the top, to settle into the gear's hole. Another gear's center hole was slightly compromised when the center hole was cut. If this happens, add a heishi bead to the top to protect it.
Attach the bail to the pendant
- Use 16-gauge wire to rivet the bail onto the pendant.
- Line up the bail in the desired location on the pendant.
- Centerpunch where the hole will go in the pendant.
- Punch pendant with the 1.25mm EuroPunch pliers. When you hammer-textured the bail, you made the existing holes slightly smaller. This will make it easier to rivet cleanly, but you'll need to use the bead reamer to enlarge the holes just enough to push the wire through all 3 pieces of metal.
- Rivet, making sure that the bail stays in the proper position to hang nicely.
- Add ball chain. 40" is long enough to double up for a short necklace, leave long, or let a customer cut to desired length.
- For more information on riveting, check out The Complete Metalsmith: An Illustrated Handbook by Tim McCreight (#62-011 62-011).
- Design Inspiration: "Snazz-it-up" Pendant with Handmade Bail by Kate Ferrant Richbourg, from the book Stamped Metal Jewelry by Lisa Niven Kelly (great book, but currently unavailable // possibly out of print).
Free Technique Sheets & How-Tos
- Riveting Techniques (PDF)
- Techniques for Creating a Stamped Metal Charm (PDF)
- Blog post: Comparing Rivets
Suggested Supplies
- 1 gross [use 2] #26-233-0 Bead, Metal, Heishi-Style, 3.4x1mm
- 1 each #44-780-30 Blank, Oval, Two Hole, 9x32mm
- 1 each #44-780-23 Blank, Round, 32mm
- 1 spool [use 40"] #40-881-1 Chain, Footage, Ball, 2.4mm, 100ft
- 1 pkg of 100 [use 1] #40-801-1 Clasp, Ball Chain, 1.8-2.4mm (not shown)
- 1 dozen [use 1] #44-499-0 Disk, Round, 25mm, 1 Side Scored
- 1 each [to antique copper components] #86-324 Liver of Sulfur, XL Gel, 4 oz.
- 1 tin [use use 11 gears] #44-700 Watch Parts, Mixed, Small Tin
- 1 spool [use use 2" or four 14g wire rivets] #47-405-14 Wire, 14ga, Round, 20'
- 1 spool [use use 2" or three 16g wire rivets] #47-405-16 Wire, 16ga, Round, 32'
- 1 each [for antiquing brass components] #86-343 Win-Ox™, 3 oz.
Tools
- #69-189 Cut Lube, 2oz
- #85-395 Tool, Bead Reamer Set
- #69-234 Tool, EuroPunch Pliers, Round, 1.25mm Hole
- #69-135 Tool, Hammer, Ball Pein, 4oz
- #69-235 Tool, Metal Punch, Two Hole
- #69-245-18 Tool, Stamp, Star with Spiral
- #69-245-16 Tool, Stamp, Square Spiral
- #69-125 Tool, Steel 4" Square Block
- #69-275-21 Tool, Wubbers™, Medium Bail Maker
- #69-364 Center Punch
- Safety Glasses
- Brass Hammer
Suggested Books
- #62-380 Book, Stamped Metal Jewelry: Creative Techniques and Designs for Making Custom Jewelry
- #62-011 Book, The Complete Metalsmith: An Illustrated Handbook
Dec 1st 2021
Our Bead Blog
-

Edgy Elegance Necklace
Mar 22nd 2024Created by: Guest Designer Deb FlorosSuggested Supplies 1 #20-111-204 TOHO Glass Seed Bead, Size 11
-

Elegant Button Earrings
Mar 22nd 2024Created by: Guest Designer Deb FlorosSuggested Supplies 1 #27-841-042-50 Beadalon Bead Bumper, 1.5m
-

Abstract Painted Cuffs
Feb 26th 2024Created by: Guest Designer Deb FlorosSuggested Supplies 1 #51-810-05-17 Leather Cuff Bracelet, 1/2"