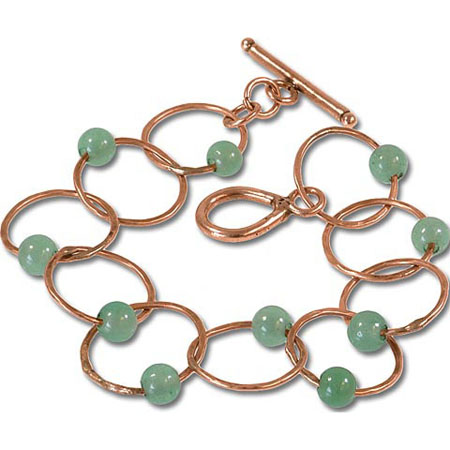
Captured Aventurine Bracelet Tutorial

Created by: Polly Nobbs-LaRue
Designer Tips
- Unspool approximately 20" of copper wire. Pull it smooth with flat nylon-jaw pliers.
- Trim the end neatly (flush) with flush cutters.
- Coil the wire around a 14-20mm round mandrel, looping pliers, or bail-making pliers.
- Using good flush cutters, snip each coil apart so you have identically-sized links. Trim carefully so the ends of the links line up flush. If you have gaps, your solder join will not look good and will not be secure. (See copper soldering blog part 2 for tips.)
- Repeat until you have 10 links.
- Add a bead to a link. Tear off a small piece of paper towel (about 2" long), get it wet, and wrap it tight around the bead. Close the link and make sure the ends align nicely. Re-bend and/or re-cut as necessary to get them fully flush (straight against each other).
- Pull the wet-paper-wrapped bead to the far side of your link.
- Lay the link on your solder brick (or slightly off the edge of a magnesia fire block), heat the wire evenly on both sides to be joined. When the wire begins glowing on both sides of the join, touch the solder to the seam, and it should flow. (See copper soldering tutorials part 1 and part 2 (below) for more details.) If the paper starts smoking or burning, stop! Let everything cool off, re-wet paper towel and start again, keeping your torch to just the 1/3 of the wire closest to the join.
- Use fiber-grip tweezers to grab hot item and quench in cool water.
- Repeat for 5 more links.
- Add 2 soldered beaded links to an unsoldered link, add a bead, and wrap the bead in wet paper towel. Pull all of these to the back side of the link. Solder this link just like before. Quench.
- Add an unsoldered link to the end of these 3, add another previously soldered link, add a bead, and wrap in wet paper towel. Pull to back, solder link. Quench. Repeat until you have a string of 10 or 11 links, depending on desired bracelet length.
- Make 3-6 jump rings (5 to 8mm in diameter) from the same gauge copper wire. Cut the ends nice and flush. Use one to attach the loop end of the toggle clasp, and use at least 2 to attach the bar end of the clasp. Test to make sure you can open and close the toggle. If not, add more jump rings to the bar end. Solder each jump ring just like the larger links, but be extra careful that you don't accidentally solder a few jump rings together into one big unbending glob. (If you do this, then cut them off and re-do this portion.)
- Quench as needed.
- If desired, for both strength and appearance, texture the links with the rounded side of a chasing hammer or ballpein hammer.
- To clean, pickle for about 3 minutes, and/or tumble for about 3 hours. Use copper tongs to remove links from pickle.
Assembling the bracelet:
Free Technique Sheets & How-Tos
Suggested Supplies
- 1 strand [use 9] #21-001-011-01 Bead, Aventurine, 6mm, Round with Large Hole
- 1 pkg of 10 [use 1] #39-850-00 Clasp, Toggle, Teardrop
- 1 pkg of 4 ounces [use 0.5"] #69-388 Solder, Copper Wire
- 1 spool [use about 20"] #47-405-18 Wire, Copper, 18ga, Round, 50'
Tools
- #69-200 Large Jump Ring Mandrels or #69-269-L Jump Wrap-n-Tap Pliers or Wubbers X-Large or Jumbo Mandrel Pliers
- #69-380 Tool, Tapered Flush-Cutter
- #69-271-91 Tool, Glitter, Nylon Jaw, Flat-Nose Pliers
- #87-081 Rings & Things Blazer® Torch Kit
- #69-138 Tool, Hammer, Chasing
- #69-125 Tool, Steel 4" Square Block
Additional Supplies
- Quenching bowl with cool water (or tin can of cool water)
Optional Tools
- #69-355-08 ShineBrite™, for Tumbler, 8 oz.
- #69-088 Sparex®, 2-1/2lbs
- #69-357 Tool, Little Dipper™ Pickle Pot
- #69-282 Tool, Stainless Shot, 2lb
- #69-281 Tool, Tumbler, 3lb Capacity
- #69-260 Tool, Tweezers, Copper, 9"
Dec 2nd 2021
Our Bead Blog
-

Simply Springy 2-Hole Bracelet
Apr 28th 2025Designed by: Guest Designer Deb Floros Suggested Supplies 1 #61-840-50-01 Beadalon Cord, WildFire,
-

Exotic Statement Necklace
Apr 28th 2025Designed by: Guest Designer Deb Floros Suggested Supplies 1 #88-400-003-5 58x50mm Pewter Connector,
-

Rubber Tubing Necklace and Memory Wire Bracelet Set
Mar 21st 2025Designed by: Guest Designer Deb Floros Suggested Supplies 1 #61-622-02 2mm Rubber Cord, Bulk, for J