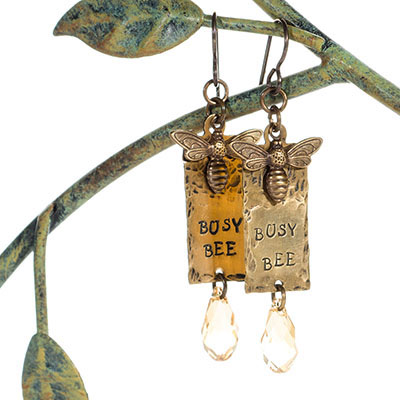
Busy Bee Earring Tutorial

Created by: Tiffany White
Designer Tips
- Tape the stamping blanks to the steel block. Use a permanent marker to draw lines where you want to stamp the phrase "BUSY BEE".
- When stamping, make sure that each letter is facing the correct way before you stamp.
- Use the pein (round) side of the hammer to texturize the stamping blank around the edges.
- Use the metal hole punch to make a hole at the bottom of the stamping blanks.
- Antique the brass with Novacan Black.
- Polish the blanks, so the lettering and texture pop.
- Polish the bee charms, so the details pop.
- Flatten the wings on the bees.
- Use a jump ring to attach the crystals at the bottom of the earrings.
- Use two jump rings at the top of both pairs of earrings to attach the bee charms and the earring wires.
Free Technique Sheets & How-Tos
- For a step-by-step tutorial with images, check out the Rings & Things blog post: Busy Bee Earrings.
- Jewelry Basics 101 (PDF)
Suggested Supplies
- 1 pair #88-103-06-0 Vintaj Natural Brass Charm, Busy Bee, 13x17mm (no longer available, see 13x10mm #44-695-0 instead)
- 1 ounce [use 6] #37-136-6 Antiqued Brass Jump Ring, Round, 5mm
- 2 each #44-720-07 Brass Stamping Blank, Rectangle with Loop, 28x12mm
- 1 pair #34-063-41 Niobium Ear Wire, French Hook
- 2 each #06-010-13-150 Swarovski 6010 Briolette Pendant, 13mm - Golden Shadow
Tools
- #69-257-0004 3M Sanding Sponges, 800-1000 Grit
- #69-244-28 EURO TOOL 1/12" Stamp Set, Uppercase Aras™, 27pc
- #69-271-03 EURO TOOL Glitter, Chain-Nose Pliers
- #69-238 EURO TOOL Hole Punch, Round, 1.5mm hole
- #63-528 EURO TOOL Polishing Pads, Ultra, 2x2"
- #69-138 Tool, Chasing Hammer
- #69-125 Tool, Steel 4" Square Block
- Permanent marker
- Tape
Jul 31st 2021
Our Bead Blog
-

Edgy Elegance Necklace
Mar 22nd 2024Created by: Guest Designer Deb FlorosSuggested Supplies 1 #20-111-204 TOHO Glass Seed Bead, Size 11
-

Elegant Button Earrings
Mar 22nd 2024Created by: Guest Designer Deb FlorosSuggested Supplies 1 #27-841-042-50 Beadalon Bead Bumper, 1.5m
-

Abstract Painted Cuffs
Feb 26th 2024Created by: Guest Designer Deb FlorosSuggested Supplies 1 #51-810-05-17 Leather Cuff Bracelet, 1/2"