
Growing up in the 1970’s, I predictably spent part of my childhood making macramé. In fact, I spent hours tied to the ends of masses of cording creating the ubiquitous plant hangers that have become an icon of the era. Call me sentimental, but I got a warm and fuzzy feeling when asked to dust off my knotting fingers and make a hemp macramé bracelet for Rings & Things’ Blog.
One of Rings & Things’ most popular online jewelry projects has always been Project #68-002-10 (catchy title, eh?). Well, we decided it was time to give our classic, line-drawing macramé technique sheet some 21st Century pep. Here goes …
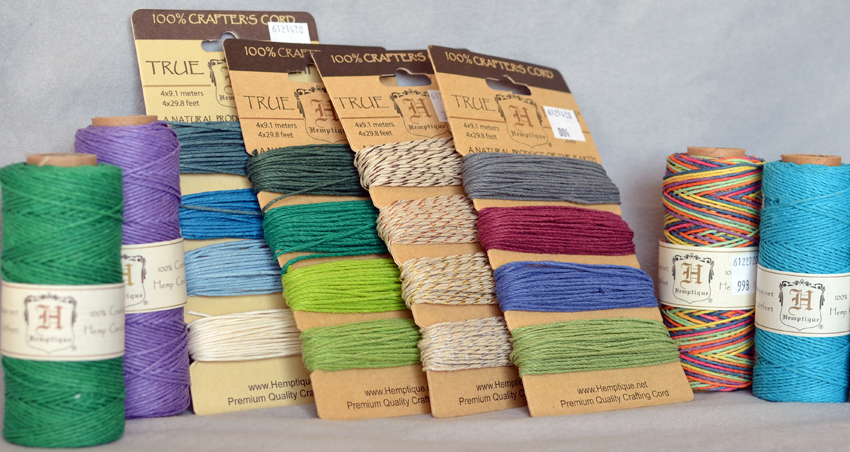
First, you’ll want to gather all your materials — and a great thing about hemp bracelets is that they don’t require much!
Here’s what you’ll need to make one 8-inch bracelet:
- 100 inches of 1mm hemp cord (just under 3 yards)
- Beads (see below to make your choices)
- Tape (good ole’ masking tape works great)
- Scissors or clippers
- Glue (any school or craft glue that dries clear will do)
- Optional: a clipboard, to make your project portable
For the beads, you’ve got a lot of options, but the important thing to keep in mind is that the hole size needs to be large enough to encompass two strands of cord! For 1mm hemp cord, the holes need to be at least 2mm wide (preferably wider).
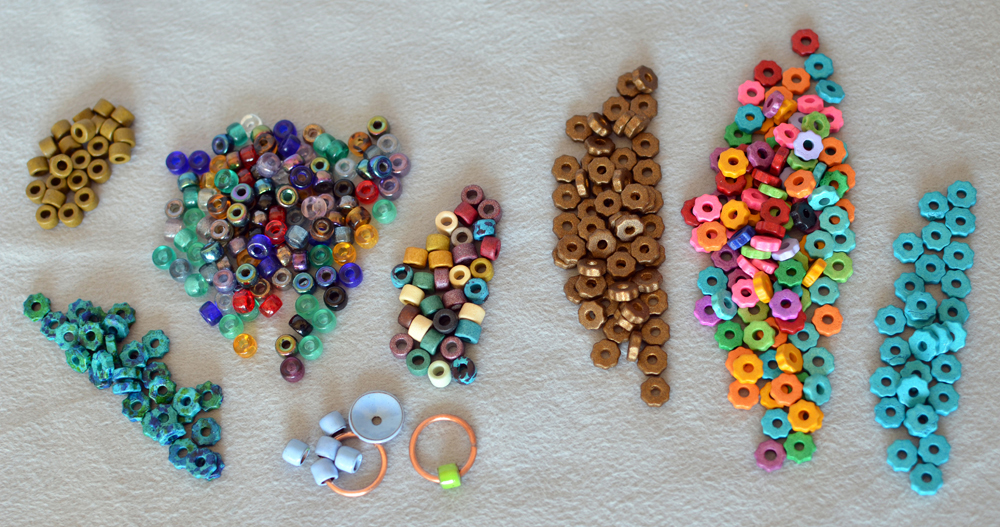
You’ll use 5-8 smaller beads to adorn the knotted bracelet. Options include:
- 6mm glass roller beads (this is what our original project used)
- 6-8mm large-hole gemstone beads
- Large-hole metal beads
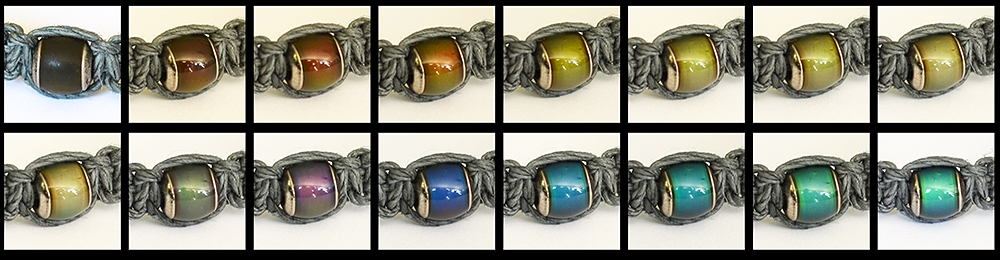
- 6x7mm barrel Mirage Beads™ (color-change mood beads)
And, you’ll use 1 larger bead (or large-hole button) to create a simple clasp. Options include:
- 9x6mm crow bead (these are plastic, but they’re a nice size)
- TierraCast buttons (with or without shank)
- Any other bead or button with a hole size of approx. 3-4mm
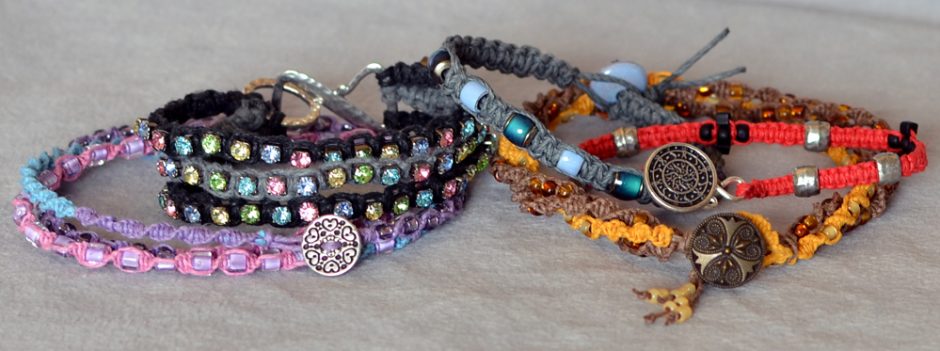
For the bracelet pictured above, I decided to go full retro 1970’s and use barrel Mirage Beads™ since they are reminiscent of the mood rings that were popular back then — the beads actually change color with small temperature changes!

I decided to also use artisan-made enameled copper beads because I’ve always liked colorful, enameled components. For the clasp, I chose a matching enameled copper cupped disk which worked perfectly to make a simple button-style clasp.
Plan your pattern ahead of time to see how many beads will fit in the desired bracelet length. You can use just one type of bead, or create a pattern that alternates between 2 or more types/colors of beads. In the bracelet pictured above, I chose to use 7 beads in a simple alternating pattern that is symmetrical and centered, with an enameled “shortie” in the center: M E M E M E M. I also chose to space my beads so that the blue enameled shorties would NOT end up next to the blue enameled clasp (cupped disk).
R G Y B B Y G R.
Once you’ve gathered all your supplies, cut your hemp cord into the following measurements:
- One 10″ piece
- One 20″ piece
- One 70″ piece (the remainder)
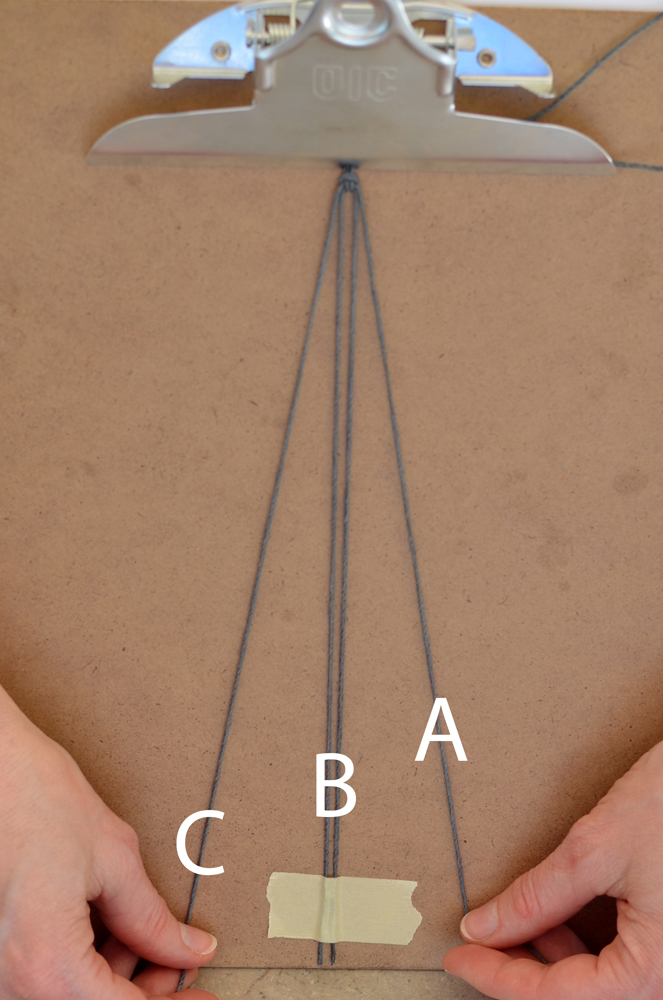
Find the centers of the 20″ piece and the 70″ piece and place the center loop of one on top of the center of the other.


Then, take the center of your 10” cord and make a half-hitch knot around the center of the longer four strands. Check to make sure the cording is still even and all ends still match up.

Now you’ll want to anchor the project, so you can make nice, tight knots. For a short project like a bracelet, a clipboard works great since it makes your project portable. Secure the short (10″) cord into the top clip. Pull the 20″ cords tight and tape them to the bottom of the clipboard. Leave the longest 2 cord ends dangling loosely.
If you don’t have a clipboard, you can anchor your cords to a table top with tape. (When I was a kid, I anchored long projects by tying the anchor cord to my Mom’s cabinet handle and sitting on the center cords to keep them taut).
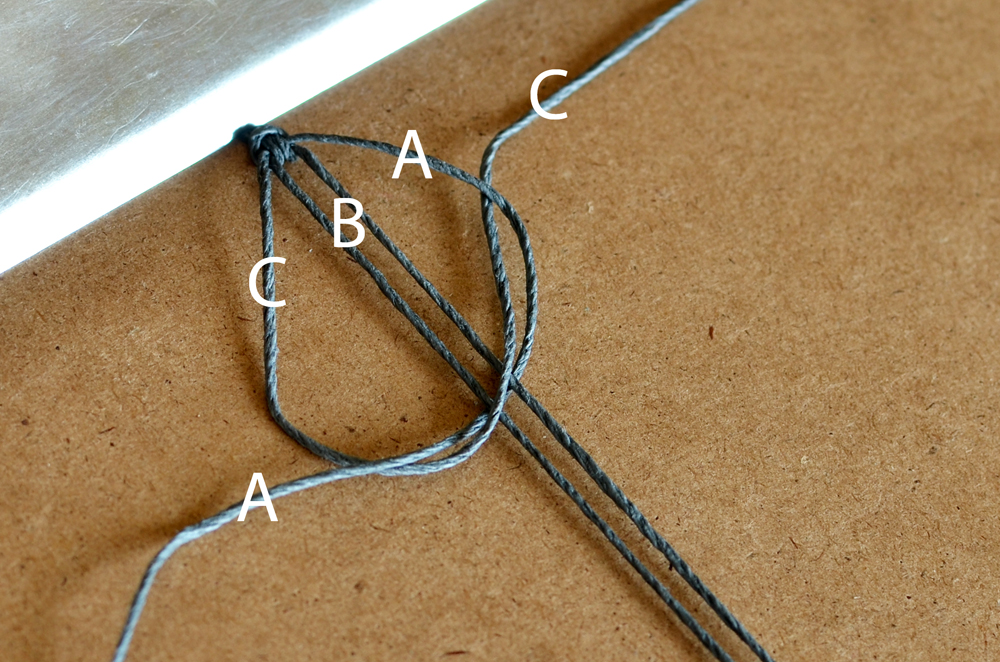
It’s time to start knotting! This bracelet project uses a single basic knot, called the square knot (a.k.a. half knot). To create a square knot, follow the illustrations below, in which the long (knotting) cord that starts on the right is “A,” the two short (filler) cords in the middle are “B” and the long (knotting) cord that starts on the left is “C”.
- Start with cord A and bring it behind cords B, forming a loop (about the size of a 50-cent piece) on the right side.
- Make sure cord C is behind the long length of A (now on the left side).

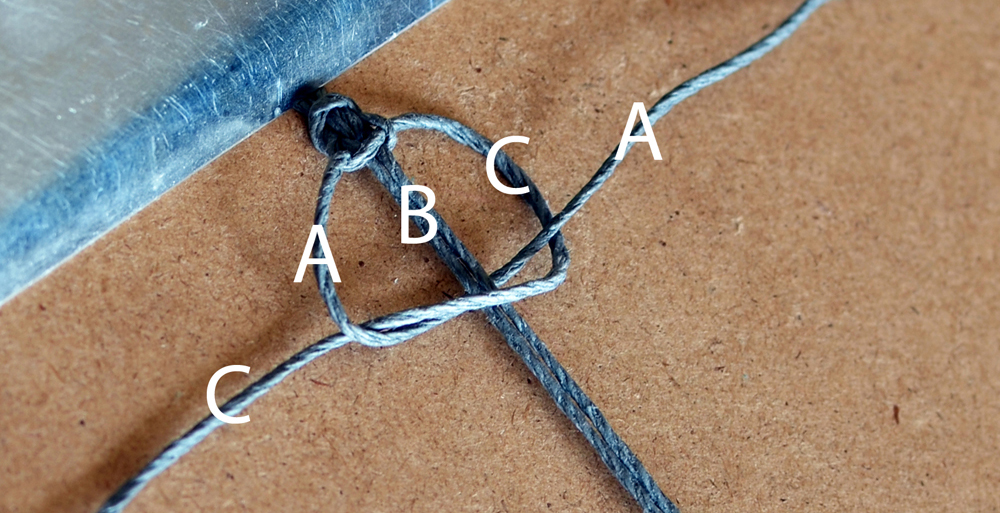
- Now, bring cord “C” over cords B and through the loop of cord A.
- Pull tight.
- Tip: The tighter the cord is pulled, the smaller the knot will be. Find your desired size and pull at that same tightness throughout the project for consistency.
- Repeat the previous 3 steps, but this time start on the left side with cord “A” to make your 2nd knot.
Repeat again, switching back to the right side for the 3rd knot.
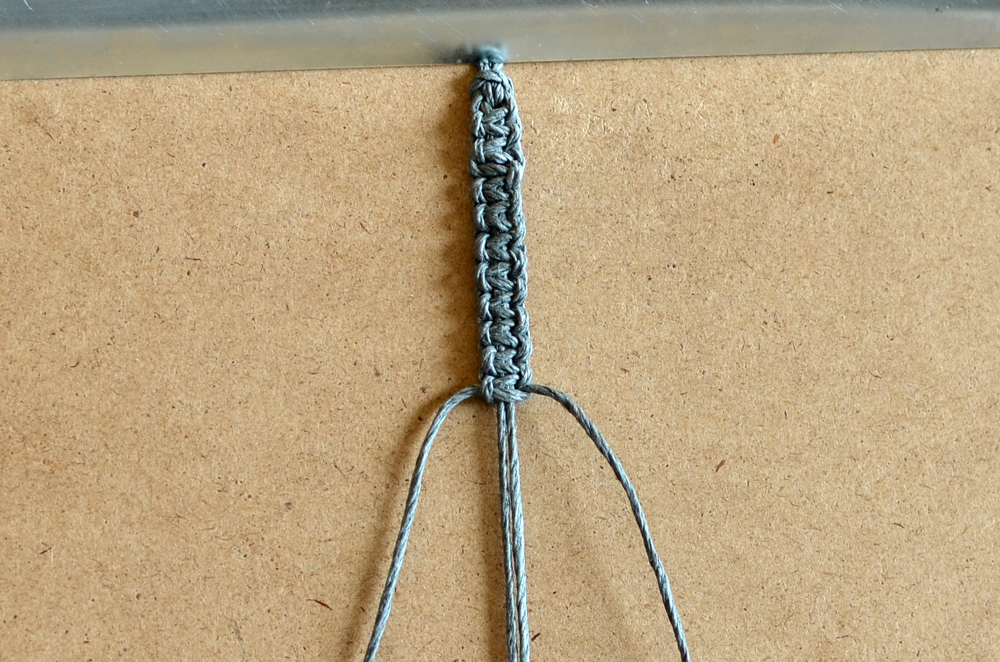
Alternate sides for every knot (one knot starting from the left, the next knot starting from the right). Do this for approximately 20 knots. Be sure to create an even number of knots, and remember to pull knots consistently snugly.
Hint: keep track of which side you are working on. After a knot is pulled tight, notice that the side to be worked on next is the side with the cord facing forward, not the cord facing the back.
Note: It you continue knotting from a single side, instead of alternating sides, you will create a half-knot spiral (a.k.a. spiral stitch) instead. The spiral stitch is also really cool and can also be used to make a bracelet. Just keep in mind that it will have more dimension and will not lay flat.
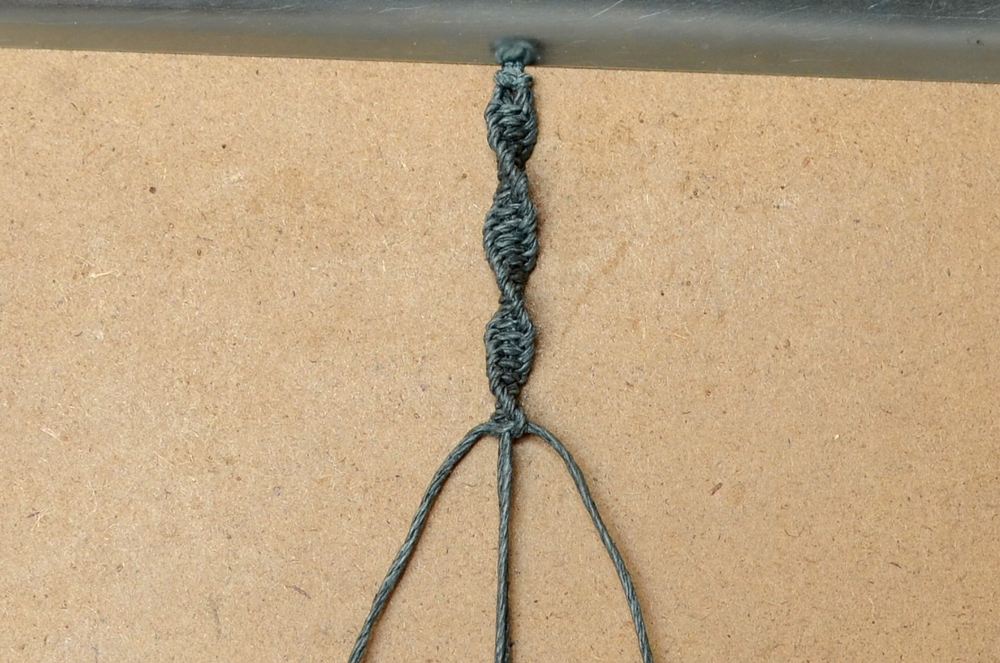
half-knot spiral (a.k.a. spiral stitch).
Adding beads to your macramé pattern:
- Tip: to make stringing the beads easier (and help prevent the ends of the B cords from fraying), rub a dab of glue into each B cord end and form each end into a tip. Let the tips dry, then commence stringing.
- Slide your first bead over both cords B, and push it up close to the last knot (but don’t bunch up the knots). If the bead is difficult to slide over the cord, twist the bead as you push it on.
- Go around the beads with cords A and C, then make a knot as usual with cord A (starting on the right side, assuming your last knot before adding the bead started on the left).
- Push the knot up to the bottom of the bead and tighten to the desired consistency.
- Add 3 more alternating knots.
- Add 2 more beads the same way (adding 4 knots after each bead).

- Even if you’ve pre-planned your bead pattern, it’s a good idea at this point to test the length on your wrist (or ankle). Does it go about half way around? If yes, then this is the middle — only add 2 more beads. If no, then continue adding beads (with 4 knots after each bead).
- Don’t worry if it seems like the project won’t be long enough. That piece of cord hanging back at the beginning makes this project any desired length between 6 and 12 inches.
After adding your last bead, make about 20 more knots (the same number you made at the beginning).
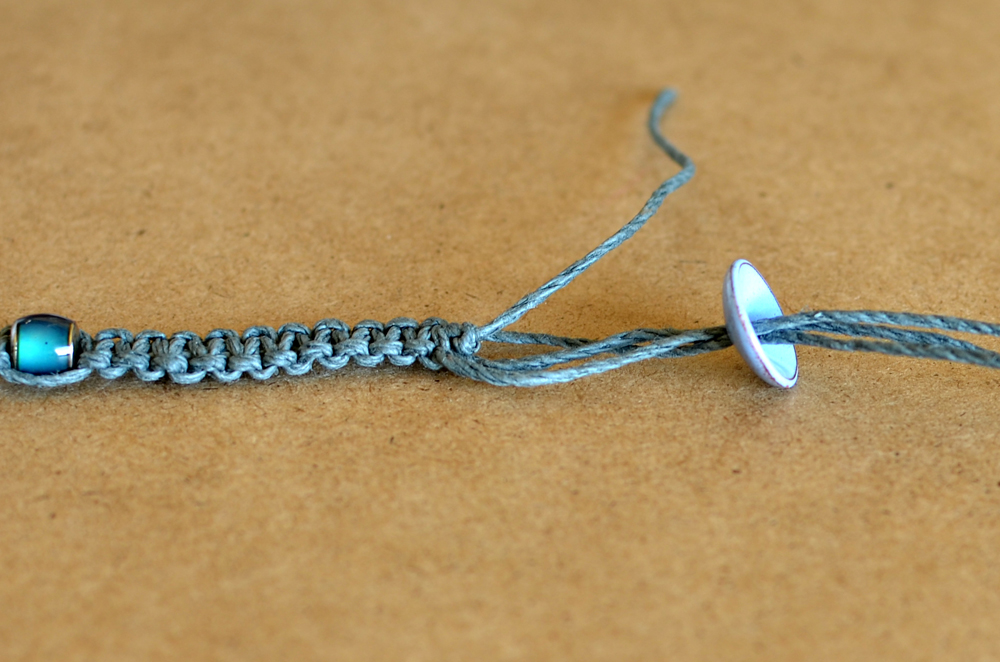
To make a simple clasp: After you’re done knotting, slide your large bead onto all 4 cords — if it fits. For the cupped disk, I improvised since only 3 of the four strands would fit through the disk’s hole. I knotted one of the middle (B) cords snug up against the last square knot, trimmed it flush and added a drop of glue.
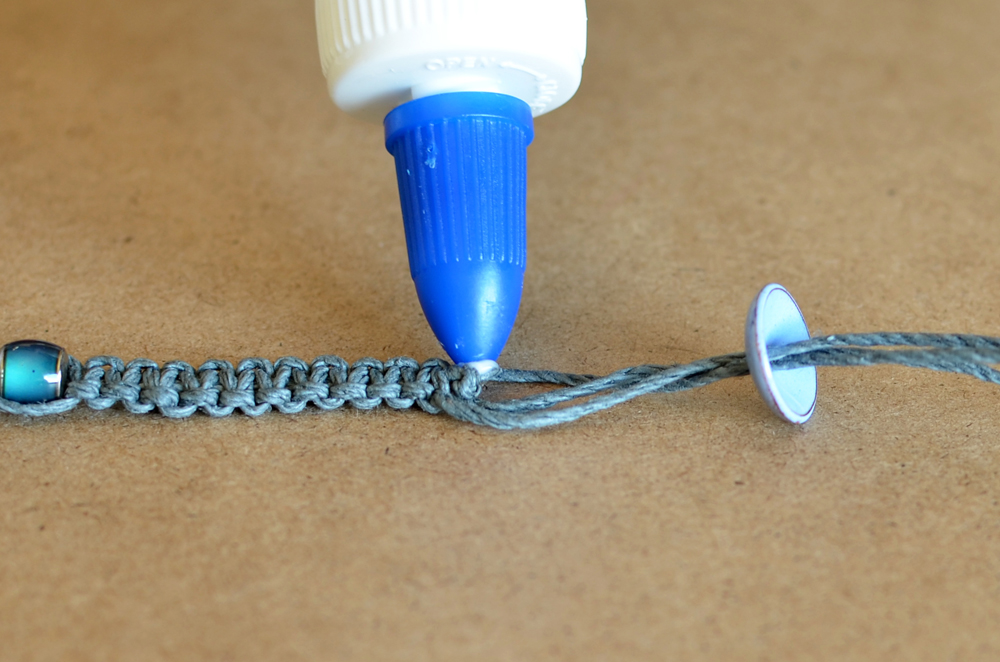
Pull all (remaining) cords snugly and tie a knot. Trim the ends and add a dab of glue for extra security. This forms the “button” or “hook” part of your clasp.
To make the “loop” part of your clasp:
- Measure bracelet on wrist (or anklet on ankle) to find your desired length.
- On the opposite side of the bracelet (the 10 inch length of cording), tie a knot where you want the bottom of your loop. (Since my wrists are small, I was able to start my loop right next to the macramé section, and did not need to create this first knot).
- Determine how long the loop needs to be for your “hook” to go through it and hold (about 3/4 of an inch worked for my design). At that spot, tie another knot to complete the loop.
- Trim excess cord and apply a drop of glue to secure the knots.

You can alternately use a metal jewelry clasp by tying it to the finished ends of your knotted strand.
Once you’ve got the hang of the square knot, these bracelets are a snap to make, and it won’t be long till you’re coming up with an array of variations!

Macramé bracelets make great inexpensive price points for craft fairs and festivals, as well as great gifts for old friends and new. With so many vibrant colors of hemp cord now available, the possibilities are endless for design variation.
Once you’ve mastered this basic square knot bracelet project, check out our Shamballa Bracelet Blog Project and Kumihimo Bracelet Blog Project for more cool knotting designs that use hemp cord. Happy knotting! ~ Melissa

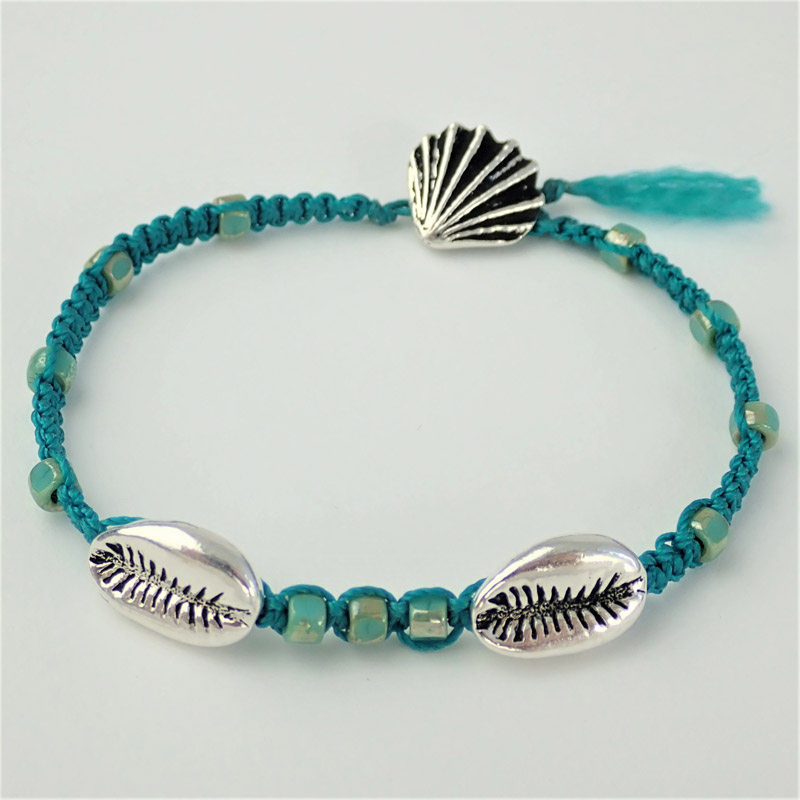
NEW MACRAME PROJECT
This new macrame project features TierraCast’s Oceans Collection and is perfect for beachside. Visit the Rings & Things Design Gallery for free jewelry-making instructions and to shop for supplies.
Cowrie Micro Macrame Bracelet Tutorial created by Rings & Things designer Michelle Horning
Edited December 2021, to update links.


26 Comments
Great instructions 🙂
I put a link to this page on my blog.
Thank You!!
Hi Patricia, thanks for sharing our blog! 🙂
Glad you found it useful.
Can’t wait to try this! I’m going to a 70’s theme halloween paraty and this will be a perfect addition to my costume. thanks so much
In the photo with the multiple bracelets, is there a tutorial for the yellow and brown one? It looks like there are 3 spiral strands coming off each side. Would love to know how to do that. Thanks!!
Hi Tammie,
We don’t have one yet, but the designer is writing up an explanation, and we’ll post it here as soon as it’s ready.
~Polly
Hi Tammie, I didn’t make that particular bracelet, so I asked the designer who did. She said it was basically the result of a happy accident. 🙂 Below is what she told me about her process. ~ Melissa
“I started out making a brown bracelet, but I wound up with much longer threads than I needed. Instead of cutting the hemp shorter, I just kept going. I made a loop for the button then started a 2nd spiral going back around the bracelet the other way. Once knotted, the 2 spirals naturally nestled into each other. I realized at that point that I still had enough of my center threads to make a 3rd spiral. I decided to introduce another color into the mix. I tied yellow L and R threads onto the center threads then knotted a 3rd spiral. When I got back to where all 3 strands meet, I used the remaining length of my yellow threads to make a whip stitch around the bare loop. This made the loop more sturdy and attractive.”
Hi I tried to get tutoial for leather macrame bracelet. I could not ge it. Can you please send me one and email it to me please. Thank you so much Louise Edwards
Hi Louise, we do not have a separate tutorial for making macrame with leather. You can use these same instructions, but in most cases you will want to cut longer lengths of cord than indicated above since a thicker cord will take up more length per knot.
Most of our leather cord is 2mm or thicker in diameter:
http://www.rings-things.com/Products/Leather-Cord-and-Leather-Strips/
We do carry a few colors of 1mm thick “goat skin” leather cord:
http://www.rings-things.com/Products/Goat-Skin-Leather-Cord/
Even with 1mm leather, it’s best to cut your cords a bit longer, as leather knots may not pull quite as tight as hemp. Happy knotting!
Made these in high school with waxed and unwaxed dental floss
That sounds like a fun variation, Helen.
Thanks for the step by step guidance on how to create this bracelet. It looked really complicated when I just browsed the pictures but it is much simpler now.
You did a very good job of how to make the knots for the bracelet. Thank you for sharing your hobby and skill. I will copy what you did and see how it turns out. – hobbiescraftsandmore.com
In the 70s, when I made plant hangers, I’d tie the top to my big toe!
Thank you for your site. I am interested in making anklets out of cord and puka shells. I was just going to do a regular braid in between (b/c I like how this looks). Do you think I should order hemp cord, or will this stretch too much if it were to get wet? Or do you recommend getting waxed cord b/c it would not stretch as much, and might be less scratchy on skin? Thank you so much for your experienced input. Jeni Kay
Hi Jeni Kay,
In my experience, our hemp cord hasn’t stretched, or not enough for me to notice. But other hemp cord may be different. Or I might not have worn it long enough to stretch it out noticeably. Hemp cord does have a reputation for being a little scratchy. Ours is nicely polished, but people with sensitive skin will still notice a bit of scratchiness. Those people would definitely prefer the waxed cord because of the smooth finish.
Here are a couple of fresh links –
Hemp Cord: http://www.rings-things.com/Products/Hemp-Cord/
Cotton Cord: http://www.rings-things.com/Products/Cotton-Cord/
Waxed Linen Cord: http://www.rings-things.com/Products/Linen-Cord/
This was very helpful. I even posted this on my blogger page. And it got over 1.3 likes !!!!
Thank you so much !!!!!!
I would love to learn how to make the pink bracelet with the beautiful crystal in the middle. Can someone direct me to a tutorial that shows how to make that? I’d be so appreciative. I think it is adorable!
Hi Penny,
The pink bracelet above uses the clear purple-lined cube beads from this Toho color mix: https://www.rings-things.com/Products/TOHO-reg-Seed-Bead-Mixes/TOHO-Seed-Bead-Cocktails-trade-Grape-Ape.html (and if you click into the bead link, you’ll find a picture of just the pink bracelet by itself … it’s technically a long wrap bracelet with 2 other colors but you can of course make it normal length).
And it’s done with spiral knotting which is still half knots like above, but instead of alternating left half knots and right half knots to make a series of square knots, you just keep doing either left half knots OR right half knots all the way down. See picture #16 above, for a photo and explanation of the spiral knotting.
Great instructions and correlating photos! I had zero problems (which is a 1st!) making this beautiful bracelet with some beads I’ve been looking to use somehow. I used a button as the end bead, as I figured it would slip off less with it AND it’s the best I could come up with while looking through my craft supplies. Thank you and please keep the great instructions on beautiful pieces coming! ♡♡♡
Are there instructions for making an adjustable bracelet (the type where the knot slides to take it on and off) rather than a clasp?
Hi Carolyn,
I’m happy to say, the answer is YES! Right here: https://blog.rings-things.com/2012/01/diy-shamballa-style-macrame-bracelet-tutorial ~Polly
Hi,
Is there a tutorial for a macrame bracelet with the beads only on one side of the bracelet?
Thanks!
Michele
Hi Michele,
We don’t have one, but you would be surprised how easy it is to make variants. Try putting the beads on just one side, but otherwise knot exactly the same as the original macrame instructions — just don’t pull your knots too tight, so if you don’t quite like it, you can take it apart and try another variant. I have a feeling that doing something on just one side, with out matching beads on the other side, is very likely to cause the bracelet to spiral or curve interestingly. I’m fairly sure you won’t be able to make it lay flat. Let me know how it goes!
–Polly
[…] 2. How to Make a Macramé Hemp Bracelet […]
Hello, I bought one already made but it become undone. For the life of me, i couldn’t get the pattern until i found your page. The one think i do not know is how to finish it off? This bracelet does not have any beads. It looks like the other end finishes off with the tips burnt. Can you share how to finish it off without beads please?
Hi EmJay,
Finishing the ends is always a challenge – basically you just have a make a series of knots that work to hold it together, but don’t look too big and ugly, and when you’re sure it’s secure, you trim the ends. If a macrame bracelet or necklace comes undone, personally I find it impossible to repair it, because the ends have already been cut, so I don’t have enough to hold onto, to even knot as much as the previous person knotted it — which wasn’t enough (or it wouldn’t have come undone). Maybe if you use tweezers to hold the short ends, you can do it, but it will be very fiddly, and you’ll definitely need to glue it, to get it to hold for even a few more wearings.
Sorry for the bad news — I have a favorite necklace / triple wrap bracelet at home that has the same problem. I’ll have to completely take it apart, salvage the beads, and start over with new cord – since there just really isn’t enough cord left on it, to securely knot the ends.
–Polly