
Modern and Edgy Gunmetal Tassel Earrings
Hello everyone! Tiffany here with a fun tutorial for you! With winter approaching, I find myself putting away my bright and airy spring and summer jewelry and replacing it with darker, fancier neutral pieces. I want jewelry that can easily go from the office to after work cocktails. Tassel earrings have always been a favorite of mine. I especially love the way tassel earrings move with you, catching the light. Recently, I have seen modern tassel earrings similar to these at high end department stores. Being a jewelry maker, I of course wanted to make my own version. Beading chain was the perfect material to make these earrings, because it really reflects the light. After a little trial and error, I have come up with a fairly easy way to re-create this designer look from home.

Everything needed to make these earrings. Look below for close-up photographs of all the items. Fun tip: I use dollar store sheet pans lined with bead mats to create all of my projects. They stack easily to neatly store all your on-going projects.
The supplies needed are the following:
- A ruler
- Gift wrapping (like Scotch) tape
- E-6000 adhesive
- Chain nose pliers
- Metal shears
- Post earring findings with loops
- Small jump rings (3-5mm range)
- Beading chain
- Ribbon ends, 10mm preferable

I used gunmetal beading chain, jump rings and ribbon ends. For the post, I used white finished ones that I gave a patina with Novacan Black patina solution, so they would match better.

Tools and supplies needed to complete these. Pardon the condition of my E-6000, it has seen better days. Ruler, E-6000 adhesive, tape, chain nose pliers, and metal shears.

Use your ruler to decide how long you want the tassels to be on your earrings. Note, that you will lose about 1/2 inch when trimming the tassels. I found 3 inches was the perfect length for me.

Use your metal shears to cut the beading chain. Once you cut one, you can ditch the ruler for now and just measure each additional piece by holding it next to the first piece.

Cut a total of 24 pieces of beading chain, 12 pieces for each earring.

Line up twelve pieces of the beading chain.

Use the edge of your ruler to tidy up the twelve pieces of beading chain. You want the pieces to be as flush as possible at the end, and snugly next to each other.

Take a small piece (about an inch) of gift wrapping tape and gently place it on top of the beading chain ends. The tape is not what will ultimately hold the chain, it is just to hold it together so you can use adhesive.

Wrap the tape around the ends, securing it by overlapping it once. Cut the excess tape and press closed.

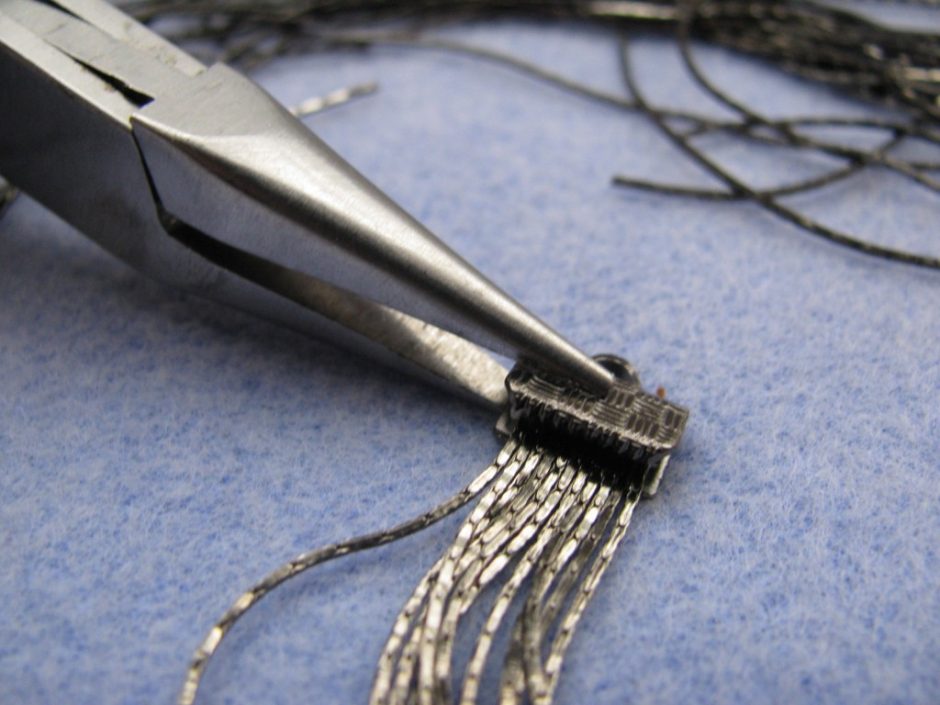
Use your metal shears to trim the ends of the tassel where the tape is. You want to leave only about 1-2mm of the taped section. Just enough to keep it held together. You don’t want any tape to show after you put the ribbon end on.

Place a thin line of E-6000 glue across the top of the tassel. Make sure that there is some of the glue touching all the pieces of beading chain.

Place the ribbon end over the end of the tassel, where the glue has just been placed. Make sure the ribbon end is centered over the tassel, then pinch it closed with your chain nose pliers. Do this carefully because if you clamp down too hard it can spread the beading chain out of line.

Use your chain nose pliers to attach the post findings with a jump ring. You could of course also simply add french wires to the end of your ribbon ends. Let the earrings dry overnight to be safe before wearing them out.

If needed, trim the bottom of the tassel earrings with your metal shears so all the ends make a straight line. Also hold the two earrings next to each other to make sure they are the same length and trim as necessary.

The last step is to wear them and wait for the compliments! Seriously, these earrings get noticed!
Well, I hope you all enjoyed this tutorial! Please feel free to ask me any questions about how I made these!
Thanks!
TIffany

6 Comments
Hi there, Tiffany. What a great tutorial! I personally am a huge fan of Tassel earrings but have never made them myself. Would definitely be trying this out during the weekends. Just a bit of help needed here Tiffany, how much would materials required for making this cost?
Hi Kritika,
For $38.65, you could order one pack of each of the supplies (including glue), and make 6 pairs of 3″ tassel earrings. Then, you would run out of beading chain. It’s a 10-meter spool, but each pair of 3″ earrings would use 60-66 inches of chain.
But after those first 6 pairs, you would have enough left-over earring posts, earring nuts, ribbon ends and jump rings to make 30 more pairs! So each spool of chain (at $12.27) after that, would let you make another 6 pairs. You would probably also need the 3.7oz tube of glue, rather than the .5oz tube, so add another $2.50 to that total. I’ll see if I can create a link to just the minimum parts you’d need.
If you don’t already have tools that work, you would need to get chain-nose pliers and metal shears too. There are many plier options from about $5 to $67! See Tiffany’s links above, for tool options.
Here is a link to the 6 basic components to make the black tassel earrings. If you put a 1 by each of those, then click “add”, you’ll see the total price.
To see the price to make 36 pairs of earrings, put a 6 by the beading chain, but leave a 1 by all the others.
If you’d like to turn the fronts of the ball-post black, you would also need an antiquing solution, such as the Novacan that Tiffany suggested.
I love these! Thanks for the tutorial!
Love the tutorial…the earrings look so snazzy
Wow! Really simple and sophisticated. Can’t wait to make.